Using Gizmos to Build an Experiment
Synapse experiments are a collection of building blocks, called "gizmos", that you can combine to assemble your experiments. Gizmos are available for a variety of tasks; including reading input signals, filtering, online spike sorting, data storage, channel mapping and much more. Each gizmo can be a single task or comprise a group of tasks bundled together for a particular type of experiment, such as online spike sorting and data storage.
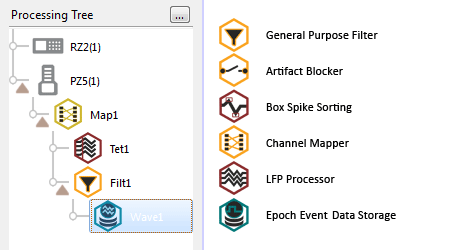 |
| Synapse Gizmos (partial list) |
Synapse's designtime experiment interface is streamlined to show what you need when you need it. As you make selections, relevant options are displayed. In addition to the command bar, the interface is divided into four areas.
- Processing Tree: Your selections here determine what's displayed in other areas.
- Gizmos: Gizmos that can be added to the selected item in the Processing Tree, organized by type.
- Options: Configuration options for the item selected in the Processing Tree.
 |
| Designtime Window |
The Processing Tree
The Processing Tree shows the parts of your experiment in a hierarchical diagram. Each experiment can have many parts or branches that form your experimental "machine." It's easiest to identify each branch by looking at the point where signals are input or output.
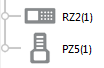
RZ processors and other devices that represent the starting point (or potential starting point) for a branch form the trunk of the tree. Biological signals are typically acquired by an amplifier, so amplifiers also appears on the trunk of the tree. It is important to note that most acquired signals pass through the RZ for processing and storage, but that does not necessarily mean all acquisition gizmos should be added to the RZ branch. They should be attached to the device that serves as the primary input source for a particular signal set.
If a device in your system does not show up automatically in the Processing Tree, you will need to edit the Rig. See The Rig.
Gizmos for tasks such as filtering, signal processing, and data storage, form the branches of the tree diagram. They are added to the device or gizmo that will be used to input or output the signals associated with the particular task.
To add a gizmo:
- After you have selected an item in the Processing Tree, double-click the gizmo in the Gizmos list or drag it into place.
Where to Add a Gizmo
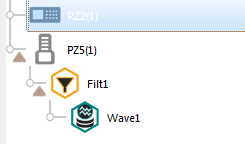
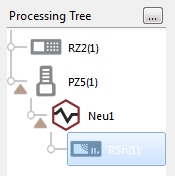
Neural processes, like spike detection, are acquired using an electrode and headstage connected to an amplifier, so they are added to the PZ Amplifier in the tree.
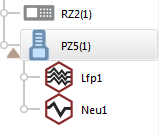 |
| Spike Sorting Gizmos added to PZ5 Amp |
Multiple tasks can be added to any branch, in parallel or in a chain, with tasks ordered according to data or signal flow.
 |
| Filter and Store Gizmos in a Chain |
A stream store gizmo is added to a filter. So, filtered waveforms are stored.
 |
| Filter and Store Gizmos in Parallel |
The store and filter are added in parallel. So, raw waveforms directly from the amplifier are stored. The stored waveforms have not passed through the filter.
At each step of the design process, Synapse uses information about your hardware and selections you've already made to show only allowed choices.
Working with Gizmos
Drag and Drop
You can drag gizmos from the Processor List or within the Processing Tree to add or reorder them. You can also drag a gizmo to the Processing Strip (enabled in the Synapse Preferences) to replace a gizmo in an existing branch displayed there. When you drop the gizmo, a shortcut menu appears to allow you to add, replace or insert. The Processing Tree will update to reflect these changes.
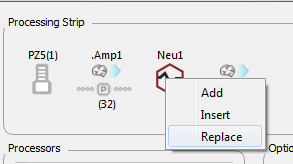 |
| Processing Strip Menu |
Data Types
If a gizmo that requires you to select a source is added to the Processing Tree, the gizmo's block diagram is displayed. In the drop-down menus for each input the available list of inputs is arranged and filtered by accepted data types (multi-channel, single-channel, float, integer, TTL).
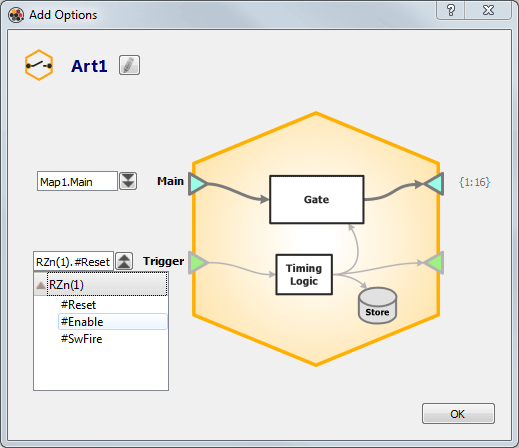 |
| Gizmo Block Diagram with Trigger Source Selector |
Adding a Device to a Gizmo
Some devices, such as the RS4 data streamer, initially appears at the trunk of the Processing Tree and must be moved to the end of a branch. You can drag a device to any gizmo with a multi-channel signal output or change its primary source in the Options area.
 |
| Processing Tree with RS4 |
Two-Sample Delays
Each branch in the processing tree represents a signal flow or processing path. Each gizmo or device in a branch adds a two sample delay to that path. The path pictured above, from the PZ5 to the RSn, will have a four sample delay. You'll need to be aware of these small delays for experiments with complex processing paths that include many gizmos, custom user gizmos, or where timing is critical. See Creating User Gizmos for more information on user gizmos.
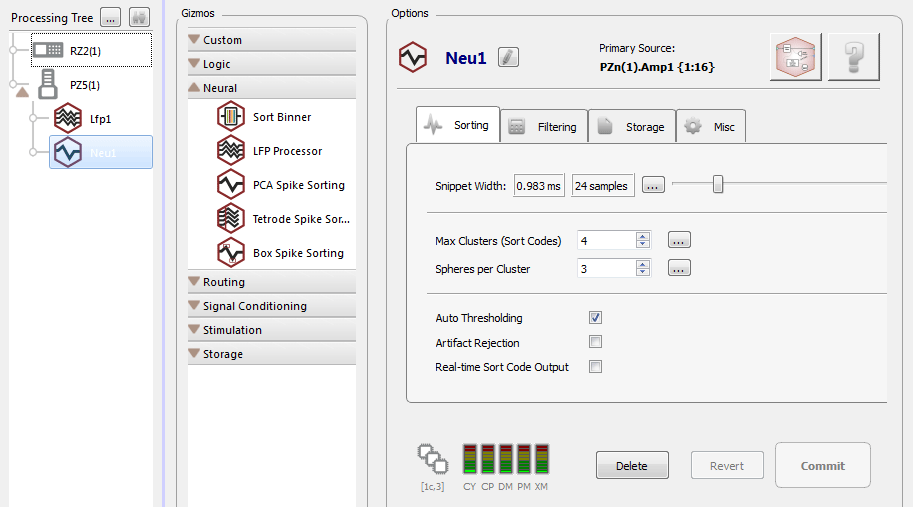
The Options Area
When a gizmo is selected (highlighted) in the tree, its configuration options are displayed in the Options area to the far right. This area also includes a block diagram that provides a logical view of the processes in the gizmo.
The diagram is displayed by clicking the Block Diagram button.
The Block Diagram

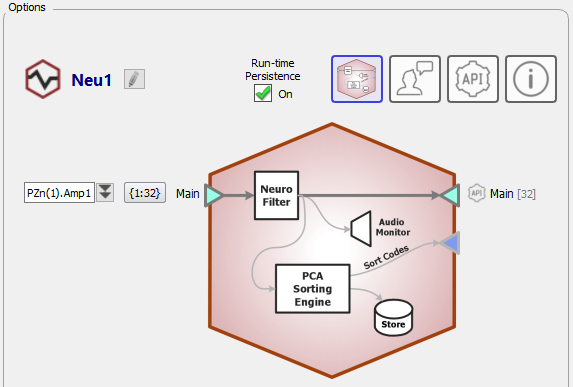 |
| Block Diagram with Signal Source Selector |
The block diagram in the Options area of the designtime window provides a quick reference for what inputs, outputs, and data is stored by the gizmo. The input source or number of channels and external triggers can also be modified here. The drop-down menus are populated with relevant and valid options.
Gizmo Naming Scheme
Synapse automatically generates and uses consistent naming wherever possible. For example, the gizmo name is generated automatically for you and is based on the type of gizmo selected as well as the index number, so you can use multiple gizmos of the same type in one experiment. In the illustration above, the name "Neu1" is automatically generated for the PCA Spike Sorting gizmo, added from the Neural group of gizmos, and the name and gizmo index are used to name the corresponding data store.
TDT recommends using the auto-generated naming schemes to help make experiments and data consistent across users and subjects.
Channel Counts

The Channel button displays the first channel number and the number of channels (or count), indicating the current range of channels included in the primary source input to the gizmo. By default, all available channels are selected.
Clicking the button displays the Select Channel Range dialog box where you can change the range to select a subset of available channels. For example: to sort and store spikes for channels 33-48, clear the All check box and enter: First: "33" and Count: "16."
Automatic Propagation of Changes
Changes to channel count in the data stream automatically propagate through the tree branch to attached gizmos.
For information on modifying gizmo options, see the corresponding gizmo in the Gizmo Reference.
Global Buttons
Located below the options tabs, the Delete, Revert, and Commit buttons are applied across all tabs.
The experiment is saved each time you make or "Commit" a change. If you need to roll back a change in the experiment design after it has been committed, you can do so in the Experiments Revision Log. See Experiment Changes and the Revision Log for more information.