Managing Users and Subjects
Lab Management
The Synapse relational database is the key to the software's powerful lab management features. Synapse uses it to track and save all aspects of your experiments and every aspect of your interaction with the interface. It contains the who, how, and what of each Synapse session, virtually everything except the acquired data. Managing Data for Your Lab, explains how Synapse uses key categories of information in its relational database, like experiments and subjects, along with Synapse preferences; to name and manage acquired data files. This section explains how Synapse user and subject features help you manage how people in your lab interact with the software.
Users
Lab managers can use Synapse preferences related to users, to create and assign user accounts to lab groups or individuals, decide whether passwords are required at log in, and control how experiments are shared within the group. In the relational database, user names are linked to experiments, subjects, parameter changes, and the windows layout.
By default, user features are not enabled. Some features, such as filtering and the History window, that will be discussed in this section can be used in the default state. However, enabling user login greatly increases their utility and benefit.
The user functionality allows for individual labs to determine how user names will be used, with the most common being that every person might have there own user name. However, user names can be used to create roles or groups. You'll need to consider how your choice will work with other preferences settings, such as privacy options, before making a final decision.
There are also two different user modes available: with or without passwords. The password functionality is not a security feature. It provides an extra layer of caution to encourage users to login to their own user ID so that logs, change tracking, and filtering will be more effective.
Important
Passwords apply only to experiment configurations, all data are available to all users in the data tank.
To enable User login:
-
Click Menu at the top of the command bar and then click Preferences
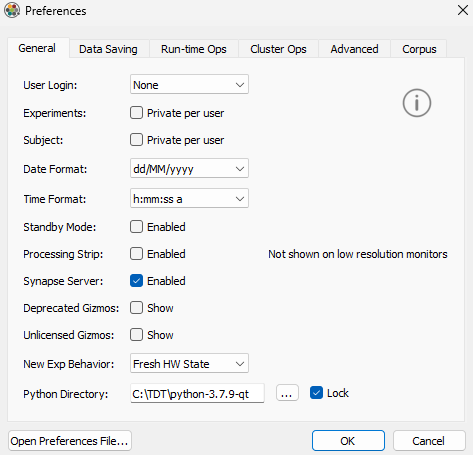
Preferences Dialog -
For User Login, choose Required or Required with Password.
-
Optionally, select any of the following options:
Experiments Check Box - select to make experiments private per user.
Subject Check Box - select to make subjects private per user.
Privacy
The purpose of privacy in Synapse is to aid in filtering and to minimize mistakes and confusion. When experiments or subjects are private, they are only available to the user that created them. Privacy is controlled in two places.
In the Preferences dialog, the Experiments Private Per User and Subject Per User check boxes make privacy the default sate for new experiments or subjects created. It doesn't change the privacy of existing experiments or subjects.
Selecting either check box in the Preferences dialog makes privacy the default, by enabling the Private check box in the dialog used for creating new users or subjects. However, this check box is available and can be selected or cleared, regardless of the preference setting. This allows users to choose to make particular experiments or subjects private.
Adding and Selecting Users
When user login is required (in the Preferences dialog). A User button is added to the command bar.
Adding Users
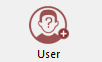
To add a new user:
-
Click the User button on the command bar, then click New.
New User Dialog -
Enter a name in the User Name field. You can also enter a description, password, or notes, and choose a user icon.
-
Click Save.
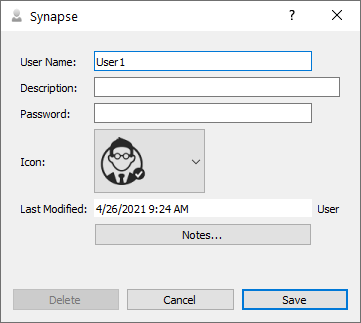
After users have been added, they are available on the shortcut menu or by clicking More.
 |
| User Category Menu |
Important
When users are assigned, Synapse is able to store windows layouts for each user and for each experiment. Runtime configuration settings can also be saved by user and experiment and this information becomes part of the 'best' persistence, that is, the best persistence is the most recent runtime settings for the current experiment AND the current user. See Using Persistence with Users and Subjects below.
Subject
Depending on the work done in your lab, you may have just a few chronically implanted subjects or you may have many subjects used for screening. Whatever your lab's work style, the subject name plays a special role in naming data tanks. Synapse easily adapts to either style using the settings in the Preferences dialog and in the category dialogs.
You can select, edit, or add subjects using the Subjects category button on the command bar.
Adding A Subject
To add and a Subject:
-
Click the Subject button in the command bar, then click New.
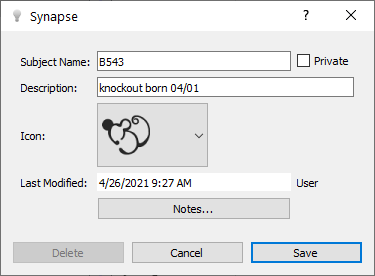
New Subject Dialog -
Enter a name in the Subject Name field. You can also enter a description, password, or notes and choose a user icon.
-
Click Save to add the subject.
The new/edit subject dialog also includes a check box to make a subject private. This setting is tied to the Subject: Private per user option in the Preferences dialog. It has no meaning unless user names are enabled.
After subjects have been added, they are available on the shortcut menu or by clicking More. You can also add multiple subjects from this dialog.
Organizing Subjects
Making subjects private by user is one way to help organize subjects. Another way it to use subject categories in the Subject window. You can find this window by clicking More on the Subject shortcut menu. It works similarly to a Windows folder window, with categories (or folders) on the left and subjects (the contents of the folder) on the right. You can create new categories and subcategories by right-clicking the Root folder or an existing category folder.
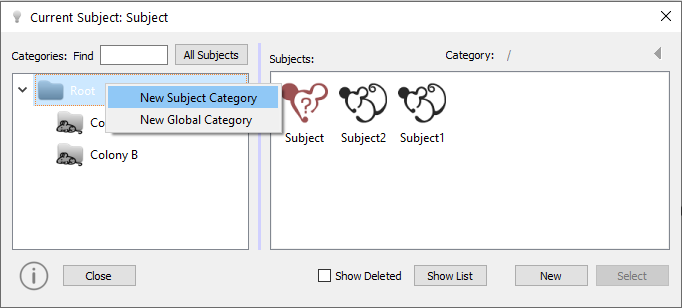 |
| Subjects Window |
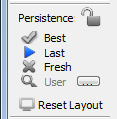
Using Persistence with Users and Subjects
The Persistence runtime interface was introduced in See Launching Your First Experiment.-See Using the Runtime Interface. on Persistence. It is worth taking another look at how persistence relates to users and subjects.
With a single user and a single subject, persistence ensures that your runtime settings, such as clustering definitions, filter settings, and display options are retained when you switch from preview or record mode to idle.
Fresh
The Fresh option is the easiest to explain and understand. It allows you to return to a fresh start by using the experiment's default settings for each gizmo at run time.
Best and Last
By default, Synapse uses the Best option, which applies the most recent settings for the current experiment and current subject.
The Last option uses the most recent settings, regardless of subject or experiment. This is useful if you set up your cluster parameters for an animal, but then switch experiments. You can import the settings from the previous run directly into this new experiment.
Lock Icon

Even if you switch to another to another type of persistence, such as Last, Synapse will return to Best when you return to Idle mode unless you lock the Persistence. Initially, the difference between these two options can be difficult to see.
 |
| Runtime Window After User Adjustments |
Because a different subject is being used, the saved settings are not applied. You see a fresh window.
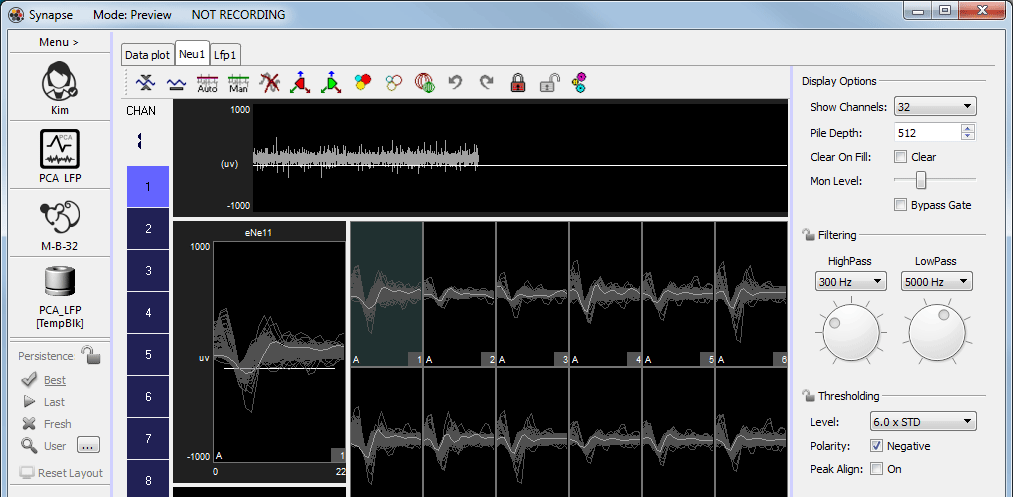 |
| Runtime Window with Best Persistence and New Subject |
You may or may not want this behavior depending on the type of experiment. For example, if you are doing a behavioral experiment and using synapse primarily to present stimuli, you might want to apply the last settings regardless of a change of subject. In that case, you would select Last persistence.
 |
| Persistence Interface - Last Selected |
If you choose Last and Synapse detects a new subject being used, you will see a warning like the one below. Click Yes to continue or No to stop and either change the subject or choose Best preference.
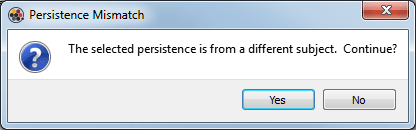 |
| New Subject Alert - Persistence Mismatch |
The more you become comfortable with the persistence features, the more you will realize how helpful they are and how much you already rely on them.
Layout Persistence
It is important to note that the arrangement of windows/tabs, called the 'Layout', is tied to the current User and Experiment. Click the RT Layout button at the bottom of the Persistence area on the command bar to change the layout.
You can clear the layout for the next recording, import layouts from other experiments/recordings, or setup the flow plots for the next recording.