Parameter Sequencer
Common Use Cases

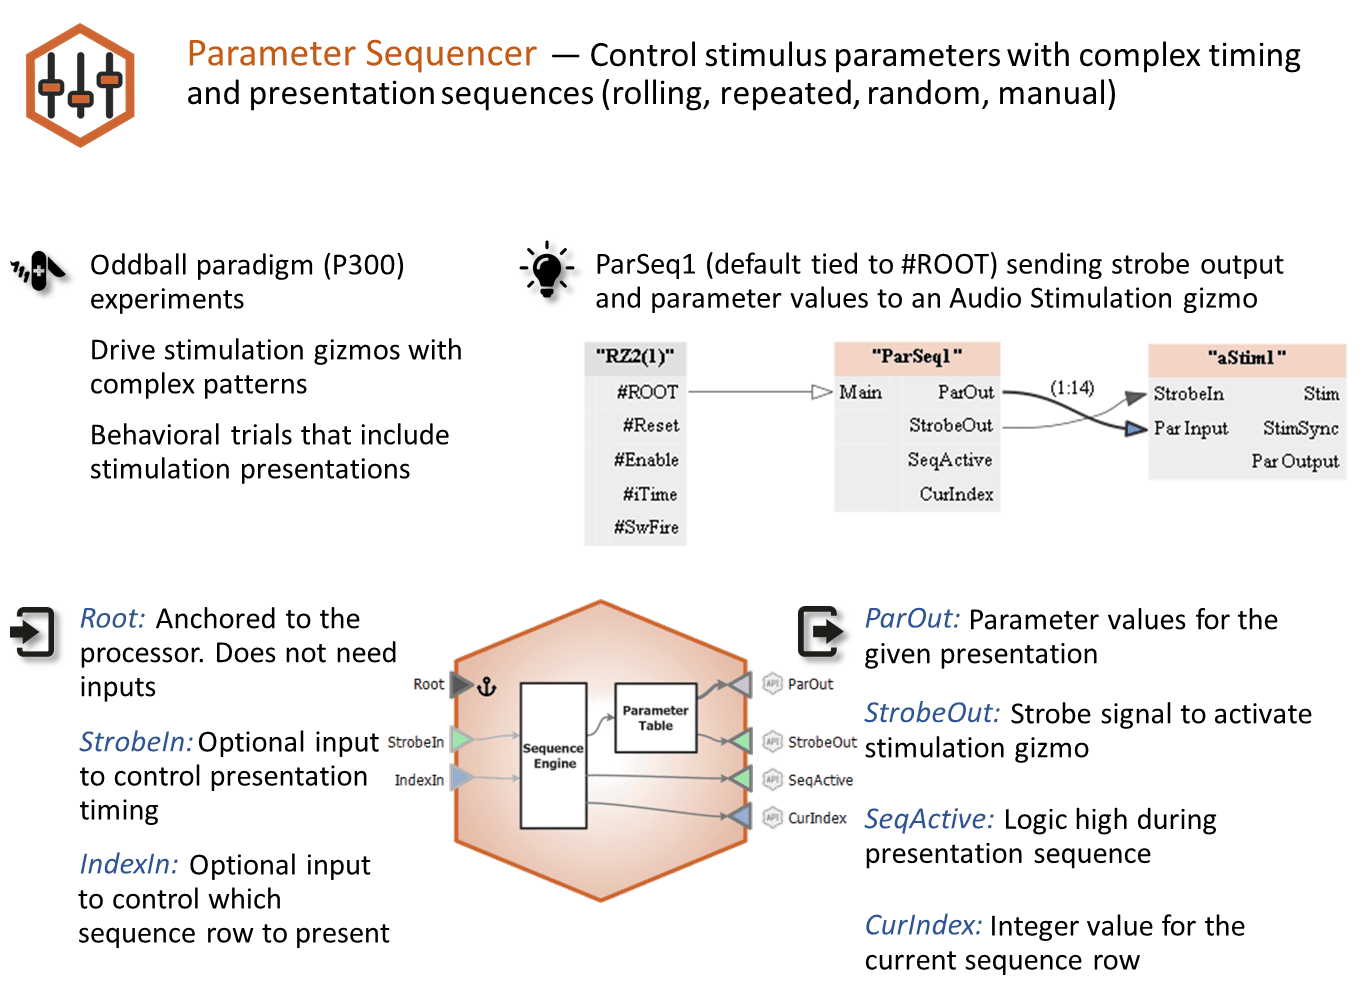
Control stimulus parameters with complex timing and presentation sequences (rolling, repeated, random, manual). High-level parameter control and stimulus presentation.
Gizmo Help Slides
Reference
The Parameter Sequencer gizmo is an interface for controlling stimulus parameters and presentation sequences. It is a highly flexible gizmo with many options for timing, triggering, and control to cover a wide variety of stimulus presentation needs. It is typically used with any of the stimulation gizmos. By selecting the Param In mode in the stimulation gizmo's parameter table you tie that parameter to the parent Parameter Sequencer.
Example
See Using Parameters for more general information on parameters and experiment walkthrough examples.
The Parameter Sequencer requires no inputs by default. Optional inputs for presentation timing and row selection are available depending on gizmo selections. Several different types of outputs are available for monitoring, storage, or to trigger other gizmos or devices.
Parameter Sequencer Runtime Interface
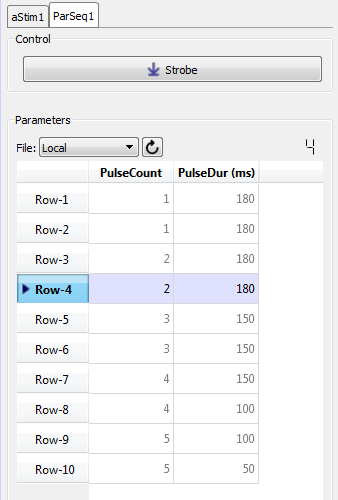
At its most basic, the sequencer runtime interface is a table of stimulus parameter combinations that can be selected for use at runtime.
 |
| Parameter Sequencer Tab, Split Window |
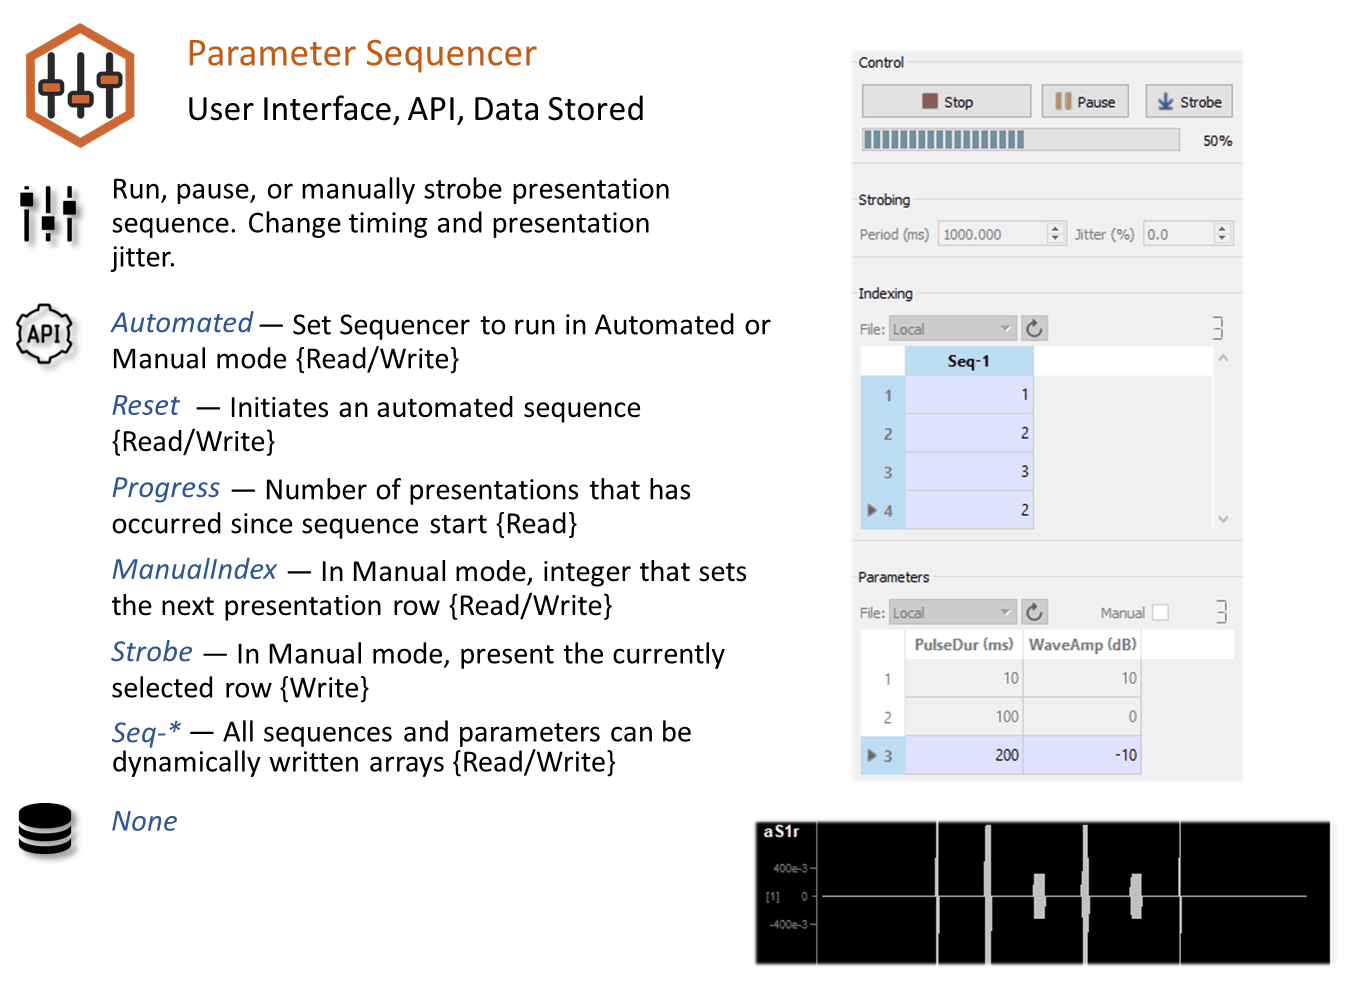
In the example above, combinations of values for Pulse Count and Pulse Duration are saved to the database and manual control was selected. Here you can trigger a presentation of the stimulus by clicking the Strobe button. The parameters in the highlighted row will be used to generate the stimulus. You can change rows by double-clicking a value cell in the desired row. Once the new row is selected, click Strobe again.
 |
| Parameter Sequencer Used to Manually Control Progression of Audio Stimulation Through a Sequence of Tone Bursts |
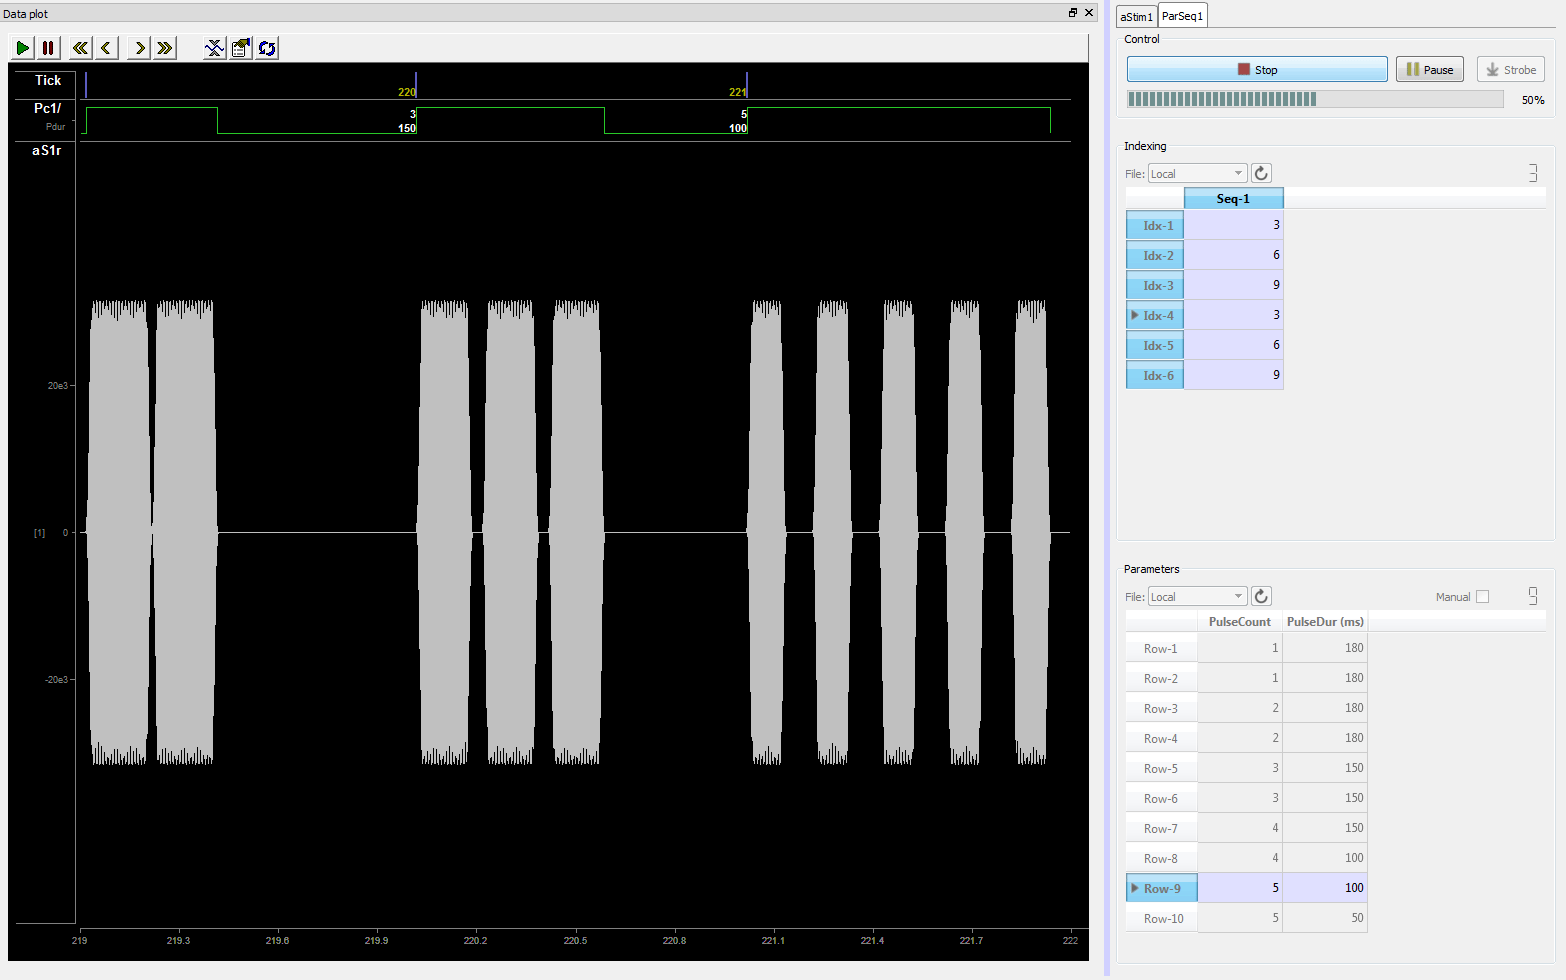
The stimuli can also be presented with the parameter combinations in the order listed in a sequence file. The example above shows the first three indexes (1 - 3), which correspond to rows 3, 6, then 9 in the parameters table. There is a visible difference as the pulse duration and count changes with each presentation. In this example, the interface is designed so you click play, then it runs through the sequence in response to a strobed input line. With many configurable options and the ability to combine the Parameter Sequencer with any of the stimulus gizmos and the Parameter Manifold gizmo, the possibilities will cover most any situation.
Parameter Sequencer Configuration Options
General Tab
The General tab pulls together information about where related files will be stored and how the sequencer will be timed/triggered.
 |
| General Tab |
Working Directory
By default, the parameter and sequencer tables are stored with the experiment. But you can also save them locally to disk as CSV files so you can use the same parameters across multiple experiments, share them, or modify them outside of Synapse. Sequencer related files are stored in the folder you designate as the Working Directory; by default, C:\TDT\Synapse\ParFiles. If the address entered does not exist, the field will be highlighted in red. You can use the Browse[...] button to navigate to the parent folder and create the desired folder.
Strobing
Strobing determines how the sequencer advances. The strobe can be based on one of three possible sources:
-
If Manual Only is selected, you must generate the strobe manually using the Strobe button on the runtime interface.
-
Strobe In controls the sequencer with a logic signal connected to the gizmo's StrobeIn input. Strobe Count and Continuous options provide duration control.
-
Timer defines an internal timer to control the strobe, using Time(s) and Jitter(%). Use jitter to introduce a random variability to the period for your timer.
Check the Custom checkbox when you are using the Sequencer (Index Source is set to Sequence File) to enable an additional Time column in the sequence file that controls the specific time, in milliseconds, between each presentation for fully custom timing.
Working Parameter File
In this area you must select the parameter file you will be using. Local is the default selection which is the parameters that are saved with the experiment. If you want to start the experiment with a different file loaded, select it here.
Parameter files are created on the Parameter Files tab.
Using Row and Persistence you can determine where in the parameter file presentation will begin and if you want to start there or lock persistence to that row.
Indexing
The Indexing Source determines how you advance through the sequence of parameters. You can advance the index manually, using a gizmo input, or from a sequence file. The Manual Only and Gizmo Input options behave similar to the same options for the strobe source, described above. With a gizmo input, you have the option of sending a strobe out to indicate the change in the index. Strobe Out can be stored or used to trigger other gizmos. You also get the option to automatically start the sequence presentation when the recording begins (Start Seq at Run-time).
Sequence File
Choose how the parameter index is controlled.
Sequence files are created on the Sequence Files tab.
You can optionally start the sequence presentation automatically when the recording begins (Start Seq at Run-time), and optionally stop the recording at the end of the sequence (Idle When Done).
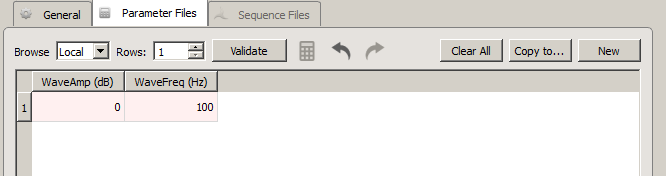
Parameter Files Tab
 |
| Parameter Files Tab |
This tab is a visual interface for selecting or creating a list of all combinations of parameters that you want to use with the stimulation gizmo at runtime. When the gizmo is linked to a stimulation gizmo in the Processing Tree, the parameters are automatically added to the table as columns.
Values entered in the table are checked against the parameter's minimum and maximum, as defined in the stimulus gizmo parameter table. This check is made automatically when the gizmo options are committed and can also be made by clicking the Validate button. The values you enter on the Parameter Files tab serve as the Local file. These values are saved within the gizmo as part of the current experiment and are not saved in a separate file. Changes made to the current file overwrite any previous values.
Saving a Copy (Copy To, New)
You can save a copy of the current parameter table as a CSV file (*.par.csv) in the working directory defined on the General tab. This ensures a permanent copy of the parameter set and allows you to have more than one file, reuse, and share files across experiments.
Use the Copy To button to save parameter sets that have already been filled into the table. Once the CSV file is created any changes in the table are saved to the CSV file using the gizmo's Commit button.
Use the New button to create a new blank CSV file. The empty file is created immediately, but it will not be filled until parameters have been added and committed.
Parameter Generation

To make this whole process easier, Synapse can automatically build out a parameter list using common mathematical operations. Select a column in the table and click on the calculator button to open the Parameter Generator dialog.
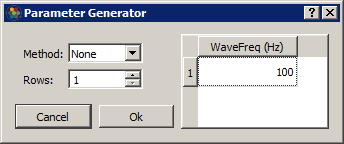
Generation Methods include Constant, Linear, Log2, LogN, Log10, Random, and Gaussian**.
For methods that use a mathematical equation (Linear, Log2, LogN, Log10), set any of the three parameters and click the calculator button next to the fourth parameter to automatically generate it.
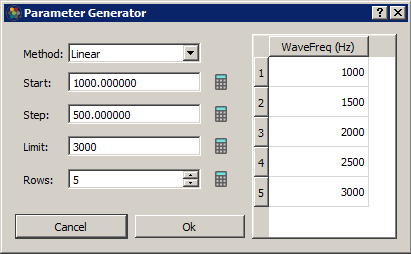
When you click OK those parameters are automatically added to the table.
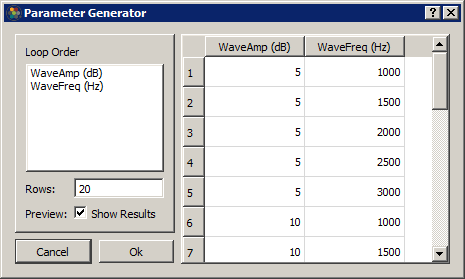
If you want to generate all possible combinations of parameters in your table, select multiple parameter columns and click the calculator button to generate the combinations.
Sequence Files
This tab is enabled when the Index File option is selected on the General tab. The tab functionality is similar to the Parameter Files tab, described above. You can create a new sequence file or browse to an existing one and you will find the same Copy To and New button options for working with multiple sequence files.
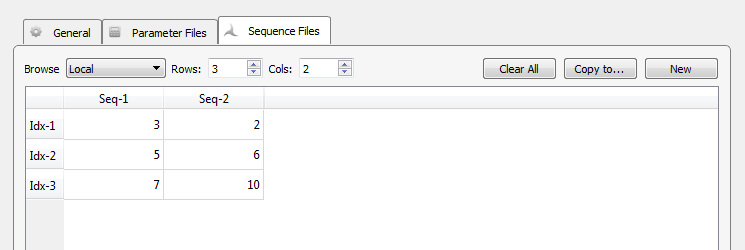 |
| Sequence File Tab |
In the sequence table, a column represents a sequence of stimulus presentations, with each index, or row, pointing to the desired set of parameters, or row of the parameters table, for that presentation. You can rename the column headers for your experiment. The illustration above shows a value of 3 for the first index of the first sequence. That means that the parameter values in the third row of the parameter file table will be used. When signal presentation advances to the second index in the first sequence, parameter values will be pulled from row 5 of the parameter file table.
Tip
You can rename the parameter rows and reference them by name in the sequence column, for example, double-click on a parameter row index number and rename it to "ToneA", and then in the sequence file enter "ToneA" in the column.
When you have more than one sequence, you can choose which sequence to begin with or to lock to on the General Tab.
If the Custom checkbox is selected on the General Tab, an additional Time column for each sequence will be available to set the specific timing of each row of stimuli.
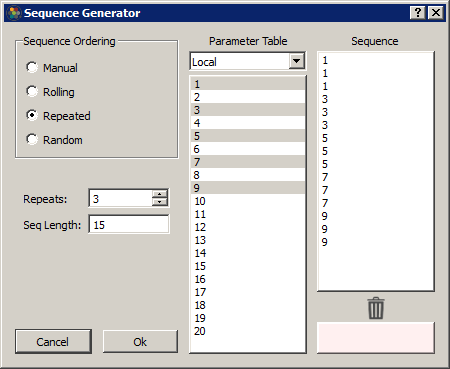
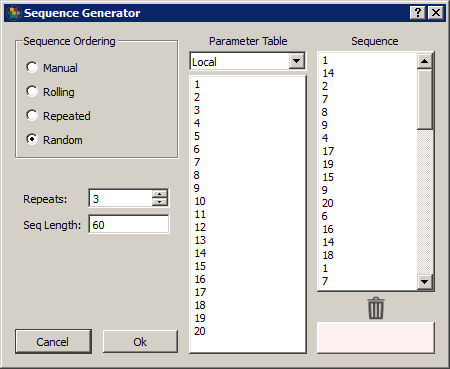
Sequence Generation
Synapse can automatically build out a sequence list using common ordering operations. Select a column in the table and click on the calculator button to open the Sequence Generator dialog.
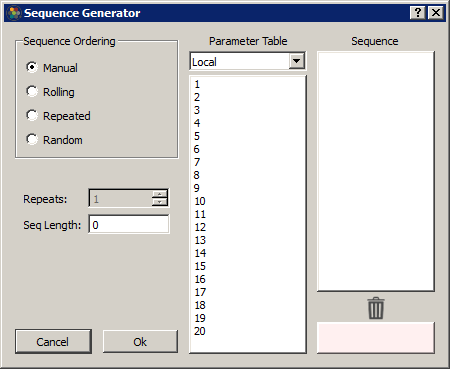
In Manual mode, you can drag/drop rows into the Sequence column to order them. Drag/drop from the Sequence list to the trash list at the bottom to remove from the sequence.
In the other modes, select the number of Repeats and the Sequence list will automatically generate using the selected rows in the Parameter Table list (it will use all rows if no rows are selected). Some examples: