Hardware Configuration
The hardware devices that make up your system were carefully selected from System 3's diverse group of signal processors, amplifiers, and input/output devices. Each device has particular features; such as the number of DSPs in an RZ processor, maximum number of recording channels, or types of optical ports available for amplifiers or other peripheral devices. Synapse keeps track of these details for you and offers choices suitable for your system as you're building an experiment. You select the parts of the experiment you want and Synapse generates it, optimized for your hardware.
The Rig
Synapse stores information about your hardware in a rig (*.synrig) file. The first time you run the software, you will need to configure the rig. Launching Your First Experiment includes information about how Synapse does some of this for you, detecting principle hardware components and making suggestions for devices that might be present, but can't yet be detected.
Often your rig needs to be configured once then you can forget about it. Your rig configuration selections should match your actual physical system. The rig is not specific to an experiment and limiting the capabilities of your system by disabling I/O channels on a device or disabling a device completely is likely to cause problems in designing future experiments.
How Auto-Detection Works
When you click the Detect button in the Rig Editor, your equipment should be displayed in a hierarchical tree diagram.
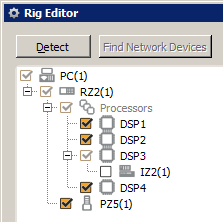 |
| Hardware Rig |
If your devices are not detected, check to ensure your system is properly connected and powered on then retry. If you are currently unable to connect devices, but want to continue to use the software for design or debugging, see Working Without your Hardware.
The Detect feature communicates with the RZ processors to determine which RZ device is connected and to identify the DSPs installed in the device. Common devices which could logically be connected are added to the tree in a disabled state, which means that device won't automatically be available when you build a new experiment. You need to review the tree to verify that it correctly represents your system and to enable/disable, add, or configure devices as needed.
PZ5 amplifiers are auto-detected starting in v96. The PZ5M does not auto detect and must be added manually.
The DSPM can auto-detect PZ5, SI, and iCon devices. If you run the auto-detect with no device connected to the RZ or powered on, then the DSPM will not correctly auto-detect a device. Power on and connect the peripheral device and reboot the RZ before you try to auto-detect again.
RX devices are identified, but information about the number of DSPs (2 or 5) and analog I/O configuration of the RX8 is not automatically detected and must be set by confirmed by the user.
Understanding the Hardware Tree Diagram (Rig)
The tree diagram in the Rig Editor represents your hardware in a hierarchical way and all branches start or end with the PC at the top of the tree. The icons below the PC represent the devices detected, added by a user, or predicted/suggested by Synapse as a device that might exist based on known information it has about the processor device(s) in the system.
For example: An IZ2 will be added if your RZ2 houses a DSP-I card, but the device is disabled by default.
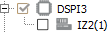 |
| DSP-I with predicted IZ2 (disabled) |
Disabled Devices and the Processing Tree
Disabled devices can later be added to an experiment in the Processing Tree using the Add HAL command in the right-click menu of the parent RZ device. Also, if an experiment requires a device that is disabled in the Rig, it will be added to the Processing Tree automatically when an experiment is opened.
Specialized DSPs and Related Devices
DSP labels provide additional information about the type of DSP and its associations. The label takes the form DSPX# where:
X = device type to which the DSP connects, such as amplifier or RS4 data
streamer (omitted if none) or indicator for multi-core DSP
# = logical number (or index) assigned to the DSP within the RZ device
For example:
 |
| Fourth DSP in an RZ, specialized DSP-I for IZ2 stimulator |
DSP Type/Device Connection Key
M = Subject Interface, iCon Behavioral Control Interface, PZ amplifier
S = RS4 data streamer
V = RV2 video processor
I = IZ2 electrical stimulator
U = PO8e streamer
P = PZ amplifier
Q = Quad Core processor
Note
The optical version of the DSPQ card can also support any of the device connections (such as video processor or amplifier). This is not indicated in the DSP name.
Amplifier Connections
If Synapse detects an RZ2, a PZ5 icon is added below the RZ2 icon. This is because the RZ2 has an amplifier port and a PZ5 is typically used with this device, but Synapse can't detect the amplifier model (PZ5, PZ2, or PZ3).
 |
| RZ2 with Predicted PZ5 |
If you are using a different amp or a different number of channels than the default, you will need to change the configurations options as described below.
Each device can be individually configured using its device options. When a device is selected in the rig tree, any configurable features are displayed to the right. Options may include model number, channel count, and so forth.
Add/Remove Devices
Use the right-click menu in the rig tree to add any devices in your rig that didn't automatically configure.
To prevent loss of existing experiment hardware configuration, keep the Merge Previously Saved Configuration check box selected. To refresh all of the hardware objects in the Processing Tree to their default state, uncheck this box.
Experiment - Rig Mismatch
When you open an experiment, Synapse checks the Rig to determine if the devices required for the experiment are available in the processing tree. If a mismatch is detected, a warning window is displayed. The top of the window displays the devices required by the experiment and their status in a grid.
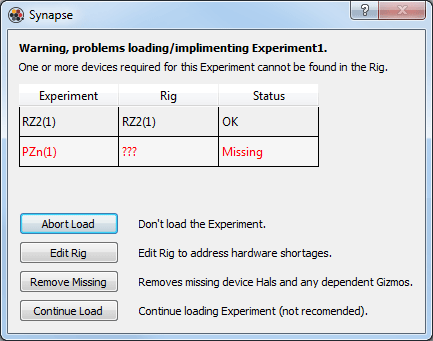 |
| Rig - Experiment Warning Window |
The lower half includes a variety of options for handling any problem.
Rig Specific Device Options
Network Devices
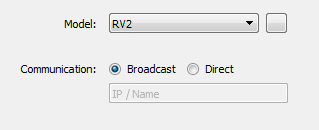
Network enabled devices, that is the RS4 and RV2, must be configured for network communications in the rig.
To configure a network device:
-
Make sure the devices is enabled in the hardware tree, then click to select it.
-
In the Options area, select the Broadcast or Direct connection radio button, then enter the IP address.
-
Alternatively, click the Find Network Devices button.

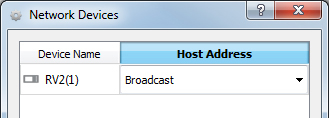
-
In the Network Dialog bog, select the IP address in the Host Address drop-down for the selected device.
Working Without your Hardware
If you have installed Synapse to a computer that is not connected to a hardware system, you can build a phantom rig for planning and debugging. You can also spec out a system that would run any experiment you designed.
-
In the Rig Editor, right-click the computer icon and click Add RZn on the shortcut menu.
If necessary, select the RZn check box.
In the area to the right, the default Model and I/O settings for the selected hardware is displayed.
-
If the model shown doesn't match, click the Model drop-down menu and click your model in the list.
-
Repeat this process to add DSPs, amplifiers, and any additional device to the diagram.
-
When all the necessary hardware has been added, click the OK button.
In the Synapse designtime window, the Processing Tree is populated with the hardware in your rig. With your phantom rig you can configure your experiment.
Close Synapse and launch the Corpus Hardware Emulator. Corpus will emulate the rig you just defined. When you launch Synapse while Corpus is running, Synapse will connect to Corpus and use the emulated rig so you can test your experiment using CPU resources. See Remote Experiment Design for more information.
Make sure your actual hardware system matches your rig configuration before running your experiment on real hardware.
Import or Export Rigs
The Rig Editor includes Import and an Export buttons. These buttons can be used to open an existing rig file (Import) or preserve the current rig for future use (export). These buttons launch Select a Hardware Rig or Save the Hardware Rig dialogs that function much like a typical Open or Save as dialog.