Audio Stimulation
Common Use Cases

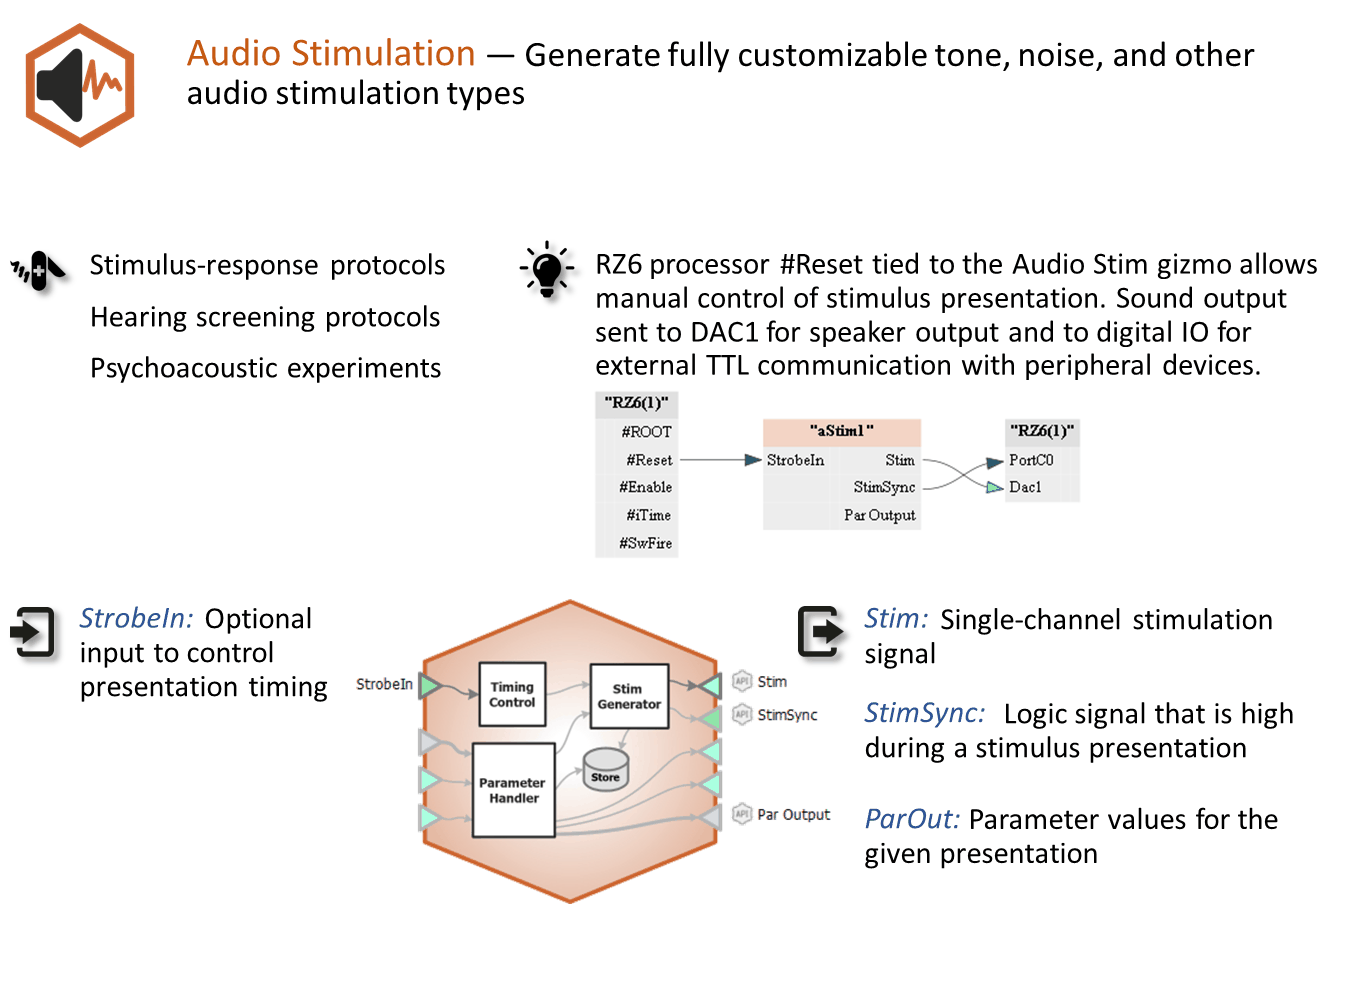
Generate fully customizable tone, noise, and other audio stimulation types. Use this gizmo for audio neurophysiology, stimulus-response protocols, hearing screening protocols, and psychoacoustics.
Gizmo Help Slides
Reference
Audio stimulation waveforms may be comprised of tones, noise, sawtooth or square waves that can vary in duration, level, and more. The overall stimulation duration can be set by a fixed duration, based on a strobe or based on pulse count. The gizmo provides static or runtime control of stimulus parameters and can input parameters from a Parameter Sequencer gizmo. The audio stimulation gizmo includes options to store individual parameters, the parameter list, and raw waveform. A timing pulse can also be output to synchronize data collection.
Audio Stimulation Runtime Interface
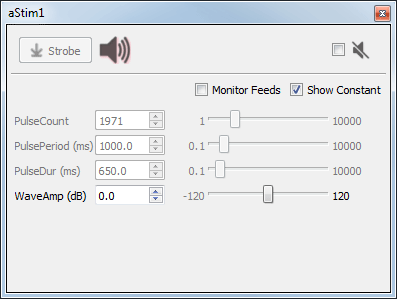 |
| Two Versions of the Audio Stimulation Runtime Tab |
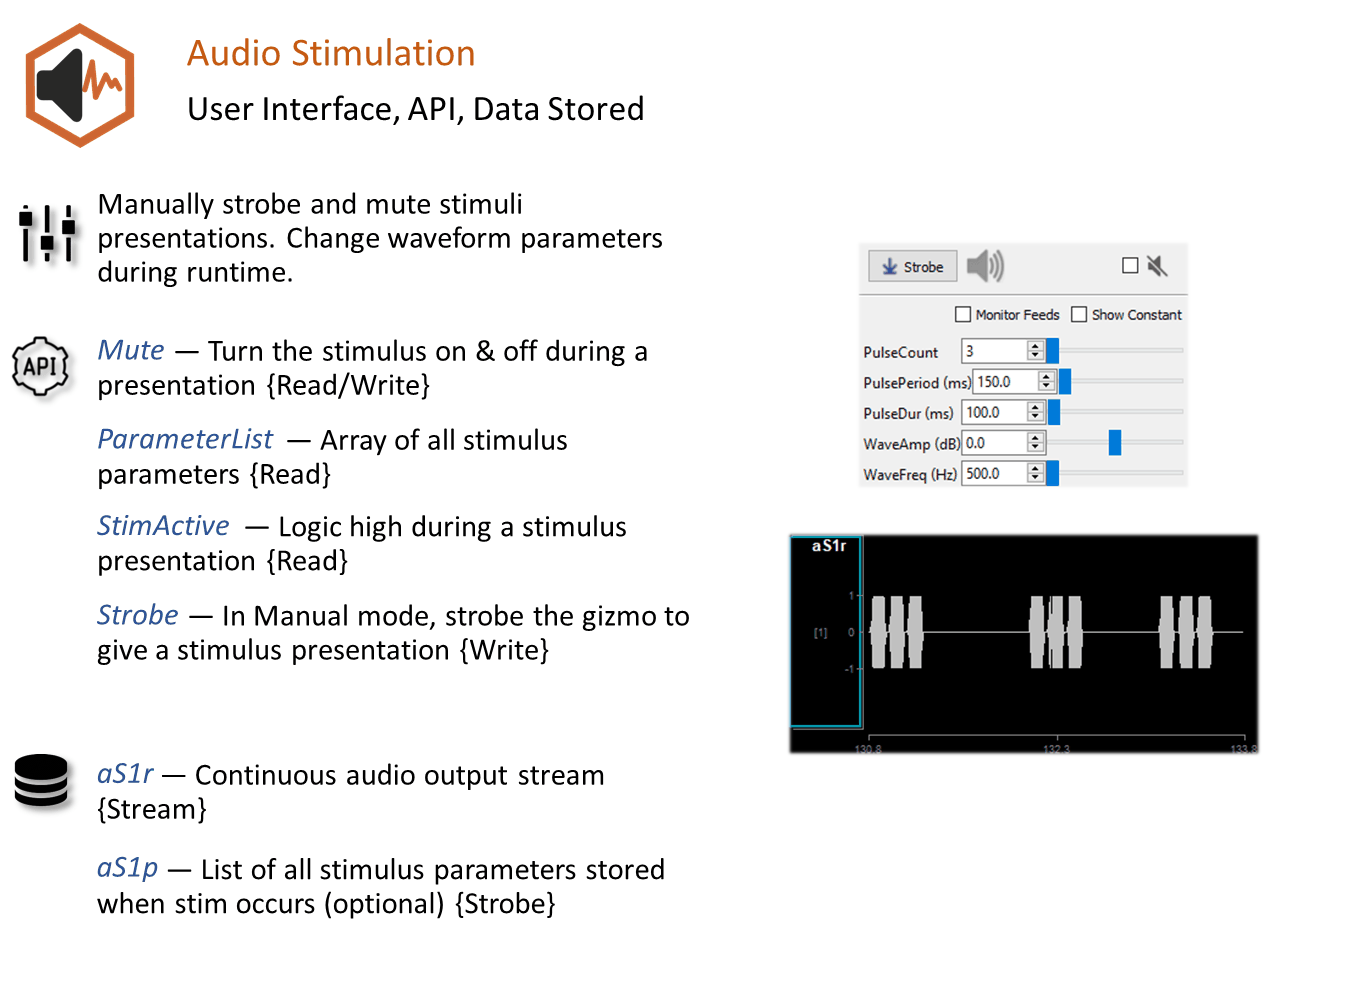
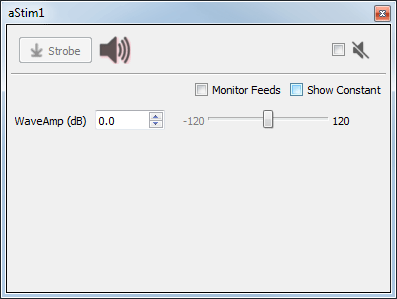
An aStim1 control tab is added at runtime. Parameters that can be controlled dynamically are shown in black (active). You can enter a value in the field, use up and down arrows, or drag a slider to modify to parameter value. You can show only the elements you need or hide the entire control. The illustrations above show two versions of the floated tab, one with only the runtime widget-controlled parameter shown and one with all the parameters shown.
Click and release the Strobe Button to trigger a manual strobe pulse.
Select the Mute Button check box to zero the stimulus signal.
Select the Monitor Feeds check box to show stimulus parameters controlled by an input signal. Also adds an Override column and check box to the left. Select the Override check box to adjust the parameter value manually instead of using the input signal.
Select the Show Constant check box to display values for parameters set to Constant. They will appear gray.
Audio Stimulation Configuration Options
Waveform Tab
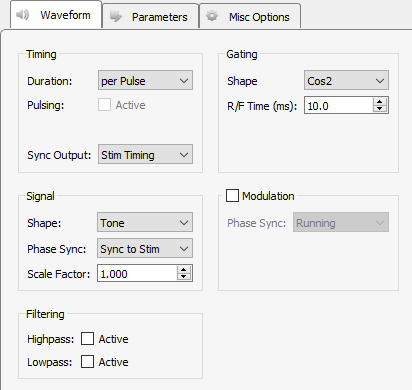 |
| Waveform Tab |
Timing
Set the Duration of the stimulus waveform: per Pulse, per Parameter, or per Strobe. Descriptions are below.
-
per Pulse enables you to set a pulse count, duration, and period (in the parameter table) relative to a pulse input to the gizmo's Main input. Typically this is your #SwFire (stimulus sweep fire line) or similar repeating pulse. The diagram below provides a quick visual guide to the three parameters of the stimulus.
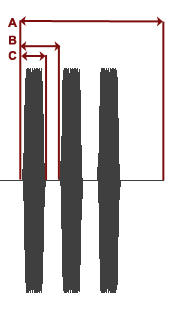
Stimulus Tone per Pulse No matter which method is used to design the stimulus, the next trigger begins a new stimulus. This ends the previous stimulus whether or not the stimulus duration or pulse count has been reached. Before your experiment, be sure to preview your stimulus to ensure it is working as expected.
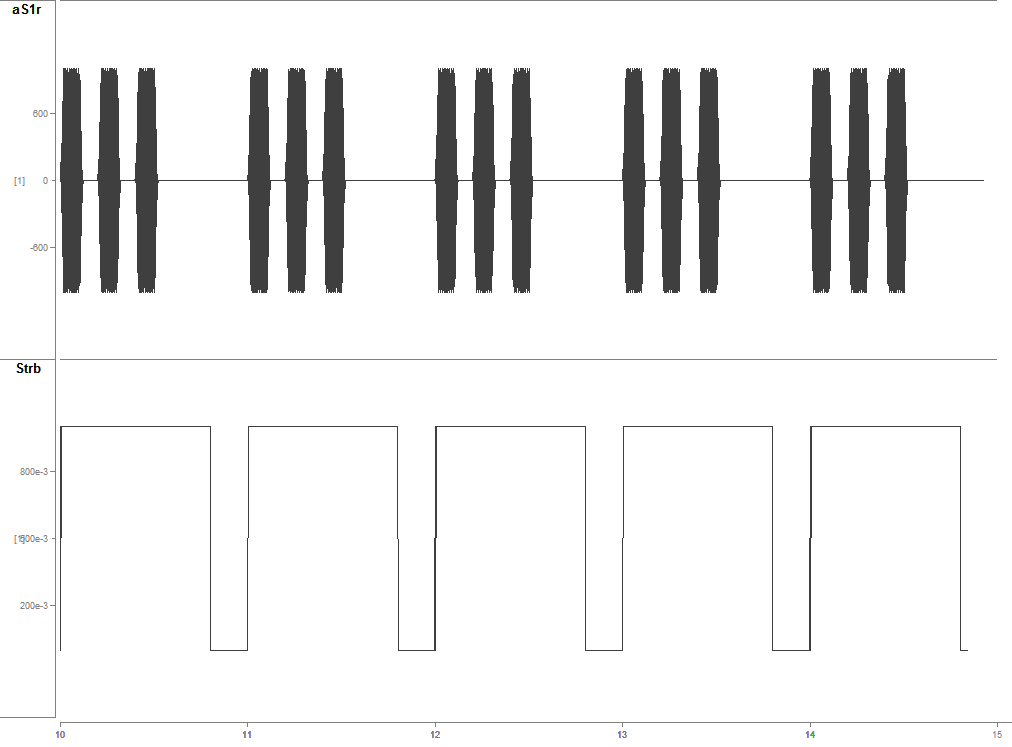
The plot below shows a tone pulse train, triggered by a sweep fire line (#SwFire)--a typical Synapse timing element available on RZ devices. It fires once every second.
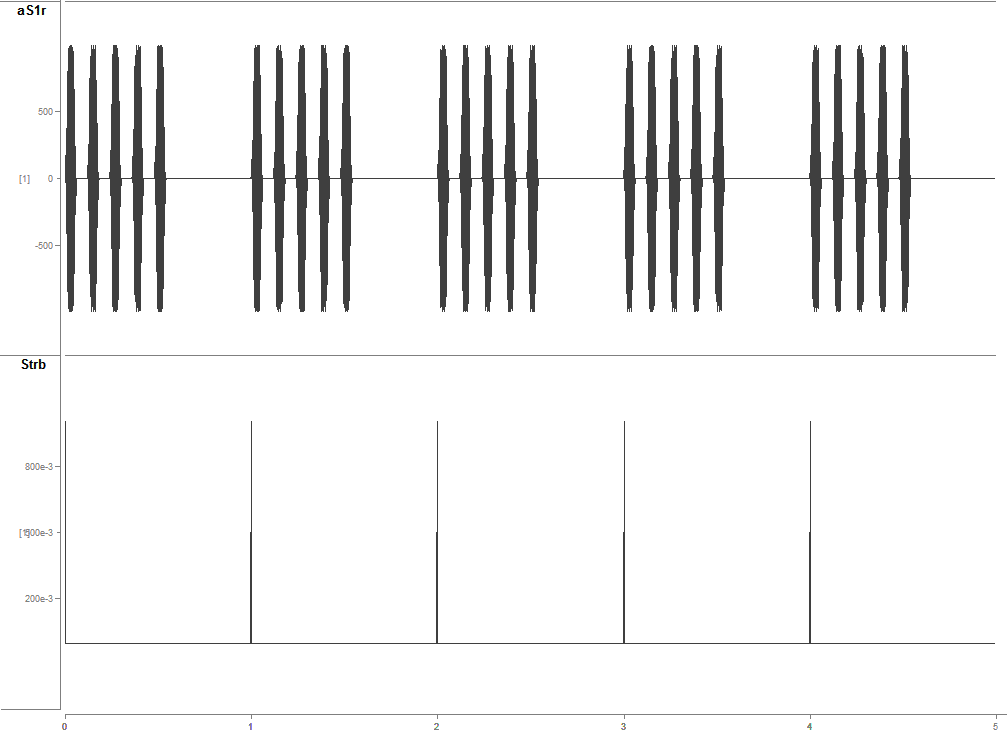
Stimulus Waveform Shown Above with Timing Pulse Below -
per Parameter is similar to per Pulse in that it also enables the pulse count and period parameters (in the parameter table). However, the duration parameter is also enabled, so you can define the duration as a time period via the Parameters Table tab where you have the additional options to:
-
Set a constant value
-
Use a runtime widget
-
Use a parameter input from a parameter sequencer
-
Use an input from a scalar input line
Tip
See Using Parameters for more information on controlling parameter tables.
-
-
per Strobe also uses the gizmo's Main input to trigger the signal, however, because no pulse parameters are applied the signal matches the duration of the Main input source, typically a strobe input.

Stimulus Timing Per Strobe
Pulsing Active check box
When selected, pulse duration and pulse count parameters are enabled in the parameter table and the stimulus is triggered when the strobe goes high, the pulse parameters are then followed and the stimulus ends with the pulse count is met or the strobe goes low. The next stimulus is triggered by the next strobe input.
 |
| Stimulus Timing Per Strobe with Pulsing Active |
Gating
Shape
Choose the type of gate to apply to the signal. Gates serve to attenuate the signal during the onset and offset of the signal, increasing or decreasing in intensity, for the purpose of removing onset/offset related artifacts from this signal.
R/F Time (ms)
Defines the length of time over which the gate is applied, therefore, the length of time in which the signal goes from 0 to full signal strength or visa-versa.
Signal
Select the desired waveform shape and related properties. Select the Modulation check box to add amplitude modulation and select whether to synchronize the phase of the modulation waveform. Note that when Phase Sync is 'Sync to Stim' or 'Sync to 'Pulse', a WavePhase parameter is available in the Parameters Tab. It is limited to the range [-179.9, 179.9], even if the table says -180 or 180. Modulation adjusts the amplitude of the waveform so that the RMS remains the same.
Filtering
Filters can be applied to the output signal. Useful for band-limited noise presentation.
Parameters Tab
 |
| Audio Stimulation Parameters Tab |
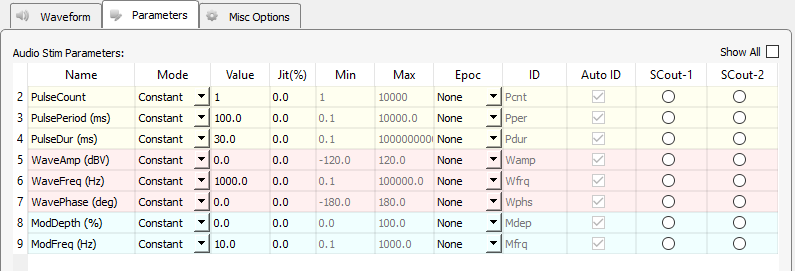
Audio Stimulation Parameters
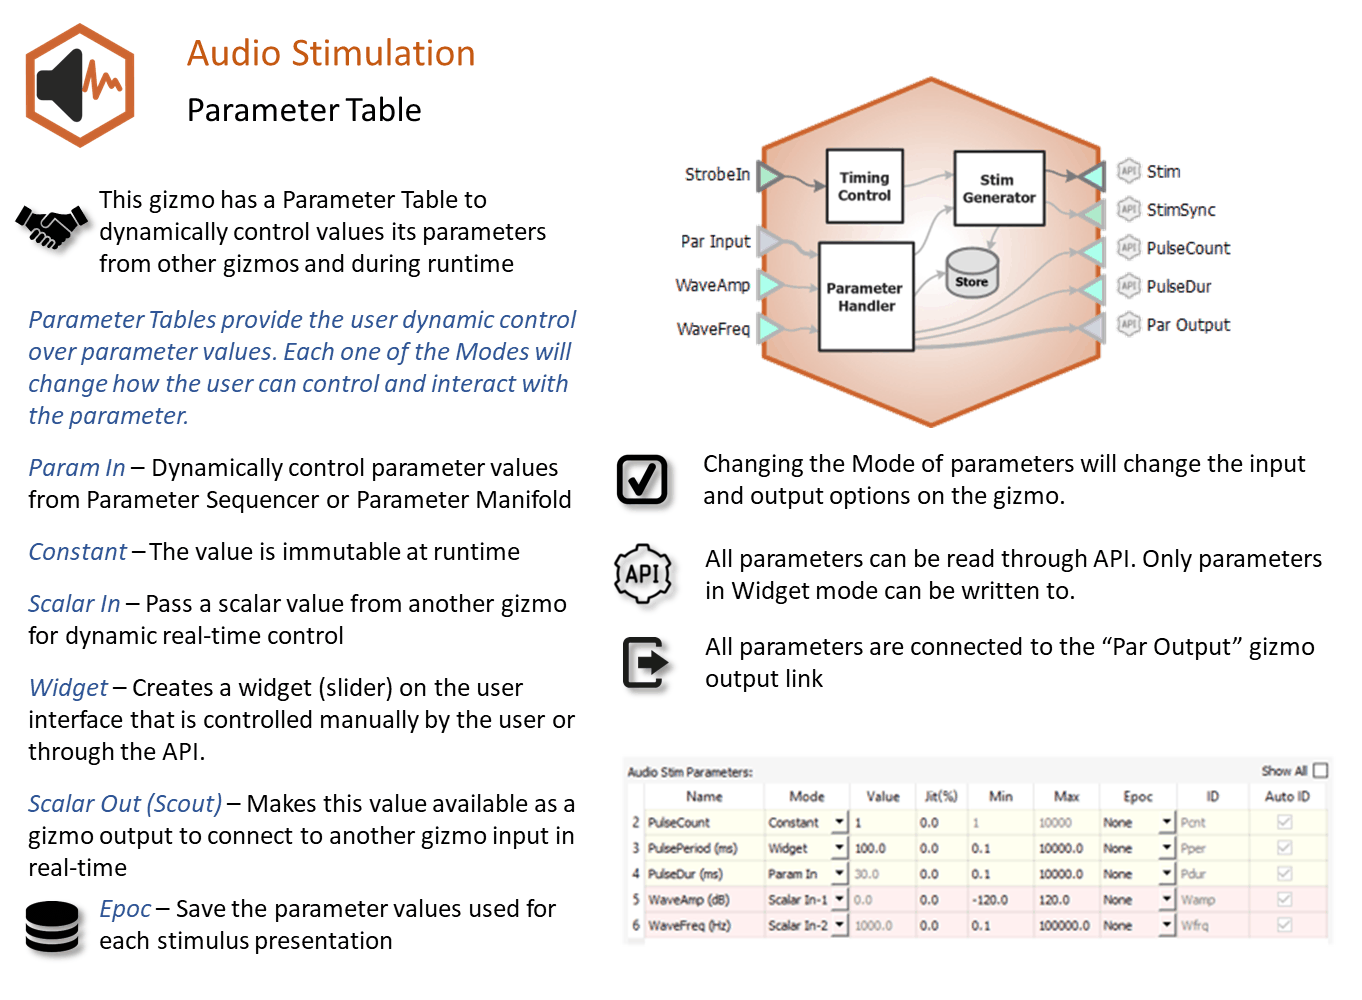
The table lists signal parameters relevant to configuring a stimulus. Each row represents a parameter and rows are shown or hidden in response to selections made on the Waveform tab. Use the Show All check box to display hidden rows.
Note
The 'WaveAmp (dBV)' parameter is not dBSPL, which is a common unit for measuring sound levels relative to human hearing. The dB units are relative to 1 V, which means requesting 0 dB amplitude will produce a 1 Volt peak-peak waveform, and 20 dB will produce a 10 Volt waveform (which is the maximum output of the RX and RZ DACs). Going beyond 20 dB without some sort of conversion downstream will clip and distort your sound output.
Please contact support@tdt.com if you have any questions.
Tip
See Using Parameters for more information on using the parameters table.
Mode
In the Mode column, you can choose to make individual variable Constant, controlled by a runtime Widget, fed by a parameter input line (from Parameter Sequencer gizmo) or controlled by a Scalar Input line.
Value Columns
Enter values in the Value, Jit% (Jitter), Min, and Max columns to set the Constant value or to set the initial value and limits when parameters are dynamically controlled. In Widget mode, the Min and Max set the Widget limits.
Epoc
In the Epoc column, you can choose to save the individual parameter value on stimulus or pulse onset.
ID and Auto ID check box
Synapse automatically generates a store name for each parameter. TDT recommends using Auto ID to ensure no store names are duplicated. A "/" is appended to the name to indicate that the full epoc (onset and offset timestamp) is stored.
SCout-1 and SCout-2
Select the radio button in the desired row to feed the parameter to an output signal on the gizmo.
Misc Options Tab
 |
| Misc Options Tab |
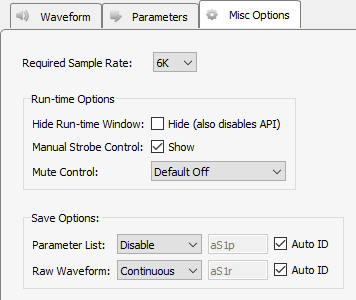
Required Sample Rate
The minimum rate required. Synapse looks through the entire experiment and your Rig and sets the sample rate according to this and other limiting factors.
Hide Run-Time Windows
By default a runtime tab is added in Preview or Record mode. The contents of the tab are defined with configuration options on the General and Parameter options tab. Select the check box to hide the runtime tab.
Manual Strobe Control
When selected, a manual strobe control is added to the runtime UI.
Mute Control
Mute allows you to temporarily mute the stimulus during runtime. You can choose to hide or show the control and, if shown, set the default start state.
Parameter List
Select whether to store the value of all parameters, at each stimulus or pulse onset. This generates a multi-channel list of scalar values. The channels map directly to the rows of the parameter table on the Parameters tab. By default, some parameters are hidden in the table, but values are stored for all parameters.
Raw Waveform
Select whether to store a copy of the raw stimulus waveform. You can choose to store continuously or only when the stimulus is active.
Auto ID field and check box
A store name is generated automatically. To use your own store name, clear the Auto ID check box.