OpenBridge User Guide
Overview
OpenBridge serves as both a general export utility and a "bridge" between an TTank data tank and Plexon's Offline Sorter. OpenBridge exports to NEX v100, DDT v103, EDF+ EDF and PLX v103 file formats. OpenBridge runs on Windows® 10 operating system.
The bridge functionality is available for Plexon's Offline Sorter. It allows for a smooth export and return of sorted data back into the data tank.
Although EDF+ supports exporting snippets, the OpenBridge EDF+ export function does not support exporting snippets. It does support exporting stream data in the EDF+ format.
OpenBridge features:
- Allows user selection of events, sorts, and channels for export
- Manages high channel count data sets as multiple files to accommodate Offline Sorter file limitations.
- Automatically launches Offline Sorter on export of PLX or DDT formats.
- Preserves channel numbering across applications.
- Automatically detects changes to PLX files.
- Automatically imports new sorts into the tank.
- Cleans up files after all sorts have been merged into the tank.
See Using the Bridge with Offline Sorter for more information on PLX export and importing sort codes back into the data tank.
Workspace Basics
About the OpenBridge Workspace
OpenBridge provides a versatile workspace where users manage the export process The customizable workspace includes collapsible panels that can be docked or floated and provides auto hide push pin tools. Context sensitive menus, when available, can be accessed by right-clicking the related area.
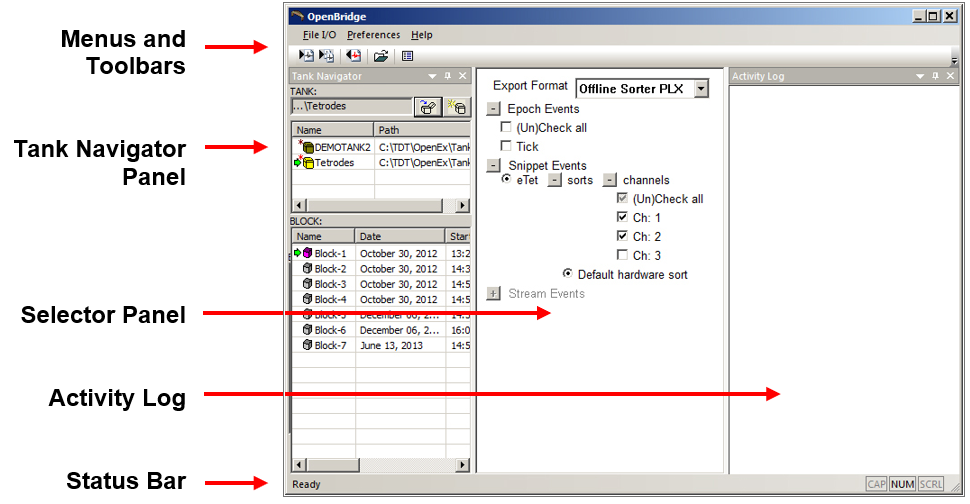
Menus and Toolbars
Menus and toolbars provide access to all commands and tools. Frequently-used commands are available via toolbar buttons. Hover over a toolbar button to display a description of its function in the Status Bar. See The Toolbar and Menus for a complete list of commands and tools.
Tank Navigator Panel
A collapsible panel for selecting the tank and block. Registered data tanks are displayed for quick selection.
Selector Panel
This panel is used for selecting export format and data. It shows all available epoch, snippet and stream events for the selected block with check boxes for quick selection of events and channels. Only event types that are allowed for the current export format are available.
Activity Log
Activity records are displayed, including export/import status and names of exported files.
Note
If a panel is not in view, right-click the menu bar area then select the desired panel on the shortcut menu.
Selecting a Data Set in the Tank Navigator Panel
The tank structure is hierarchical; each tank might include multiple blocks, each block might contain several events and each event might include several channels. OpenBridge exports data as channels. Before the channels can be selected for export, the tank, block, and event(s) must be selected.
The Tank Navigator panel displays tanks and blocks to allow the user to select the desired data set. It can be docked or floated depending on the user's needs.
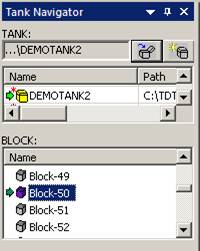
Selecting a Tank
Users can select a tank in the TANK list area of the Tank Navigator. By default, only registered tanks are displayed. More options, including registering or unregistering tanks, are available from the TANK list shortcut menu.

Click the Open Existing Tank icon to open the Browse for Tank dialog and navigate to the desired tank.
To register or unregister a tank, right-click the desired tank in the TANK list and select the appropriate option from the shortcut menu.
Note
Unregistering a tank does not delete the tank files, however, only registered tanks will be listed in the TANK list at startup.
Selecting a Block
All blocks in the currently selected tank are shown in the BLOCK list area of the Tank Navigator. Choose one of the blocks for export. This will update the available events in the Selector Panel. The shortcut menu in the BLOCK list controls what information is displayed, making it easier to locate the desired block when the selected Tank contains many blocks.
To display the shortcut menu, right-click the BLOCK list:
When a block is selected, available Epoch Events, Snippet Events and Stream Events (depending on what export format is selected) are enabled in the Selector Panel.
Setting the Export Preferences
Click Preferences in the menu bar. The settings in the Preferences dialog are arranged on tabs, a General tab for options common to more than one export format and individual tabs specific to each export format.
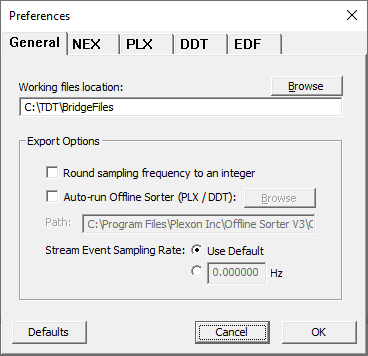
General Tab
NEX, DDT, EDF Tabs
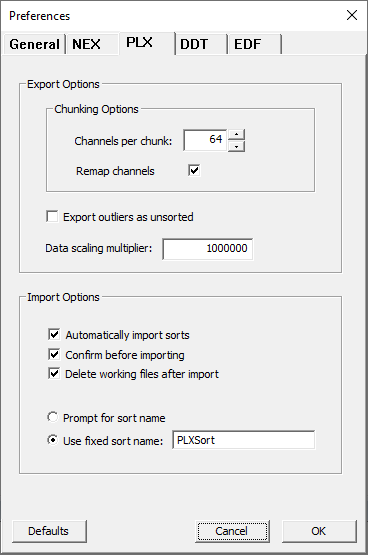
PLX Tab
Export and import options for the PLX data format. See Using the Bridge with Offline Sorter for more information.
Selecting the Export Format
OpenBridge exports to NEX v100, PLX v103, DDT v103 and EDF+ EDF file formats. The scaling multiplier and other settings for each format are set in the Preferences dialog (see above). Use the Export Format drop-down list in the Selector Panel to choose the desired file type.
Note
See Selecting Events below for information on the data types supported by each export format.
Selecting Events
The selections in the Selector Panel are used to specify data for export. Only event types in the currently selected block that are supported by the selected export format are available. Plus signs to the left of each event type are used to expand events lists. When the selections are not available they appear light gray. The supported event types for each format are as follows:
Use the event tree in the Selector Panel to choose the stores and channels to export.
Exporting Data in NEX, DDT, and EDF Formats
Before exporting, set export format and preferences and select data as described above. Ensure that the desired events, sorts and channel numbers are chosen in the Selector Panel.

Click the Export selected channels button on the toolbar, or click "Export Channels" in the File I/O menu.
The exported file name format is:
TankName_BlockName_SnippetEventName_StreamEventName_Number.fmt
where fmt is the format type and Number increments on each subsequent export.
Exporting Data using Batch Processing
Batch processing eliminates the need to configure or apply the export to each block, however, it takes additional processing time. You will need to allow for this extra time in your workflow.
Batching works by applying an export configuration file (*.obconf) to the blocks in a tank. To create the configuration file:
- Ensure that the desired export format and events, sorts and channel numbers are chosen in the Selector Panel
- Go the Menu > Configurations and click 'Export'
- Specify location and file name, then save.
To run a batch export over many blocks in the same tank, modify a command line string as follows:
C:\TDT\OpenEx\Bridge\OpenBridge.exe -tank C:\TDT\OpenEx\Tanks\DEMOTANK2 -configuration C:\TDT\test.obconf -blocks -logPath C:\TDT\BridgeFiles
Where:
C:\TDT\OpenEx\Bridge\OpenBridge.exe is the path to the OpenBridge application
C:\TDT\OpenEx\Tanks\DEMOTANK2 is the tank path
C:\TDT\test.obconf is the configuration file path
C:\TDT\BridgeFiles is the destination path
OpenBridge will use the configuration from the .obconf file to export all blocks
in the tank. If you want to export a subset of the blocks in the tank, add the
"-blocks" switch with a comma separated list of blocks. For example, add
–blocks "Block-1,Block-2,Block-4" to the command to export these three blocks only.
Type or paste the command string into the command line or into the search box on the Start menu to launch. The OpenBridge window will open, perform the export, and then close.
Using the Bridge with Offline Sorter
The OpenBridge exports data to PLX format and can automate and simplify much of the export/import process. It can launch Offline Sorter, manage channel numbering and file handling, and then import data back into the TDT data tank. Work through the steps in this section to make full use of the automated PLX format features in OpenBridge.
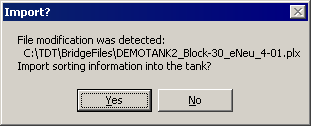
When exporting to PLX file format, snippet and epoch data is exported from the tank and analyzed in Offline Sorter to create new sort codes. After the new PLX file is saved in Offline Sorter, OpenBridge can automatically detect when new sort code information is available and reintegrate this new sort code information back into the tank using a new sort name or Sort ID. Once the process is complete, data can be viewed or used for further analysis in OpenSorter, MATLAB or OpenExplorer.
The diagram below illustrates the basic OpenBridge workflow. User preferences control and configure all automated processes.
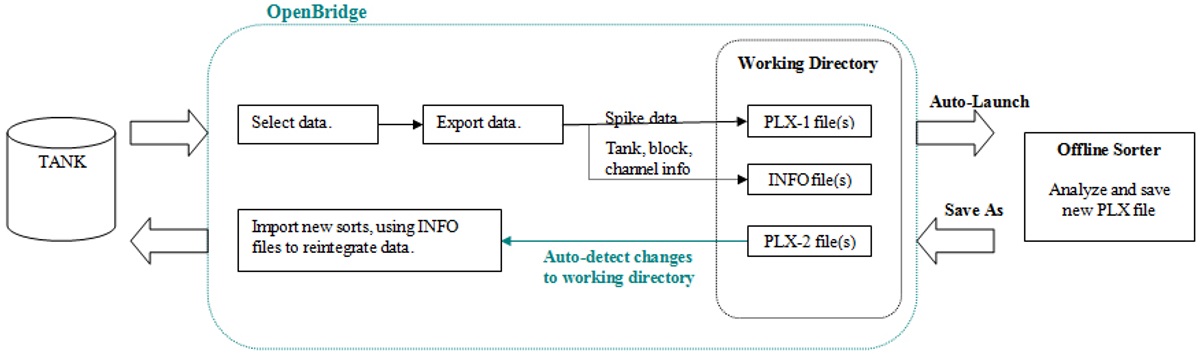 |
| The OpenBridge PLX Workflow |
Setting PLX Export Preferences
The PLX export settings are accessed using the PLX tab of the Preferences dialog.
To open the PLX Preferences dialog:
- Click Preferences on the menu bar.
- Click the PLX tab.
Once all preferences have been set, ensure PLX is selected in the Export Format drop-down list.
Exporting Channels
Before exporting, set preferences and select data as described above. Ensure that the desired events, sorts and channel numbers are chosen in the Selector Panel
Click the Export selected channels button on the toolbar, or click "Export Channels" in the File I/O menu.
If the Auto-run Offline Sorter (PLX / DDT) option is selected in the OpenBridge Preferences, Offline Sorter will be launched and the exported data set will be loaded automatically. Otherwise, manually launch Offline Sorter and load the PLX file.
Note
The Offline Sorter Hardware key must be connected to enable all features. If a warning message is displayed, insert the key before continuing. You will need to close and re-open Offline Sorter.
The PLX file is stored in the working folder (set in the Preference dialog) and named
using the following convention TankName_BlockName_SnippetEventName__Number.plx where
Number is incremented on each subsequent export.
Exporting Tetrode Recordings
The Tetrode Sorting gizmo in Synapse concatenates the four snippets of a tetrode into one long snippet and saves that to a single channel in the data tank. When exporting to PLX, Plexon's Offline Sorter expects the data from each tetrode to be in four unique channels. OpenBridge automatically detects tetrode data in the OpenEx data tank and splits each tetrode snippet into individual channels on export. However, sort codes identified in Offline Sorter can not be transferred back into the TDT data tank at this time.
Importing Channels
After you have completed sorting and analysis in Offline Sorter, save the file to the OpenBridge Working directory.
Depending on selections in the Preferences dialog, OpenBridge may:
- Auto-detect the new sort data
- Automatically import new sort data
-
Prompt for confirmation before importing
-
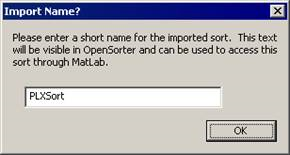
Prompt for a sort name before importing

If OpenBridge is not set to auto-detect new sort information, you can import the information manually by clicking the Import Sorted Files button, to launch the Import Sorting from PLX dialog.
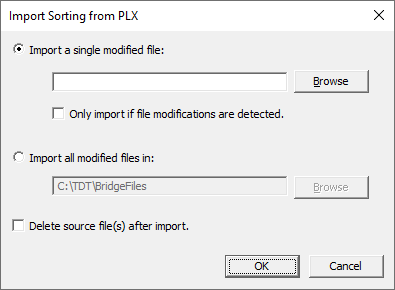
In this dialog you can choose to import sort information from a single file or all files in the working directory. You can also choose whether or not to delete source file(s) after import.
- Click the desired radio button and browse for the new file.
- Click OK.
- If you are prompted to enter a sort name, type the new name and click OK.
The Toolbar and Menus
The OpenBridge Toolbar
The Standard Toolbar provides access to the most common OpenBridge commands.
 Export Selected Channels
 Open Export Directory
 Setup Preferences