Gizmo Inputs
You can have up to 8 gizmo inputs into the Pynapse gizmo. These inputs can be digital signals (logic TTL) or analog signals (float or integer) that go through a Logic Conversion, such as thresholding.
 |
| Input Processor |
Set the Name of the input to something that makes sense for your experiment, e.g. 'NosePoke'. This will be used throughout the Python code.
You can optionally save epoch timestamp events for each input. An integer code for the event type is stored with the timestamp. See Epoc Storage below for more information.
Important
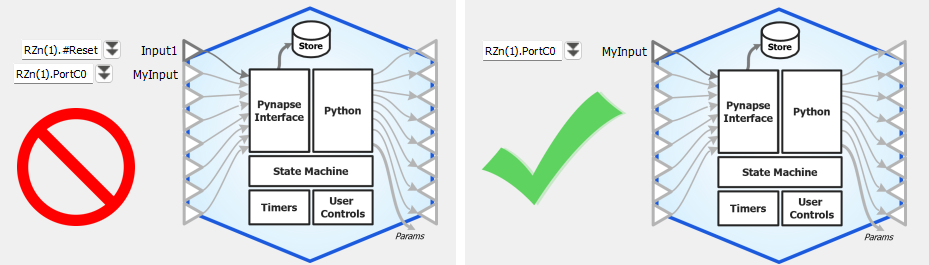
By default, Input1 is enabled and connected to the "#Reset" signal as shown below so that Synapse compiles it correctly. If you make your own gizmo inputs, replace #Reset and start with the first input.
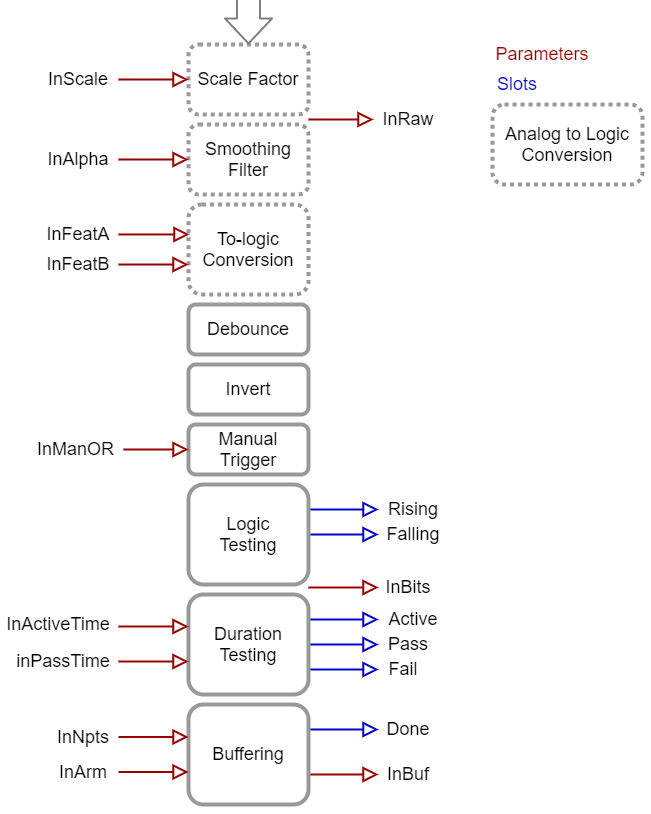
Logic Conversion for Number Signals
Number input signals pass through a logic conversion so they can trigger on/off events in Pynapse.
Pre-scale is a scalar multiplied by the signal.
Smoothing is a low pass filter that removes jitter on the analog signal before logic conversion. This helps avoid a situation where the signal is quickly bouncing around the test threshold.
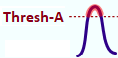
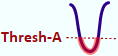
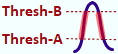
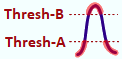
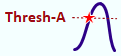
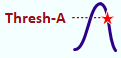
By default, the Test is Above, which is a simple threshold detection method to convert the number signal input into a logic signal when it goes beyond the Thresh-A value.
Epoc events are triggered on the 'rise' event of all of these tests. If the test can be true for more than 2 samples ('Strobe') then a timestamp for the 'fall' event is also stored. See Epoc Storage below for full epoc code information.


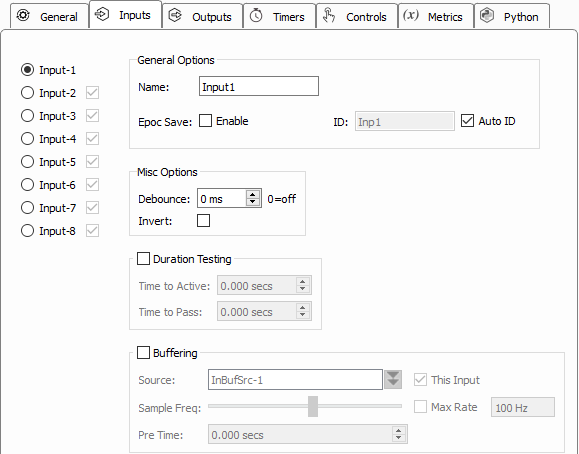
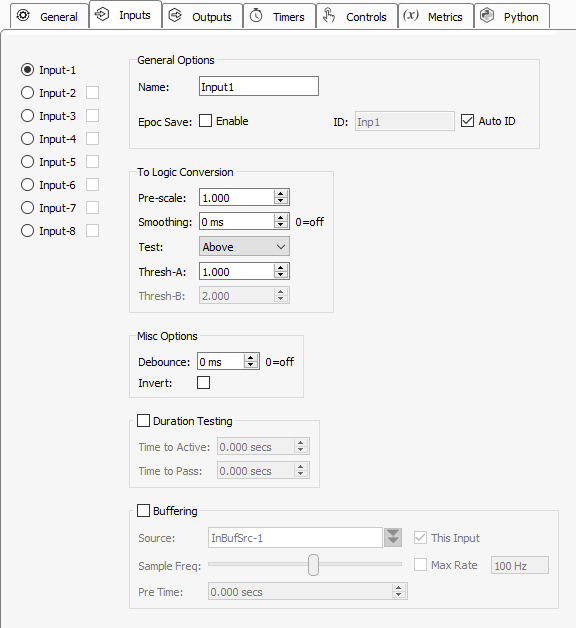
Invert and Debounce are typically used if the input is coming directly from a digital input on the RZ processor. Debounce is the amount of time the input has to settle before its new state is used. This is useful for lever presses or hardware button presses which can 'bounce' on contact and trigger several rapid artificial events before making solid contact.
Slot Methods for Responding to Input States
These input slots capture status information about the inputs. They are available as method definitions inside Pynapse states for each input. Write a method with this name to react to the corresponding event.
Note
'Input1' is the default name of the first input. The name of each slot method gets replaced with the name of your actual input, so if you name the input 'NosePoke' then s_NosePoke_rise() is an available slot
Example
Move through behavioral states based on status of MyInput
class PreTrial:
    def s_MyInput_rise():
        p_State.switch(StartTrial)

class StartTrial:    # StateID = ?
    def s_MyInput_active():
        p_State.switch(ActiveState)

    def s_MyInput_fall():
        p_State.switch(PreTrial)

class ActiveState:    # StateID = ?
    def s_MyInput_pass():
        p_State.switch(PassState)

    def s_MyInput_fail():
        p_State.switch(FailState)
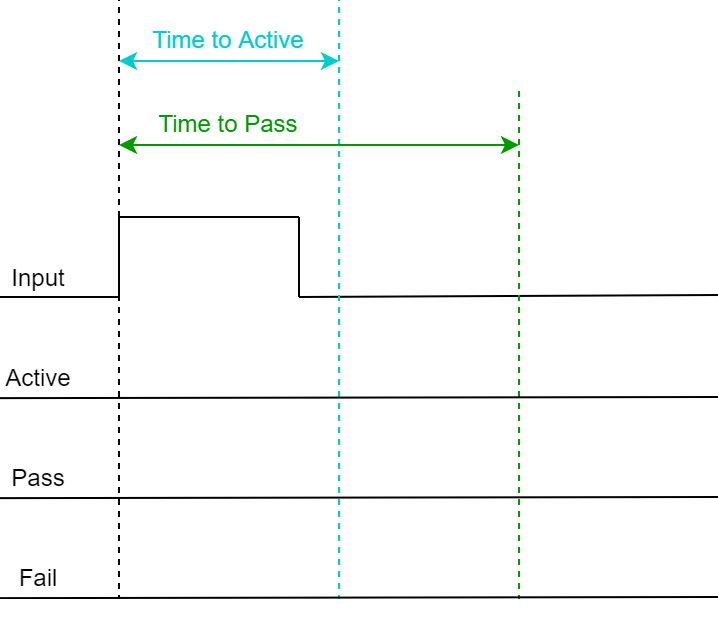
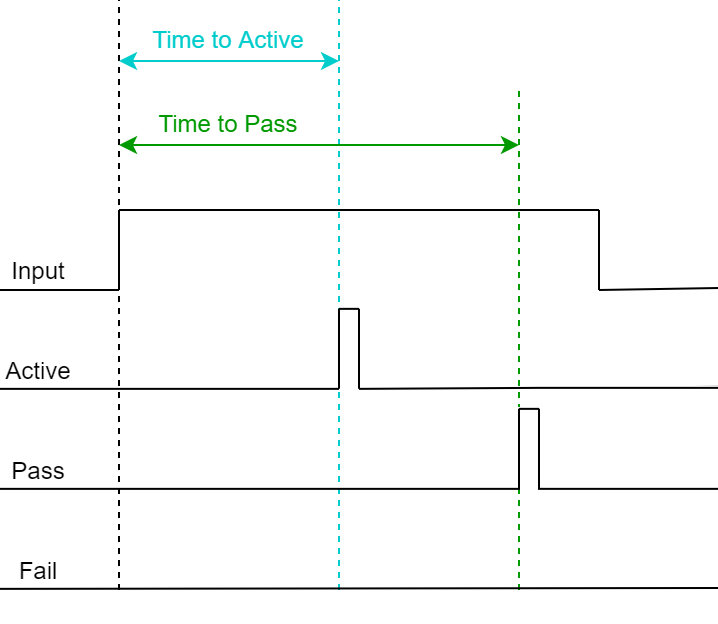
Duration Testing
The inputs can use built-in duration testing. In this example, the button has to be pressed for 600 ms
to get to the 'Active' state, and another 400 ms for it to 'Pass'. This timing happens on the hardware
and the active, pass and fail slots are triggered in Pynapse.
Time to Active not reached by Input.
No trial is initiated.
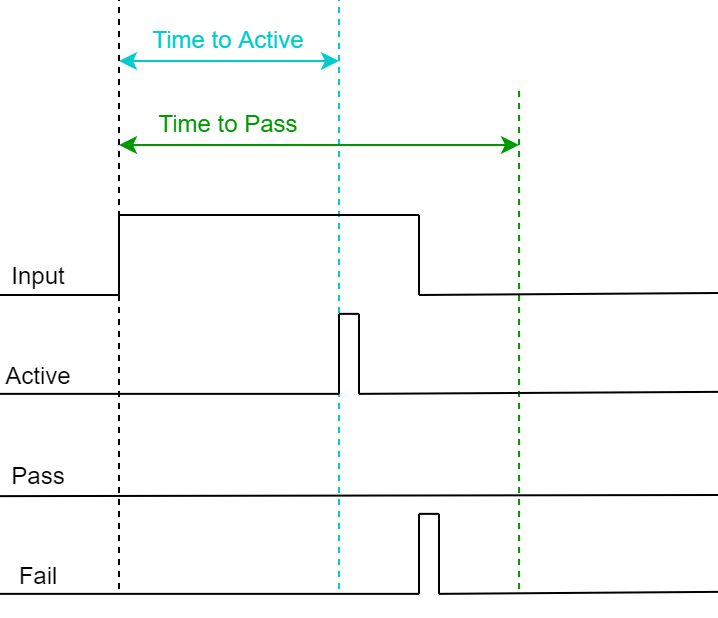
Time to Active reached by Input, so 'Active' trigger fires.
Time to Pass
was not reached by Input, so the 'Fail' trigger fires when Input is released.
Time to Active reached by Input, so 'Active' trigger fires.
Time to Pass also
reached by Input, so 'Pass' trigger fires.
Epoc Storage
Epoc events are triggered on the 'rise' event of the input and a timestamp and value of 3 is stored in the data tank. If the input is true for more than 2 samples then the 'fall' event is also timestamped and stored, with a value of 4.
The full state of the input, including duration test results, is captured in the integer code:
Example values of the epoc event:
Buffering
Buffering lets you save a small snippet of data in hardware memory and read it into Pynapse. When the input
switches to true ('rise' trigger) the buffer is captured. When buffering is finished it fires the done
trigger.
You can connect the buffer signal source can be any single channel signal in your experiment, including the input signal. Even though the inputs are all converted to digital signals for logic tests, you can still trigger Pynapse to buffer up the original analog signal and then read that into Python for online analysis. For example, you can do a threshold detection on a signal and save the snippet around the threshold crossing, and do something with this in Pynapse.
Example
Display a 1000 sample buffer when triggered.
%matplotlib

import matplotlib.pyplot as plt

class Always:   #StateID = 0

    def s_Mode_standby():
        # set up the buffer and plot
        p_Input.MyInput2.setBufferSize(1000)
        p_Input.MyInput2.armBuffer()
        plt.plot()

    def s_MyInput_done():
        # get buffer
        arr = p_Input.MyInput2.getBuffer()

        # plot buffer contents
        plt.plot(arr)
Methods
All input methods have the form p_Input.{INPUT_NAME}.{METHOD}. Type p_ in the Pynapse Code Editor
and let the code completion do the work for you.
Buffer operations
Read a triggered snippet of memory from the hardware.
setBufferSize
p_Input.MyInput.setBufferSize(npts)
Change the number of samples to store in the buffer.
Important
This call must always be made if using a buffer.
Example
Initialize the buffer size before the recording starts.
class Always:   #StateID = 0

    def s_Mode_standby():
        # set up the buffer
        p_Input.MyInput.setBufferSize(1000)
        p_Input.MyInput.armBuffer()
armBuffer
p_Input.MyInput.armBuffer()
Let the buffer accept a trigger and fill with new data.
Important
This call must always be made if using a buffer.
Example
Arm the buffer when the experiment first runs.
class Always:   #StateID = 0

    def s_Mode_standby():
        # set up the buffer
        p_Input.MyInput.setBufferSize(1000)
        p_Input.MyInput.armBuffer()
disarmBuffer
p_Input.MyInput.disarmBuffer()
Stop the buffer from loading again. Use this to avoid overwriting buffer data before you've had a chance
to read it with getBuffer.
Example
Prevent the hardware buffer from triggering/ loading new data while you read it.
p_Input.MyInput.disarmBuffer()
arr = p_Input.MyInput.getBuffer()
p_Input.MyInput.armBuffer()
getBuffer
arr = p_Input.MyInput.getBuffer(npts=0, offset=0)
Example
Capture the MyInput buffer when the 'done' trigger fires.
class Always:   #StateID = 0

    def s_Mode_standby():
        # set up the buffer
        p_Input.MyInput.setBufferSize(1000)
        p_Input.MyInput.armBuffer()

    def s_MyInput_done():
        # get buffer
        arr = p_Input.MyInput.getBuffer()
        print(arr)
Duration Settings
setActTime
p_Input.MyInput.setActTime(acttime_sec)
Override the duration test 'Time to Active' setting.
Example
Modify the timing test based on performance.
def s_State_enter():
    # if more than 5 successful trials, increase the time to active by 50 ms.
    if p_Metric.success.read() > 5:
        p_Metric.active_time.inc(delta=0.05)
        p_Input.MyInput.setActTime(p_Metric.active_time.read())
setPassTime
p_Input.MyInput.setPassTime(passtime_sec)
Override the duration test 'Time to Pass' setting.
Example
Modify the timing test based on performance.
def s_State_enter():
    # if more than 5 successful trials, increase the time to pass by 50 ms.
    if p_Metric.success.read() > 5:
        p_Metric.pass_time.inc(delta=0.05)
        p_Input.MyInput.setPassTime(p_Metric.pass_time.read())
Manual Control
Manual turn inputs on, off, or pulse during runtime. Useful for debugging.
manualOn
p_Input.MyInput.manualPulse()
Manually turn on the input.
Example
Turn on the input when entering a state.
def s_State_enter():
    p_Input.MyInput.manualOn()
manualOff
p_Input.MyInput.manualPulse()
Manually turn off the input.
Example
Turn off the input when exiting a state.
def s_State_exit():
    p_Input.MyInput.manualOff()
manualPulse
p_Input.MyInput.manualPulse()
Manually pulse the input.
Example
Pulse the input when entering a state.
def s_State_enter():
    p_Input.MyInput.manualPulse()
Number Conversion Settings
Override the feature settings applied to the input signal for logic conversion at runtime.
setFeatureThresholds
p_Input.MyInput.setFeatureThresholds(thresh_A, thresh_B)
Modify the threshold settings for the logic conversion.
Example
Modify the lever force requirement based on performance.
def s_State_enter():
    # if more than 5 successful trials, increase the force required by 0.05
    if p_Metric.success.read() > 5:
        p_Metric.thresh_A.inc(delta=0.05)
        p_Input.MyInput.setFeatureThresholds(p_Metric.thresh_A.read(), p_Metric.thresh_B.read())
setScale
p_Input.MyInput.setScale(scalefactor)
Change the scale factor applied to the signal before it goes through the logic conversion.
Example
Modify the scale factor based on a run-time Control.
class Always:   #StateID = 0

    # set input scale factor to value of the SmoothCtrl slider at runtime
    def s_SmoothCtrl_change(value):
        p_Input.MyInput.setScale(value)
setSmoothing
p_Input.MyInput.setSmoothing(tau_sec)
Change the smoothing filter applied to the input signal before it goes through the logic conversion.
Example
Modify the smoothing filter based on a run-time Control.
class Always:   #StateID = 0

    # set smoothing 'tau' to value of the TauCtrl slider at runtime
    def s_TauCtrl_change(value):
        p_Input.MyInput.setSmoothing(value)
Status
Get information on the current state of the input.
isOn
p_Input.MyInput.isOn()
Returns true if the input is currently true.
Example
When entering a state, check if an input is already true.
def s_state_enter():
    if p_Input.MyInput.isOn():
        print('MyInput is on')
    else:
        print('MyInput is off')
isOff
p_Input.MyInput.isOff()
Returns true if the input is currently false.
Example
When entering a state, check the status of the input.
def s_state_enter():
    if p_Input.MyInput.isOff():
        print('MyInput is off')
    else:
        print('MyInput is on')
getRawInput
p_Input.MyInput.getRawInput()
Read the current value of an input. If it is a number, the raw input into the Pynapse gizmo after scale factor is applied but before any feature detection.
Example
When a threshold is crossed, check the current value of the signal.
def s_MyInput_rise():
    print(p_Input.MyInput.getRawInput())
getStatusBits
p_Input.MyInput.getStatusBits()
Read the current state of an input as a bitwise integer value. Bit order is:
Done | Fail | Pass | Active | Fall | Rise | True
Used by the Pynapse polling loop.