Installing iX6 and iCon
Please carefully unbox your equipment. The iX6 Lux Optical Interface is housed in an iCon interface or iConZ interface. This section covers installation of the iCon model with fiber optic interface. For installation of the iConZ model with USB 3.0 interface, see Installing iX6 and iConZ.
iCon devices have an optical interface with orange fiber optic cables. They can connect to an RZ processor through a DSPM optical interface card.
Note
The iX6 cannot be used with an RZ10x processor.
If you received an optical DSP from TDT with your iCon, follow the installation instructions that came with it.
Testing iCon Communication
Connect the iCon to the port labeled "DSPM". Turn on the iCon and the RZ. The status LED on the iCon will light green when it is properly connected to the RZ.
Launching Synapse with iCon
Note
You must be running TDT Drivers and Synapse Version 98 or later.
You can learn more about gizmos and experimental connections in the Synapse Manual.
With your iCon and RZ processor turned on and connected, launch Synapse from the desktop. If the Licensing Dialog appears, follow the instructions in the Synapse License FAQ to send a licensing request to TDT. Synapse runs for 30 days before requiring a license key. Make sure you select the Fiber Photometry package.
The Rig Editor will then appear, but it will be blank. Click Detect for Synapse to recognize your RZ and iCon. Finally, click Ok to exit the Rig Editor.
The Rig Editor may be accessed later for modification through the Synapse Menu if your hardware changes. For example, to add modules to your iCon.
Upon exiting the Rig Editor, your processor and any peripheral equipment declared in the Rig Editor will appear in the Processing Tree.
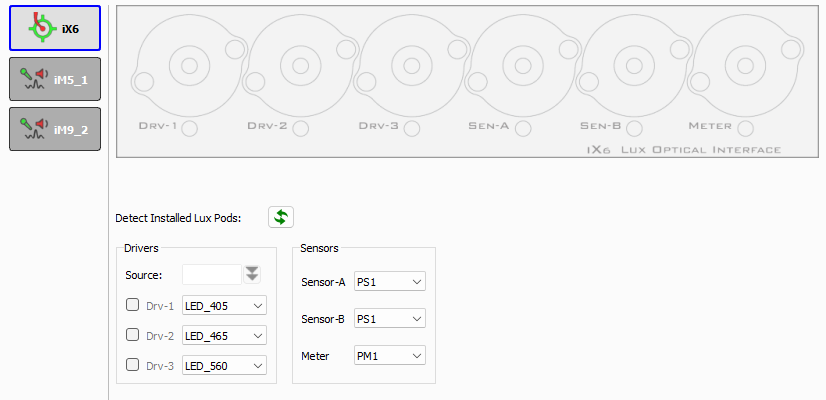
Detecting Your Fiber Photometry Equipment
Click on the iCon in the Processing Tree, then click on the iX6 module. Click 'Detect Installed Lux Pods' to automatically identify the iX6 LED and sensor configuration.
 |
| Automatically Detect Connected LEDs and Sensors |
Make sure everything matches what you see on the front of the physical iX6, and click the Commit button.
Adding the Fiber Photometry Gizmo
For basic fiber photometry recordings, the experimental setup is simple. Select the RZ3 in the Processing Tree and find the Fiber Photometry gizmo in the Specialized Gizmos category. Drag and drop the Fiber Photometry gizmo onto the RZ3 to form a connection.
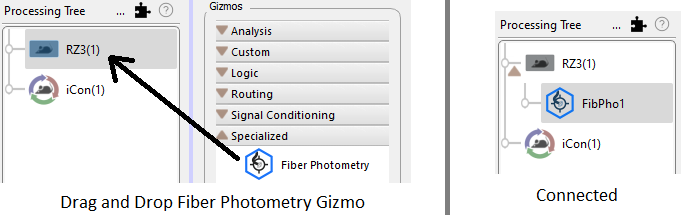
The iX6 binds to the Fiber Photometry gizmo.
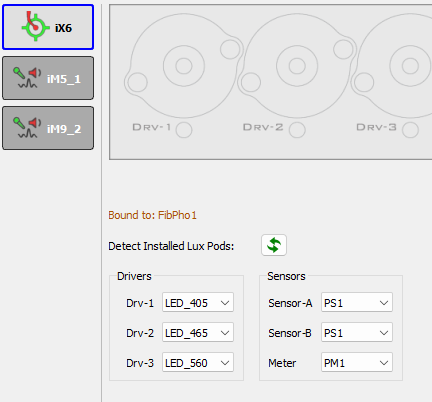
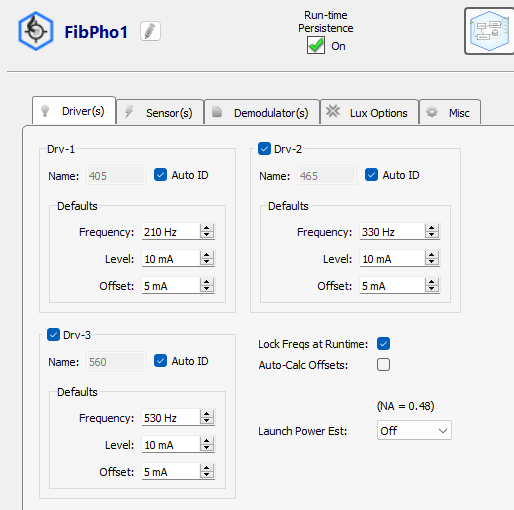
The Fiber Photometry gizmo reads the iX6 Lux components that were detected in the previous step and pre-configures the default settings. See the Fiber Photometry Gizmo section for more details.
Continue to the Optical Connections section.