Using OpenEx clients across a network with Windows 7
Tech Note: TN0954
Product: OpenEx, OpenDeveloper, OpenController, OpenScope
Version: All
Date Added: 2015-04-28
Issue
Security settings must be modified on both the server and client computers to allow simultaneous access to a Workbench server running an OpenEx project from more than one computer.
Solution
Before software components distributed across networked computers can communicate with each other, several DCOM security settings must be modified on the server computer. The steps below ensure a client computer can access data from a registered new or legacy format tank located on a server computer.
In this example, the computer connected to the TDT hardware is named TDTServer. The computer that will run OpenController or TDevAccX remotely has a user account client1 with password password1.
Server Computer
Create a user account on the server computer:
- From the Control Panel, double-click Administrative Tools and then double-click Computer Management. If necessary, expand System Tools in the left panel and then expand Local Users and Groups.
-
Right-click Users and select New User from the shortcut menu.
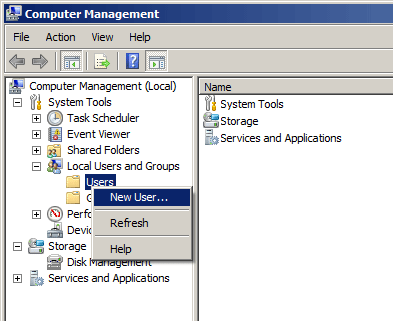
The account user name and password MUST match the client computer's user name and password.
-
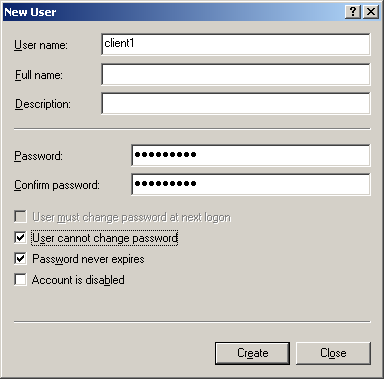
In the New User dialog box, type the user name (client1) and password (password1) in the corresponding fields.
Clear the User must change password at next logon check box and then select the User cannot change password and Password never expires check boxes.
-
Click Create and then click Close.
This account must be an Administrator. To grant administrator privileges you must add that user to the Administrators group.
Add the user to the Administrators group:
-
In the Computer Management window, under System Tools and then Local Users and Groups, click **Groups **in the left panel.
-
In the window on the right, right-click the Administrators group and select Add to Group on the shortcut menu.
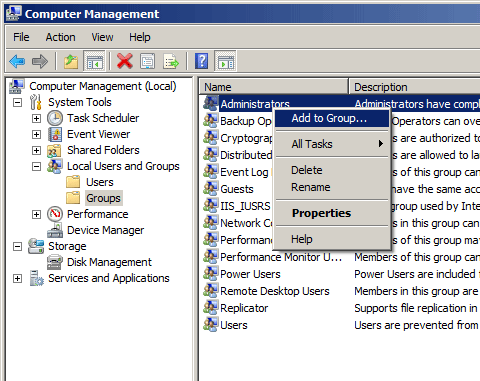
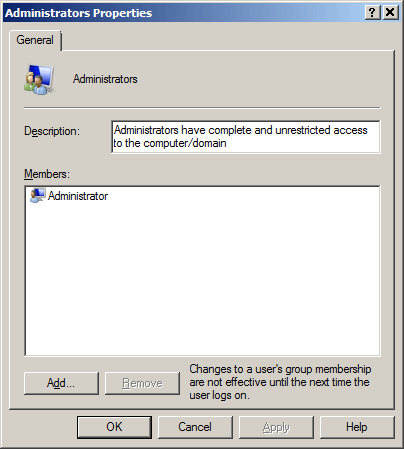
The Administrators Properties window will open.
-
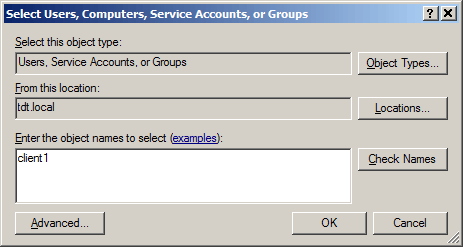
Click the Add button. The Select Users, Computers, Service Accounts, or Groups window will open.
-
Enter the user name in the Enter the object names to select field and click the Check Names button.
Note
If the user is not found, you may need to browse for a different location, using the Locations button.
If the computer is on a domain, this step will have to be performed for both the local account and the network account.
To change between the local machine and the network, click Locations and select either the machine or the network and click OK to return to the previous window.
-
In the Select Users, Computers, Service Accounts, or Groups window Verify the spelling, and click OK.
-
Close the **Computer Management **window.
-
The Control Panel and Administrative Tools windows should still be open (if not, reopen now). Double-click **Component Services**in the panel on the left.
-
Expand Component Services, expand Computers, right-click My Computer, and click Properties.

-
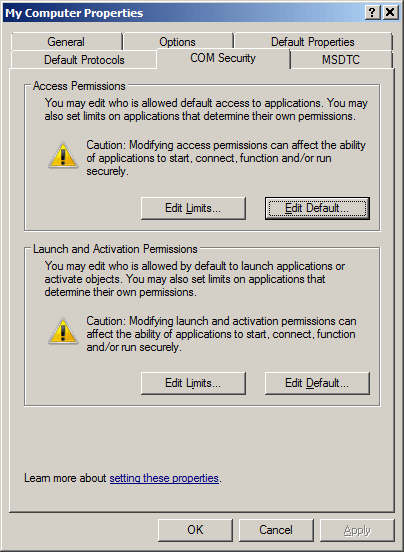
In the My Computer Properties window, click the COM Security tab.
-
Under Access Permissions, click the Edit Default button.
-
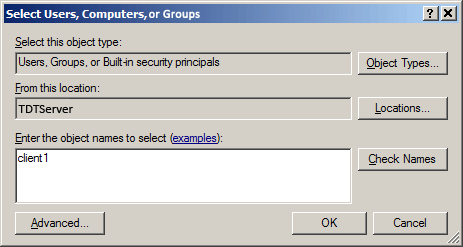
Under Access Permissions in the My Computer Properties window, click the Add button. The Select Users, Computers, or Groups window is displayed.
-
In the Enter the object names to select field, type client1.
-
Click the Check Names button.
Note
If the user is not found, you may need to browse for a different location, using the Locations button.
-
Verify spelling, then click OK.

-
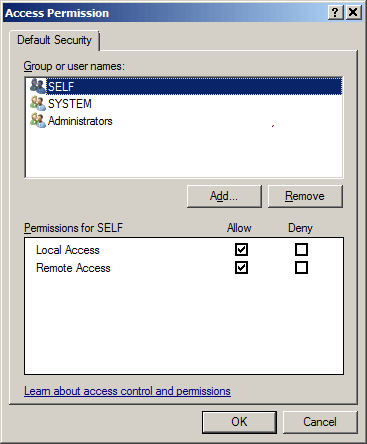
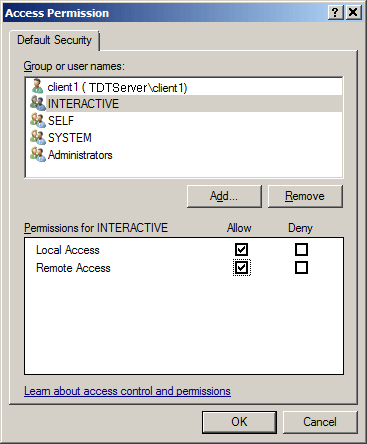
In the Access Permissions window, ensure the names SYSTEM, INTERACTIVE, and client1 are all present and all have Local Access and Remote Access permission.
If any group names are missing, click Add to enter the group name.
-
Click OK.
-
Under Access Permissions in the My Computer Properties window, click the Edit Limits button and then click the Add button.
-
In the Enter the object names to select field, type client1. Click the Check Names button, verify spelling, then click OK.
-
In the Access Permission window, ensure the group names ANONYMOUS (or ANONYMOUS LOGON), Everyone, and client1 are all present and all have Local Access and Remote Access permission. If any group names are missing, click Add to enter the group name as before.

-
Click OK. and return to the My Computer Properties window, COM Security tab.
-
Repeat steps 10-20 under the Launch and Activation Permissions options.
Turn off the windows firewall:
-
From the Control Panel, open Windows Firewall, and select the Off radio button.
-
Click OK.
-
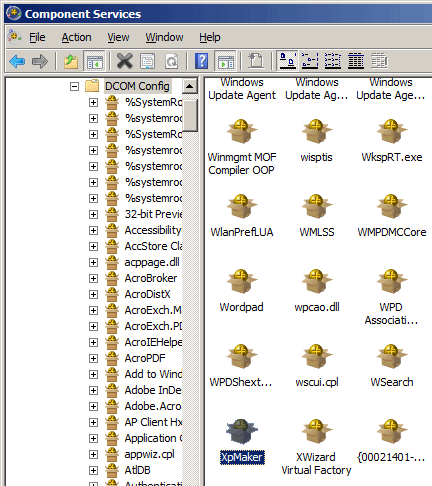
From the Control Panel, double-click Administrative Tools, and then Component Services. Expand Component Services, expand Computers, expand My Computer, and double-click DCOM Config (you can click No if you are asked to record a registry value at this point).
-
Right-click XpMaker and select Properties.
-
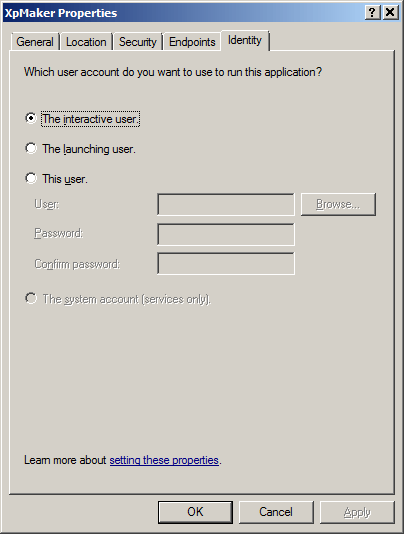
On the Identity tab, ensure that The Interactive User is the account selected to run this application.
-
Repeat steps 3 and 4 for TTankEng in the DCOM Config.
-
After you finished making the security setting changes, reboot the server computer.
Client Computer
Test the communication link by pinging the server computer from the client computer and verifying the connection in OpenController.
To ping the server computer from the client computer:
-
From the Start menu type
cmdin the search box.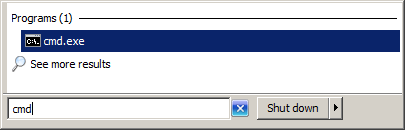
Press the Enter key.
-
A DOS command prompt opens, type
ping TDTServer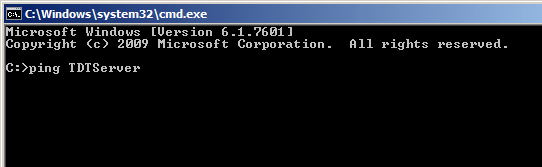
-
Verify that the server computer was reached and responded to the ping.
Add a registry entry with the user name and password of the client computer:
-
From the Start menu type
regeditin the search box, and press the Enter key. If a prompt for confirmation is display, click Yes. -
In the Registry Editor window, expand HKEY_LOCAL_MACHINE, SOFTWARE, Wow6432Node, TDT, and then TTank.
Note
For Windows 7 32-bit systems, expand HKEY_LOCAL_MACHINE, SOFTWARE, TDT, and then TTank.
-
Right-click the EnumServers folder and select New String Value.
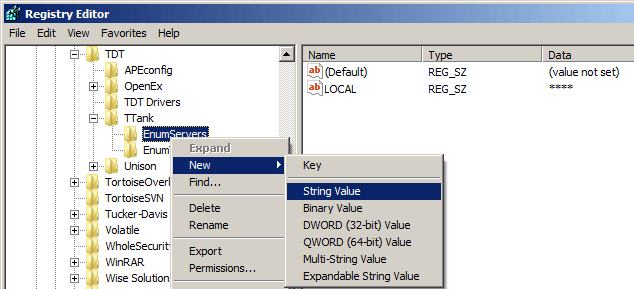
-
Type the server name (TDTServer) as the Value Name and press Enter.
-
Right-click the Value name and click Modify. Add the server name, user name and password for Value Data in the following form:
TDTServer client1 * password1
Important
This is case sensitive and must include the asterisk and spaces
After the entry is added, the registry should look like the example below:

While Workbench is running on the server computer, test communication from the client in OpenController.
-
Launch OpenController.
-
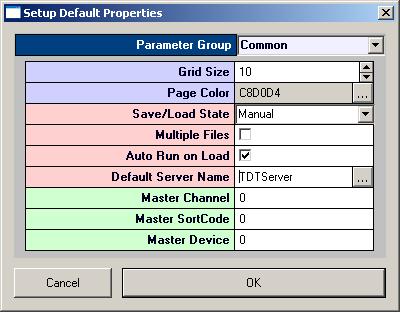
In the Edit menu, click Window Property. The Setup Default Properties dialog will open.

-
In the Default Server Name box, click the "..." browse button to view available servers.

The server name that was entered in the registry is now available.
-
Click TDTServer to highlight it, then right-click TDTServer, and click Test Connection on the shortcut menu.
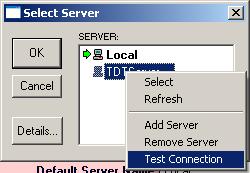
-
If the connection was successful, the following message dialog will be displayed:
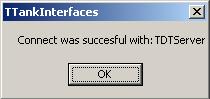
-
Click OK.
-
Double-click TDTServer to select it as the default server for Controller.
-
Click OK.
You should now have access to the Workbench server running the TDT equipment just like you would if you were running Controller locally on that machine.
-
On the client computer, launch OpenController.
-
Add a ValueWatch control.
-
Double-click the ValueWatch control and click the "..." browse button for the Source Target. The Select Target dialog will launch and display available targets as shown below. If this dialog is empty, or if you get an Access Denied error, try turning off User Account Control (UAC) on both machines, reboot and test again.
-
If you are simultaneously accessing tank data while Workbench is recording, test tank communication from the client in OpenScope.
-
Launch OpenScope.
-
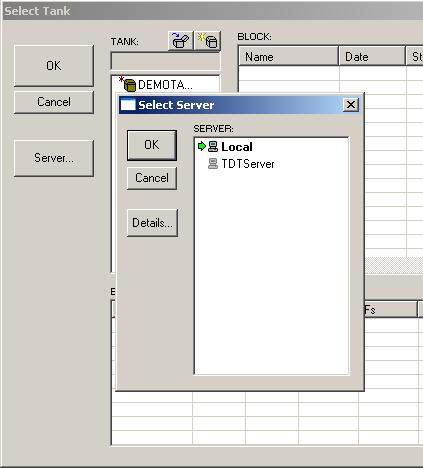
In the File menu, click Data Source to open the Select Tank dialog.
-
Click the Server button to open the Select Server dialog.
-
Repeat steps 8-11 to test communication and select the remote server.
-