Upgrading from RA4PA to Medusa4Z
Hardware Setup
Unlike the older RA4PA/RA4LI combination, the Medusa4Z must be setup before it can be used. To do this:
-
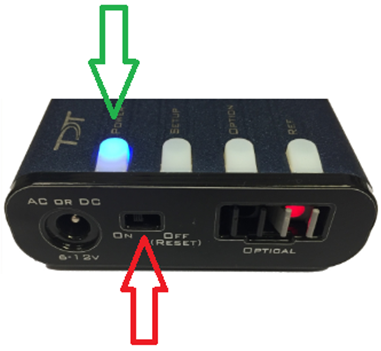
There is a recessed On/Off switch on the side of the Medusa4Z shown below with the red arrow. This must be in the On position for use. Under normal operation this switch should not be used (that it why it is recessed) because when you turn it to the Off position, the Medusa4Z will also reset all of the settings to their defaults. For normal operation, the Power button on the top of the Medusa4Z should be used. This is shown below with the green arrow.
-
With the Medusa4Z powered on, and at the main screen, press the Setup button once. This will bring you to the Active Channels screen. For a normal ABR this should be set to Single. You can toggle through the options with the Option button.
-
With the Medusa4Z powered on, and at the main screen, press the Setup button twice. This will bring you to the Sample Freq screen. For a normal ABR this should be set to the 12 kHz mode. Pressing the Option button allows you to toggle through the options.
-
With the Medusa4Z powered on, and at the main screen, press the Setup button three times. This will bring you to the Impedance Frq screen. For a normal ABR this should be set to the 1 kHz mode. Pressing the Option button allows you to toggle through the options.
-
With the Medusa4Z powered on, and at the main screen, press the Setup button four times. This will bring you to the Highpass Filter screen. For a normal ABR this should be set to the 1 Hz mode. Pressing the Option button allows you to toggle through the options.
-
With the Medusa4Z powered on, and at the main screen, press the Setup button five times. This will bring you to the Auto Shutdown screen. This is an optional feature that can be disabled if the user wants, however, we recommend the 3 hour setting. In the case of a long ABR paradigm, the 1 hour setting may be too short and the PreAmp may shut off while the experiment is ongoing. Setting this to 5 Hours or Never can result in unnecessary battery drain. Pressing the Option button allows you to toggle through the options.
The shutdown counter resets any time the user presses any button on the top of the Medusa4Z. For example, when they check the impedance of their next subject the counter will reset.
-
With the Medusa4Z and the RZ6 turned on and connected to each other, look at the Medusa4Z main screen. You want to see Med4Z in the top left corner. If you see NoOpt! This indicates an optical failure between the RZ6 and the Medusa4Z.
-
With the Medusa4Z and the RZ6 turned on and connected to each other, look at the Medusa4Z main screen. You will notice a battery icon and a battery life indicator with a percentage on the top right corner. I recommend not starting an ABR with less than 20% battery life remaining. The Medusa4Z will charge from dead to 90% in only 4 hours with the included charger. Other chargers may be used (up to 12 volts) but the charge time may be reduced.
-
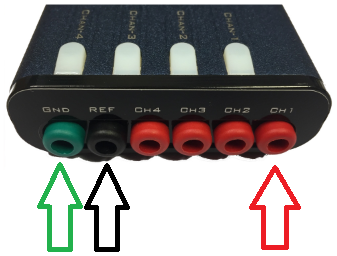
The 1.5 mm touchproof connectors that are also on the RA4PA/RA4LI will work with the Medusa4Z. Nothing has changed regarding the recommended electrode locations, CH1 should be at the vertex, GND should be at the contralateral mastoid, REF should be at the ipsilateral mastoid. For a normal ABR, CH2, CH3, and CH4 will be unused.
-
With the setup outlined above complete, you can now check the REF and CH1 impedance by pressing the REF and Chan-1 buttons on the top of the Medusa4Z. In a mouse model with needle electrodes, you should see an impedance values of approximately 1k. Slightly higher/lower isn’t a problem as long as your REF and CH1 impedances match each other. I recommend reseating or replacing the electrodes if the impedances are more than 20% apart from each other.
Software Updates
In order to use the Medusa4Z you must have the TDT Drivers, BioSigRZ, and all other TDT software at least at v95. Updates are available on our Downloads page if you find anything is out of date.
Hardware Updates
In order to use the Medusa4Z your RZ6 microcode must match your BioSigRZ version. The update instructions are also on our Downloads page next to the TDT Drivers/RPvdsEx https://www.tdt.com/files/fastfacts/Microcode.pdf.
Software Configuration Changes
-
For mouse models with the Medusa4Z, you will need to make a few changes to the stock "Root_ToneABR.acf" file:
-
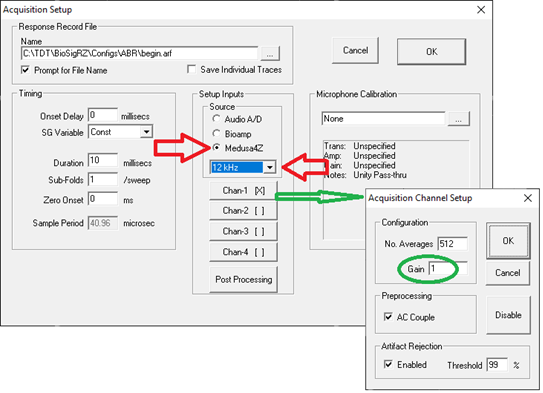
From the menu bar click Setup → Acquisition. In the Acquisition Setup screen change the Source radio button from Bioamp to Medusa4Z and set the drop down menu to 12 kHz. See below indicated by the red arrows.
-
Immediately below the Source setup you will see a "Chan-1" button. Press this and change the gain from 20 to 1. See below indicated by the green arrows.
-
-
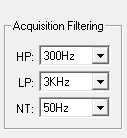
On the lower left corner of the BioSigRZ screen you can set the Acquisition Filters. In most cases the best data is found with the following settings:
Note
The NT filter should match the frequency of the mains power coming from your wall. You will see papers from around the world where this setting will vary. If the RZ6 is moved to a new location, check to be sure the NT filter is set appropriately based on the frequency of the power being used.
Once the settings have been edited, we recommend saving the resulting file with a new name, something like "Template_ToneABR.acf" because this file should be used going forward as a template for all Tone ABRs for this rig.
Wrapping up
Before running any subjects with any ABR system, we recommend running a saline test. Only when the saline test looks good should you proceed to test with a subject.