Running the Experiment
After you feel comfortable with the system, you can begin to collect data. We recommend reading through the entire guide before using a live subject.
Check Sedation
If the subject is not fully sedated throughout testing, subject responses, such as muscle movements or distress, can interfere with DPOAE recordings. To avoid this, always check the subject before beginning your experiment and monitor the subject for signs of wakefulness during testing.
Toe Pinch
For small lab subjects, a toe pinch is the most effective method to check for full sedation. Extend the rear leg and use your fingernails to firmly pinch toe or foot webbing. There should be no recoil. If there is any response, such as leg movement, the subject is not adequately anesthetized.
Note
Startling the subject with a loud clap or loud noise is not a rigorous enough way to check sedation. A subject may not respond to clapping even when only partially sedated. Also, a test subject with hearing loss may not respond regardless of sedation level.
Check Integrity of the Signal Path
Good positioning of microphone and ear tubes is critical to getting a useful recording of the DPOAE response.
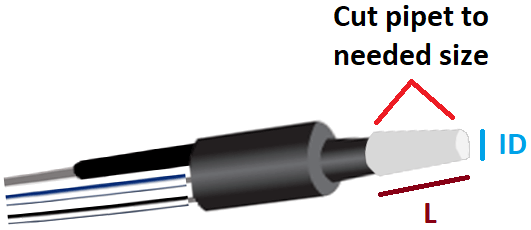
Check the positioning of the DPM1's Ear Tip, making sure there is good fit, with no gaps between the Ear Tip and the subject's ear. If the subject's ear is too small for good positioning, a pipet tip can be used to step down from the size of the Ear Tip into the subject's ear.
 |
| Ear Tip |
Length (L) should be as small as possible.
Inner Diameter (ID) should be as big as possible.
Check the seal of the clear tubes at the MF1 tube-tip and at the DPM1 Ear Tip. The clear tube should slide snugly into the tube tip and snugly onto the Ear Tip's stainless steel input tubes.
Check the tubes to make sure they are as straight as possible and they are not crushed or crimped.
Make sure the in-line filters provided with the MF1 speakers are connected between each MF1 and the cable that connects it to the RZ6.
Begin Experiment
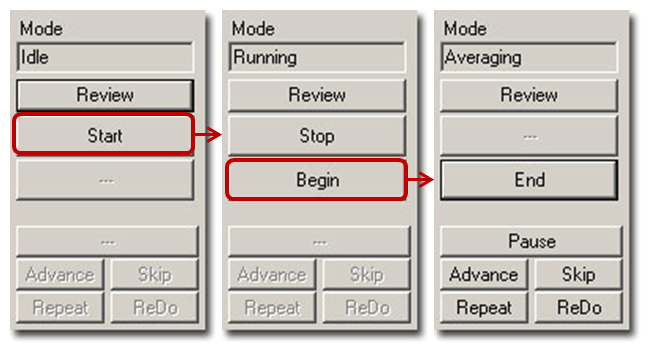
BioSigRZ is the user interface for DPOAE testing. It has three modes of operation: Idle, Running, and Averaging. Before you begin, it is in Idle mode. You can begin stimulus presentation or run the experiment using buttons on the left side of the BioSigRZ software main window. The options change depending on the mode. See below for more information about the operating modes.
To begin stimulus presentation:
-
Click the Start button. You may be prompted to specify a response record file where data will be stored.
-
If prompted, type a name in the File Name field and click Open
You are now in Running Mode.
The stimulus signal is presented using the first SigGen Index (SGI) in the stimulus schedule. No data is collected.
To begin data averaging:
-
Click the Begin button.
-
A Subject Information window opens. Information entered here is stored with the data in the response record file (.arf).
-
Enter any subject information and click OK.
You are now in Averaging Mode.
The first stimulus is presented and the DPOAE response data is acquired and included in the running average until the desired number of responses has been collected at that level. As averages are completed, the averaged DPOAE records will be appended to the History plot and the .arf data record file.
Modifying the Stimulus Schedule
BioSigRZ provides several functions that allow you to override the current stimulus schedule and control data averaging in real-time.
Advance Current SGI is halted and running average is saved. Stimulus presentation advances to the next SGI in the stimulus schedule.
Repeat Current SGI is halted and running average is saved. Stimulus is presented again at the current SGI.
Skip Current SGI is halted and running average is discarded. Stimulus presentation is advanced to the next SGI in the stimulus schedule.
Redo Current SGI is halted and running average is discarded. Stimulus is presented again at the current SGI.
Multi-Purpose Plot
During averaging, the Multi-Purpose Plot may be used to display a variety of signals. The plot is controlled through the use of the Plot Control Toolbar, available from the right-click menu. You can also control scaling using the toolbar. Consider using the options described below.
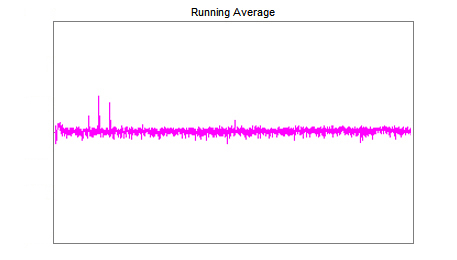
Running Avg This view displays the current running average in the frequency domain.
Zooming Click and drag from left to right over the area of interest to zoom in and change the scale of the frequency axis. Click and drag from right to left to zoom out.
Termination
In BioSgRZ, control of termination of the signal presentation and acquisition is called boundary control. When a boundary is reached and the SGI stops incrementing, signal generation will continue for the current SGI, but no more response data will be collected.
You can manually terminate data averaging at any time by clicking the End button. This returns the system to Running mode.
You can halt stimulus presentation and return the system to Idle mode or run the experiment again by clicking the Stop button.
Click Begin to run the experiment again and enter the new subject information.