Modifying the Stimulus
When the stimulus is defined, a complete list of signal parameters and variables are added to the BioSigRZ file. During stimulus presentation, the values of the variables change as a function of the SGI. This is called the stimulus schedule.
You may wish to present a subset of the current stimulus schedule. Both the stimulus schedule and the variable definitions can be modified in BioSigRZ. To do so, display the stimulus schedule (as below) then select the SGIs to be included in the subset for presentation.
To view the current stimulus schedule:
-
Select Modify Schedule from the Operations menu.
-
Or select SigGen Variables from the Setup menu.
-
Or click the Modify Schedule button.
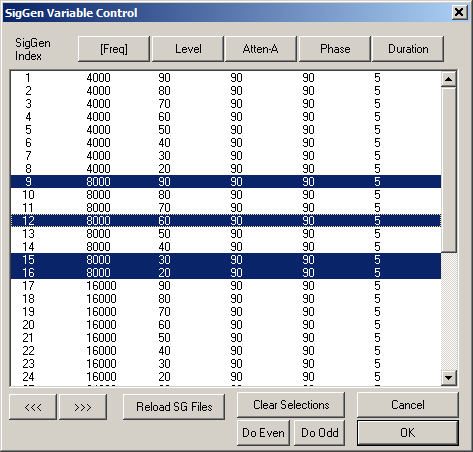
The SigGen Variable Control dialog displays the current stimulus schedule. Variable values are shown for each SGI. Select SGIs to include in signal presentation by using standard Windows techniques, such as click, SHIFT-click, and CTRL-click. You can also choose to 'Do Odd' or 'Do Even', using buttons in the dialog box. When no SGIs are selected, BioSigRZ will present the entire stimulus schedule. Otherwise, BioSigRZ will present only the selected SGIs.
Modifying Variables
The variables can also be modified to meet your needs.
To modify a variable:
-
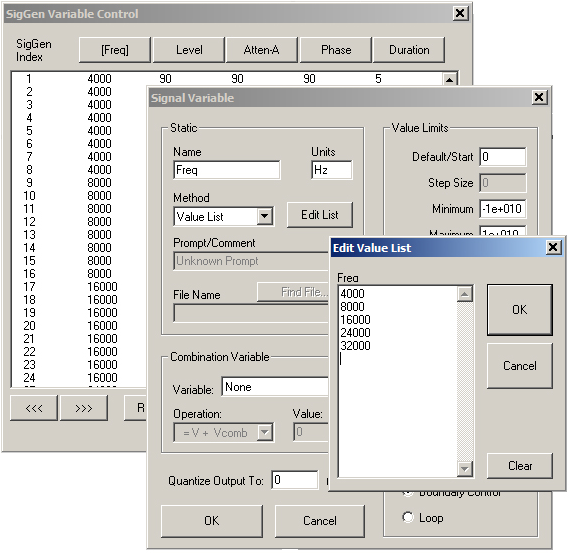
Click the variable button for the desired variable, such as Freq.
-
In the Signal Variable dialog box, make any changes then click OK to confirm and return to the SigGen Variable Control.
Different variables may have different editable options. For example, the variable frequency for a tone stimulus may be configured by entering a Value List (shown below).
Important
The changes will only be saved in the configuration file, if the Lock SigGen Files check box is selected in the Stimulus Setup dialog bog. If this check box is not selected, any changes to variables or SGI selections for presentation will be lost.
Also, if you select the Reload Files button in the Stimulus Channel Setup window, the changes will be overwritten in favor of the values in the .sig file.
The schedule tool was designed for quick edits you may want to make while testing or setting up a new paradigm. For permanent edits to your stimulus, TDT recommends using SigGenRZ (included with BioSigRZ installations) to modify the stimulus files (.sig) directly.
Customizing the Stimulus
SigGenRZ is a signal design software that enables you to create stimuli in a dialog box driven environment. Most importantly, it allows most settings to be used as variables for your experiments. All of the signals used in the BioSigRZ out-of-the- box experiment configurations have been created in SigGenRZ. It is also a helpful tool for modifying aspects of the stimulus that are not editable from within BioSigRZ.
To modify a file directly in the SigGenRZ software you will need to follow these basic steps:
-
Open the stimulus file (.sig) in SigGenRZ.
-
Make changes in the file.
-
Save the file or save the file with a new name.
-
Open the desired BioSigRZ configuration file (.acf).
-
Load or reload the stimulus file.
-
Save the BioSigRZ configuration file.
Opening the File
The stimulus files (.sig) for the BioSigRZ out-of-the-box experiment configuration are stored at:
C:/TDT/BioSigRZ/SIG/
For DPOAEs there are two files: DPOAE1.sig and DPOAE2.sig.
It is generally a good idea to leave the original files unchanged and in place, but you can still use and modify these files then rename the file.
To open the signal file you wish to modify:
-
Click the Start button on the Windows taskbar, point to Programs, point to TDT Sys 3, and click SigGenRZ.
-
Select Open from the File menu.
-
Click the desired file name.
-
Click OK.
To save the file with a new name:
-
Select the signal by clicking anywhere in the signal window.
-
Choose Save As from the File menu.
-
The Save As dialog box will be displayed.
-
Type a new name for the signal and click OK.
SigGenRZ builds a signal from mini-signals called segments. The standard DPOAE stimuli have only one segment. Some settings affect the entire signal while others affect only a segment.
The most common changes to the signal settings include Level, Frequency, F1, and F2. These can be found in the Signal Parameters dialog box.
To open the Signal Parameters dialog box:
- Click Signal from the Modify menu.
The most common changes to the segment parameters include: Gate Type, Gate Time and Duration. Parameter settings that define the segment can be modified in the Edit Signal Segments window.
To access the Edit Signal Segment window:
-
Select Modify → Segment menu option in the main window.
-
Or double-click the segment marker in the signal window.