Calibration
All speakers have some variation in output across frequencies. When you use a speaker with a known frequency response in BioSigRZ, you can adjust the stimulus output for these known frequency characteristics by applying a Calibration File (.tcf) in the Stimulus Setup. You can create custom files specifically for your speakers and setup, using BioSigRZ's Calibration tools.
During calibration, BioSigRZ performs a sweep over the frequency range of interest and generates a speaker response curve along with a correction curve that would be required to flatten the response. An FIR filter is calculated from the correction curve and stored in the contents of the calibration file. When you load the calibration file, that filter is loaded onto the RZ6 so that any tones presented through the RZ6 will be calibrated to have a flat response across all frequencies.
The first time you run a DPOAE, we recommend skipping calibration until after you have been able to successfully record a DPOAE response. If the system has not yet been fully tested, using a custom calibration file can make problems more difficult to diagnose.
When you're ready to tackle calibration, you can review the BioSigRZ Manual. It covers a standard single channel speaker calibration. The remainder of this section covers important details you'll need for calibrating your DPOAE setup.
DPOAE Calibration
DPOAE testing differs from other hearing tests in two key ways that affect calibration: it always uses two channels and it's always closed-field.
Because the two stimulus tones (F1 and F2) are presented on separate channels, with two different speakers, you will need two calibration files (.tcf), one for each of the two stimulus speakers.
The closed-field nature of DPOAEs makes it even more important that you use calibration files that are not only specific to your speakers, but specific to your setup. Tube length, curve, and position in the ear can all affect the frequency characteristics of the delivered stimulus. TDT recommends in-ear calibration, using your experiment setup, to get the best possible results. An added benefit of this type of calibration is that it is a good test of the fit and seal of the tubes and their positioning in the ear.
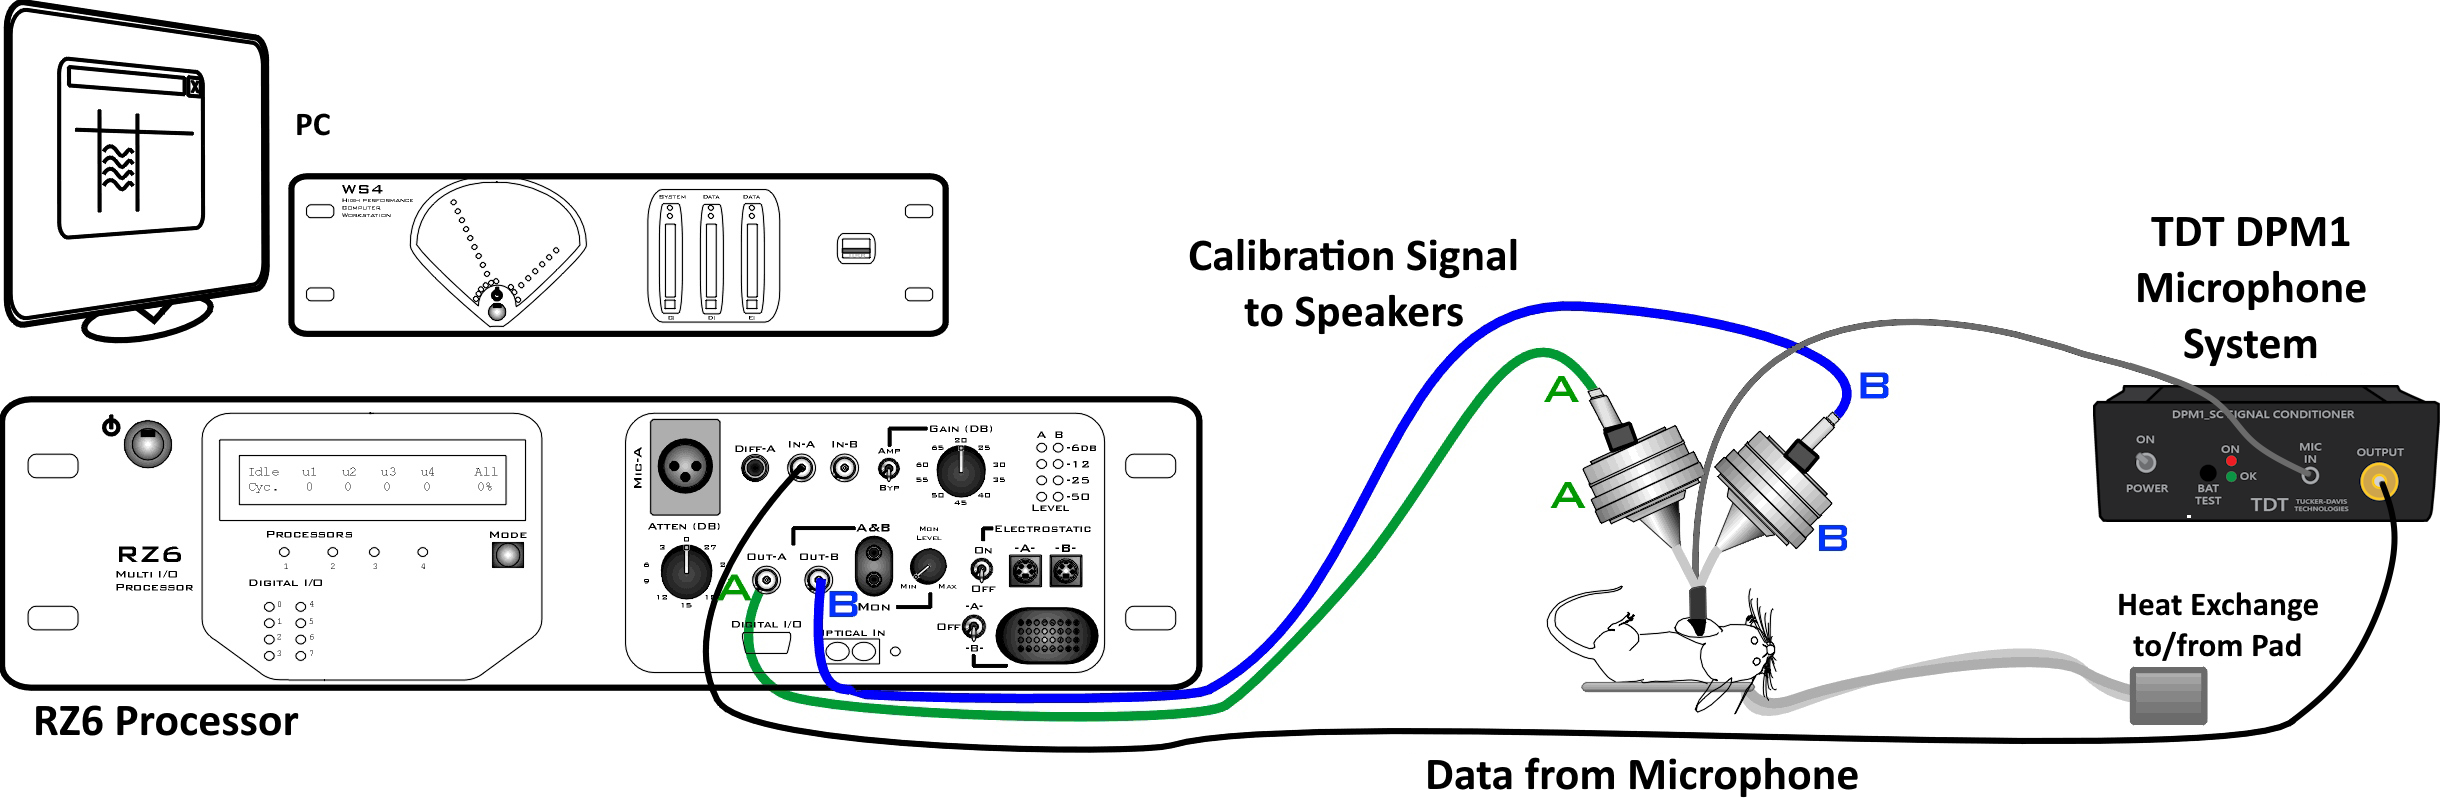
Hardware Setup
For in-ear calibration, you must have everything set-up as you will for your experiment. That is, your subject is sedated and the microphone is in the subject's ear.
 |
| In-Ear DPOAE Calibration Setup |
The Amp/BYP switch on the front of the RZ6 will be set to BYP in most cases. In BYP (bypass) mode, the Gain knob is not used and will not affect the signal.
Because you'll be creating and using two TCF files and it is critical to use the correct file for each speaker when you begin testing, TDT recommends labeling the speakers and each connection point (as pictured above, using 'A' and 'B' with colored stickers, polish, or paint) to identify the speaker. Whatever labels you use can also be appended to the TCF file names to distinguish between them.
Creating the Calibration Files in BioSigRZ
When you're ready to run your calibrations, follow the instructions in Creating a Custom Calibration (.tcf) File in the BioSigRZ Manual, with the following changes.
In the Calibration window under Microphone Calibration, select the DPM1_600mV.tcf file.
The A/B switch in the Probe area allows you to turn off one of the speakers while calibrating the other. The first time you run through the calibration, set this switch to 'A'. Speaker 'B' will be turned off, temporarily. When you're satisfied with the new calibration file you've made, be sure to save it, using "A" in the name.
Next, change the switch to 'B'. Do NOT change hardware connections. Speaker 'A' will be turned off temporarily, so that speaker 'B' can be calibrated, with no changes to your setup. Run the calibration again, and when you're satisfied with the new calibration file you've made, save it with "B" in the name.
When you have created your two calibration files (.tcf), you can close the Calibration window. Open the Setup and Stimulus menu and assign the newly created speaker-specific TCF files for channels one and two.
You can use the calibration verification utility (also described in Testing the Calibration (TCF) File, in the BioSigRZ Manual.
Important
To ensure accurate calibration, give the microphone 10 minutes to warm-up before testing.
How Often to Calibrate
For DPOAE recordings, TDT recommends in-ear calibration for each subject. Please note that the DPM1 is not a calibration microphone.
Testing Speakers and Microphones
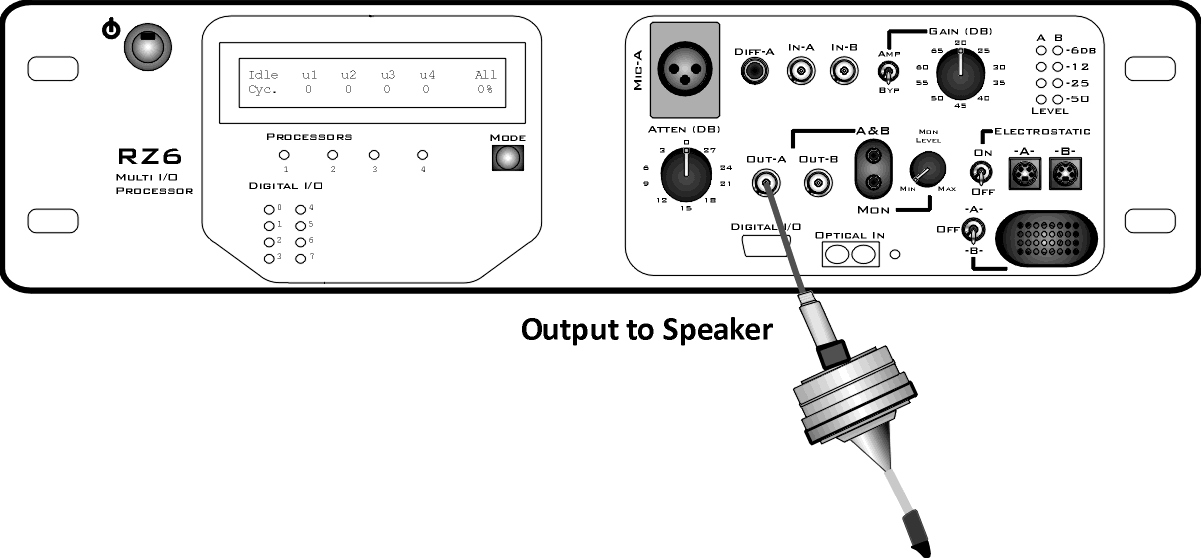
A simple RPvdsEx test circuit can be used to ensure your speakers and
microphones are working. The test circuit, SpeakerMicTest.rcx, is part
of the BioSigRZExamples.zip
zipped example folder, which can be downloaded from the TDT website.
Speaker Test
If you suspect that your speakers may not be functioning correctly, download and extract the zipped files to:
C:\TDT\BioSigRZ\RCX
Then double-click the SpeakerMicTest.rcx file to launch RPvdsEx and open the file.
To use this circuit there are a few steps required for setup:
-
Connect your speaker to Out-A.
RZ6 with MF1 Speaker
To test your speakers:

Click the Compile, Load, Run button on the toolbar. You should be able to hear a tone from the speaker.

Click the Stop button to stop the test.
Repeat with second speaker.
Microphone Test
After you've confirmed at least one speaker is working, connect the calibration microphone and run the circuit again.
Important
To ensure accurate calibration, give the microphone 10 minutes to warm-up before testing.
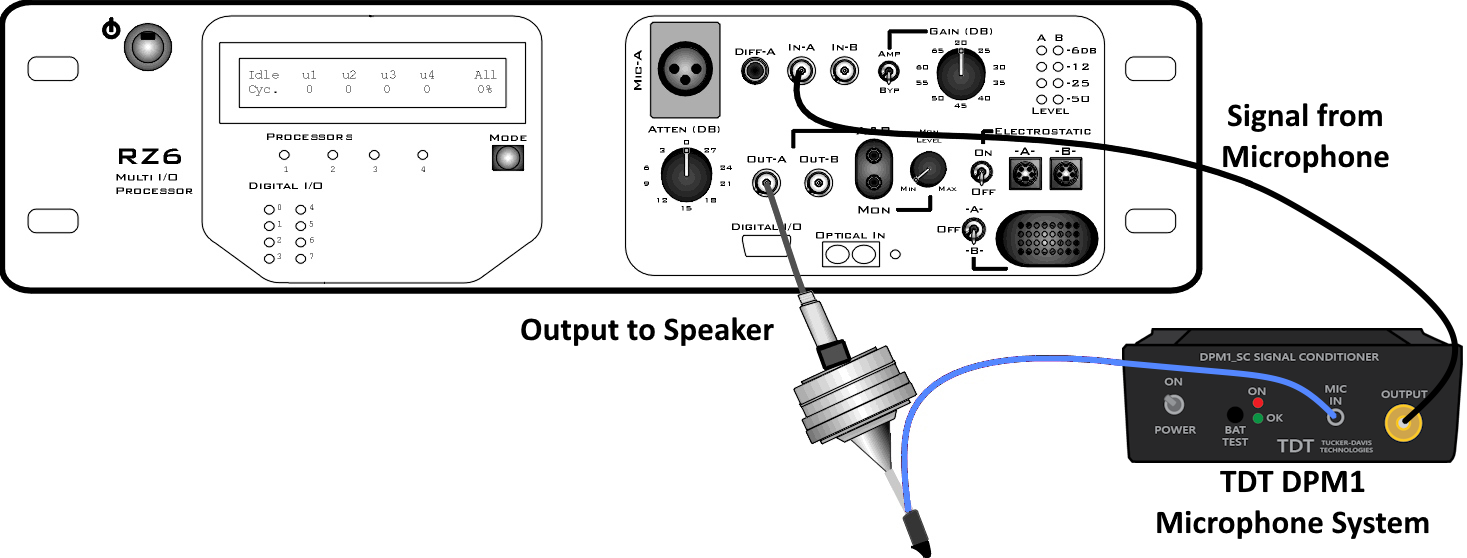 |
| RZ6 with MF1 Speaker and DPM1 Microphone |
To use this circuit there are a few steps required for setup:
To use this circuit there are a few steps required for setup:
-
Connect your DPOAE Microphone to the In-A port on the RZ6.
-
Ensure your Amp/BYP switch on the front of the RZ6 is set to Bypass.
You should be able to see a sine wave in the graph in RPvdsEx. You may need to adjust the scale using the green arrows on the sides of the graph. Click the Stop button again to stop the test.