ABR Using a Tone Stimulus Example
This example introduces BioSigRZ's streamlined interface and will illustrate the three types of workflows you're likely to use in your lab.
-
Initial Experiment Setup - The first time you set up an experiment, you'll select one of the standard configurations provided, setup your system, update the configuration file to match your hardware, and save the project with a new name. The experiment and any other modifications you make will be saved as part of the configuration.
-
Daily Operation - Once a configuration has been setup for your experiment, daily operation is as simple as loading a file, prepping your subject, and collecting data.
-
Modifying Stimulus Variables - The standard configuration files provide the most common variable values, but you can easily modify them directly in BioSigRZ. Once changes are made they are saved in the configuration file for future trials.
Initial Experiment Setup
To setup the experiment for the first time, you will need to perform the following steps:
-
Connect the hardware.
-
Run BioSigRZ.
-
Load the standard configuration file.
-
Select your transducer and device input.
-
Specify a response record file.
-
Save the configuration with a new name.
Connect the Hardware
Before running an experiment, TDT hardware must be set-up and turned on. See the System 3 Installation Guide provided with your system for set-up instructions. The diagram below illustrates typical wiring connections for an ABR experiment.
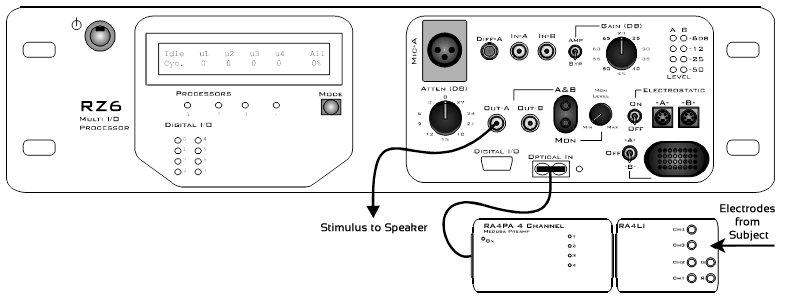
The stimulus is generated on Channel A. A single transducer is connected to this output channel. If a magnetic speaker is used (such as the MF1), connect it to Out-A and make sure the Electrostatic switch is in the 'OFF' position. If an EC1 or ES1 electrostatic speaker is used, connect it to Electrostatic -A- and turn the Electrostatic switch to 'ON'.
The RA4PA or Medusa4Z preamp is connected to the optical port on the front panel for data acquisition. If using an RA4PA, the RA4LI is connected directly to the RA4PA and the electrodes from the subject connect to the RA4LI touch-proof connectors. If using a Medusa4Z, the electrodes from the subject connect to the Medusa4Z touch-proof connectors.
Run the BioSigRZ Software
To run BioSigRZ:
- Double-click the BioSigRZ
 icon.
icon.
or
- Click the Start menu, point to Programs, point to TDT Sys3, point to the SigGen Solutions folder, and click BioSigRZ.
Load the Standard Configuration
In this example you'll begin with the standard configuration below for collecting auditory brainstem response (ABR) data in response to a pure tone stimulus:
C:\TDT\BioSigRZ\Configs\ABR\Root_ToneAbr.acf
Configuration files include information about how data will be acquired, such as number of averages, as well as information about the stimulus schedule and how it will be presented.
In this experiment, 5 ms tones with a gate time of 2 ms are presented at the following frequencies: 4000 Hz, 8000 Hz, and 16000 Hz. For each frequency, tone level varies from 90 dB SPL to 20 dB SPL in 10 dB decrements.
To load the configuration file:
-
Click the File menu and click Open Config. File.
-
Select the C:\TDT\BioSigRZ\Configs\ABR\Root_ToneAbr.acf file in the Open dialog box and click Open.
Before you can run the experiment you must specify a calibration file that corresponds to the transducer you will be using.
Select Your Transducer and Device Input
To simplify experiment setup and save you time, BioSigRZ is provided with calibration files for the most commonly used transducers and headstages/amplifiers. Additional calibration files may be available from TDT support.
To select your speaker calibration:
-
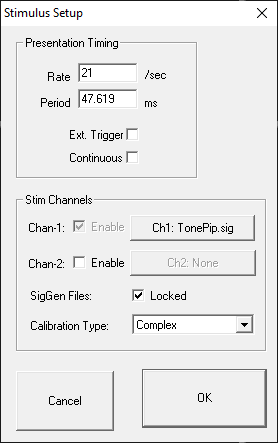
Click the Setup menu and click Stimulus.
-
Click Ch1: TonePip.sig.
-
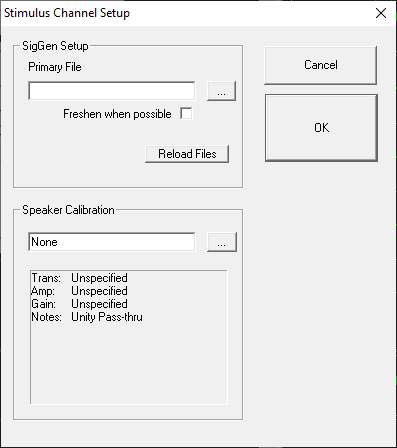
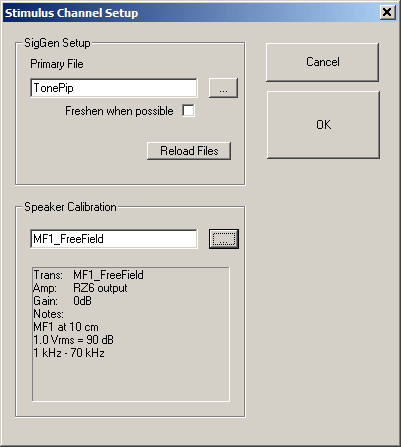
In the Stimulus Channel Setup dialog click the Browse button under Speaker Calibration.
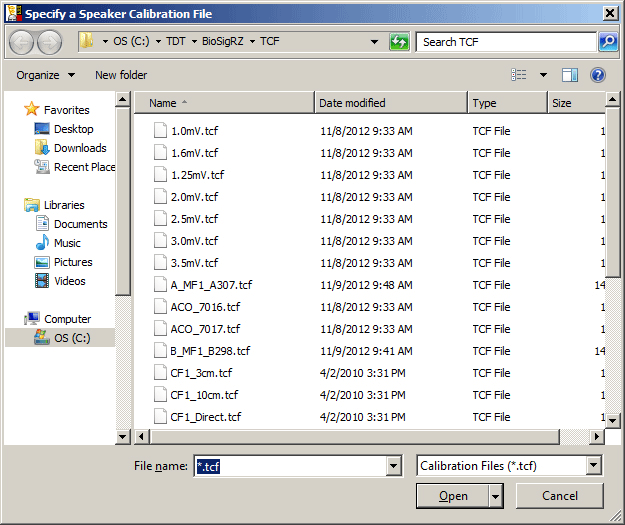
In the Specify a Speaker Calibration File dialog, calibration file names provide information about the type of speaker and calibration. For example, MF1_FreeField is a calibration file for the MF1 speaker in free field configuration calibrated at 10 cm from the subject. Several files are also provided for closed-field speakers positioned at several different distances depending on the length of tubing in use.
-
Select the appropriate file for your setup and click Open.
-
In the text area below Speaker Calibration, review the calibration information.
To ensure the accuracy of the calibration, set the manual attenuation on your RZ6 according to the gain value used in the calibration. For example: for the MF1_FreeField calibration shown above, you must set your manual attenuation on the RZ6 to 0 dB.
-
Click OK.
To specify your device input calibration:
-
Click the Setup menu and click Acquisition.
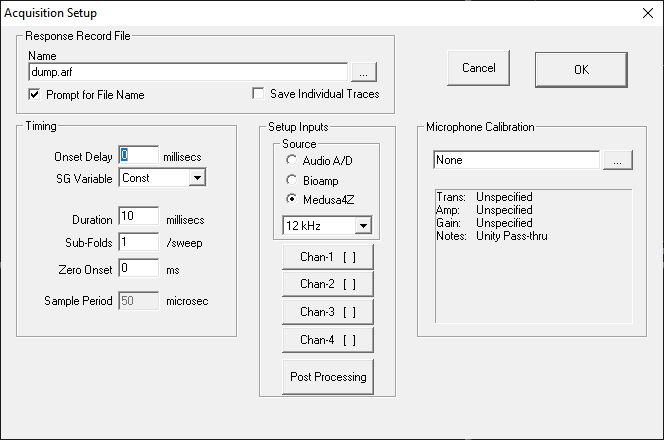
If using the RA4PA, select Bioamp. If using the Medusa4Z, select Medusa4Z and change the sampling rate to match the sampling rate on your Medusa4Z physical hardware. We recommend 12 kHz for ABR recording.
-
Click the Chan-1 button.
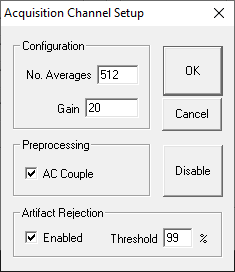
In the Configuration area, the Gain setting should match the gain of your preamplifier. If using the RA4PA/RA4LI combination, set this to 20, which is the gain TDT’s RA4LI. If you are using a Medusa4Z, set this value to 1. If you are using a third party amplifier you might need to adjust this value.
-
Click OK.
Specify a Response Record File
Response record files (.arf) are continuously maintained during data acquisition. Each averaged record is appended to the history record file. You can specify where the data will be saved in the Acquisition Setup dialog box.
To specify a record file:
-
Select Acquisition from the Setup menu or click the Setup Acquisition
 button.
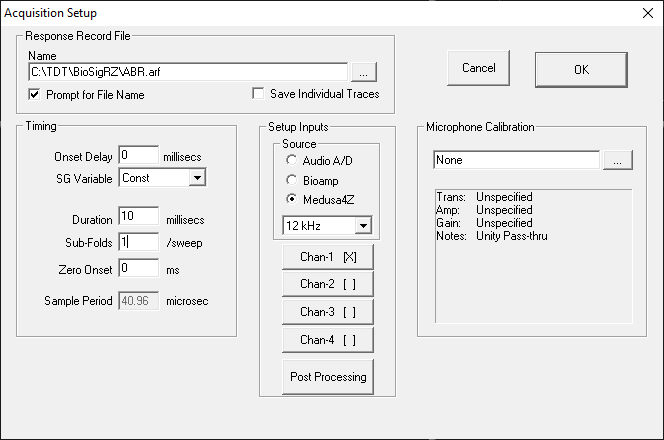
-
In the Name field, type a new file name or browse to a new location or file.
-
Ensure the Prompt for File Name check box is selected to be prompted for a new file name before stimulus presentation begins.
-
Click OK.
Save the .acf File
To save the configuration file:
-
Select Save Config. As from the File menu.
-
Enter a name in the File Name field.
-
Click Save.
Important
Some operating system configurations have file name and path character limitations. TDT recommends keeping file names, including path, short to avoid problems associated with long file names.
Daily Operation
Once the initial experimental setup has been completed, the daily operation is as follows:
-
Load your saved configuration.
-
Prepare the subject.
-
Review the input/output settings.
-
Run the experiment.
Load your Saved Configuration
You may load your initial setup configuration to perform daily operations for BioSigRZ.
To load the configuration file:
-
Click the File menu and click Open Config. File.
-
Browse to the location of your saved configuration file (*.acf) and click Open.
Prepare the Subject
At this time prepare the subject for experimental trial(s).
Review the Input/Output Settings
When making changes to an existing configuration file it is useful to quickly review or verify that the input/output configuration matches the equipment and transducer you are using.
To view input/output settings of the loaded BioSigRZ configuration file:
-
Click the Review button. This prompts the Transducer Setup and Settings dialog.
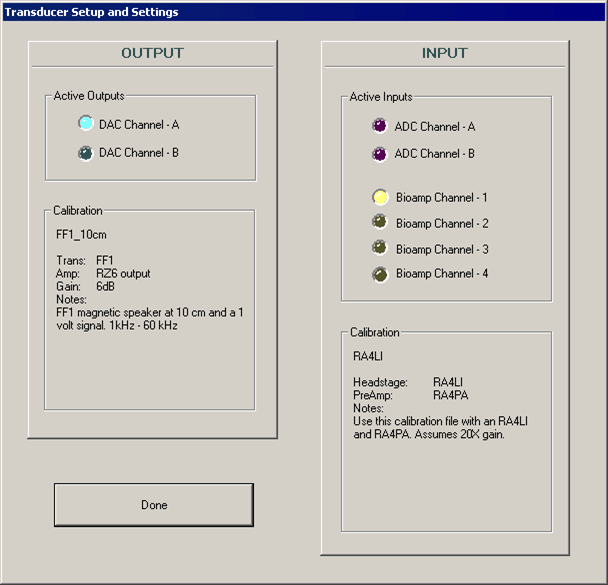
From the review dialog, the stimulus will be output on channel A, input will be acquired from Bioamp Channel 1, and the system is currently calibrated for a magnetic speaker at 10 cm with device input coming from an RA4LI headstage and RA4PA preamp. RZ6 manual attenuation should be set to -6 dB.
-
After you have reviewed the dialog and verified that the setup is correct, click Done.
Run the Experiment
You can begin stimulus presentation or run the experiment using buttons on the left side of the BioSigRZ main window.
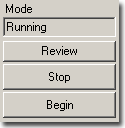
Running
To begin stimulus presentation:
-
Click the Start button. You will be prompted to specify a response record file where data will be stored.
-
Type a name in the File Name field and click Open.
You are now in Running Mode. The stimulus signal is presented using the first SigGen Index. No data is collected.
Averaging
To begin data averaging:
-
Click the Begin button.
-
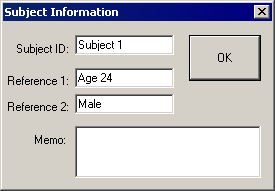
A Subject Information window opens. Information entered here is stored with the data in the response record file.
-
Enter any subject information and click OK.
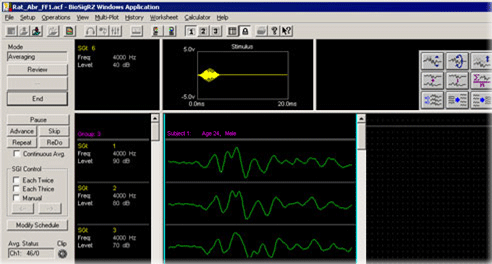
You are now in Averaging Mode. The first stimulus is repeatedly presented and the ABR response data is acquired and included in the running average until the desired number of responses has been collected at that level. In this experiment the number of responses averaged at each stimulus level is 512.
As averages are completed, the averaged ABR records will be appended to the History plot and the .arf file.
Termination
Once the boundary conditions have been met, BioSigRZ will automatically terminate data averaging. However, you may manually terminate data averaging at any time.
To manually terminate data acquisition:
- Click the End button.
At this point, you may halt stimulus presentation or run the experiment again.
To halt stimulus presentation:
- Click Stop.
To run the experiment again:
-
Click Begin.
-
Enter in the new subject information.
See Data Acquisition for more information on tools to control and streamline data acquisition and Data Analysis for more information on analyzing data during or after data collection.
Modifying a Stimulus Variable
As mentioned before, the standard ABR tone configuration probes the following frequencies: 4000 Hz, 8000 Hz, and 16000 Hz. Depending on the desired subject, you may wish to change the values of these probe frequencies. For example, for a mouse subject you might wish to probe 32000 Hz.
To modify a stimulus variable you will:
-
Load your saved configuration.
-
Review the stimulus variables.
-
Modify the frequency variable.
-
Save the modified configuration.
Load the Saved Configuration
To load the configuration file:
-
Click the File menu and click Open Config. File
-
Browse to the location of your saved configuration file (*.acf) and click Open.
Review the Stimulus Variables
To review the stimulus variables and schedule:
-
Select SigGen Variables from the Setup menu or click the Modify SigGen Variables
 icon. The SigGen Variable Control
dialog opens.
icon. The SigGen Variable Control
dialog opens.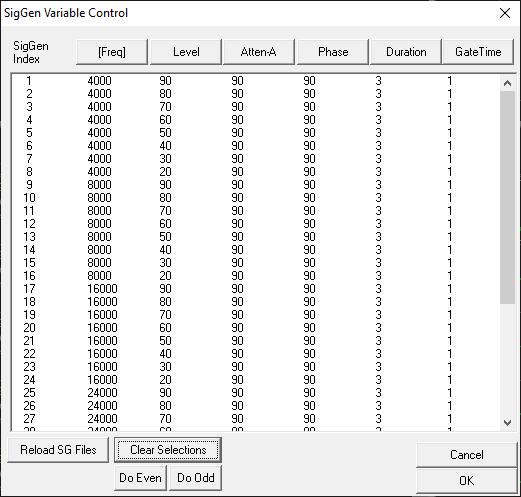
All of the variables which define the stimulus signal are displayed within this dialog. From here you can modify the stimulus schedule or modify the variables themselves.
The Stimulus Schedule
The SigGen Index (column 1) shows the order in which each variable condition, or SGI, will be presented. You can select a subset of conditions to run using standard Windows techniques. For more information, see Modifying the Stimulus Schedule.
Modifying Variables
Variables change the signal parameters as a function of the SigGen Index (SGI) and can be modified in BioSigRZ through the use of the Signal Variable dialog. See General Variable Parameters in the SigGenRZ Manual for more information on the variable parameters.
Note
When modifying the frequencies to be probed, make sure you use only frequencies in the calibrated range (see the speaker calibration notes for more information).
To modify the Freq variable:
-
In the SigGen Variable Control dialog, click the Freq button. The Signal Variable dialog opens.
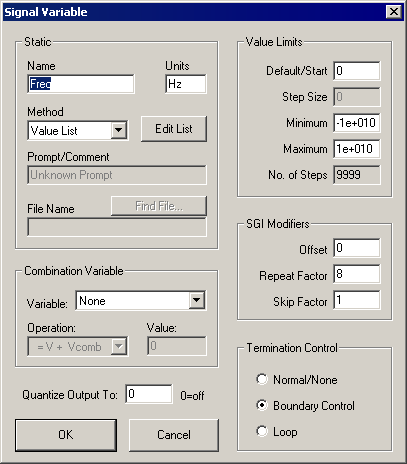
The variable Freq has been defined using the Value List method type.
-
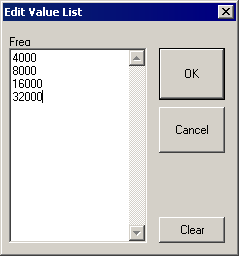
To add the desired frequency to the list, click the Edit List button.
-
In the Edit Value List dialog, add the value 32000 to the bottom of the list.
-
Click OK.
-
Click OK.
The frequency 32000 has been added to the schedule.
-
Click OK.
Save the .acf File
To save the configuration file:
- Select Save Config from the File menu.
Saving the file, saves any modifications you have made to the experiment configuration or stimulus variables. When you are ready to run the experiment again it's as simple as loading the file, specifying a record file, adding subject information, and collecting the data.