Export Settings
Using the Data Export Format Configuration Dialog Box
The Data Export Format Configuration dialog box is used to configure data for export before or during the export process.
To open the Data Export Format Configuration dialog box, click the Exp. Config button for a row. The settings available depend on the export format selected in the File Type box in the upper left corner of the dialog box.
After the export settings are configured, clicking the Save button stores the export information for future use and the color of the Exp. Config button text changes to blue.
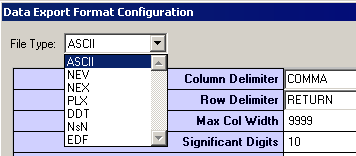 File Type Drop Down Menu
ASCII Export Settings
Column Delimiter: data is exported with the specified separators between columns.
- COMMA: each value is separated by a comma. This is the default Excel importing format.
- TAB: each value is separated by a tab.
- RETURN: each value is separated by a return character.
Row Delimiter: data is exported with the specified separators between rows.
- RETURN: each row is separated by a return character (most common).
- TAB: each row is separated by a tab.
- COMMA: each row is separated by a comma.
Max Col Width: maximum number of columns in a row. When the maximum number is reached, a row delimiter is generated. To ensure the integrity of exported data when viewed in the target application, set the Max Col Width for that application before export.
In applications, like Excel, that have a maximum number of columns, exceeding the application's maximum number of columns might cause problems when the exported data is opened in the target application. Problems might include truncated data display, automatically generated and undesirable row delimiters, and so forth. For example, if the user attempts to open an export file with more than 248 data samples in Microsoft Excel (which is limited to 256 cells in a row), the excess samples will be discarded and Excel will generate a "File not loaded completely" message. Note that the reason the maximum number is 248 is that at least six columns out of the 256 are used for other information such as block, event, time stamps, and so forth. If more than six columns are used before the data columns, then there will be fewer columns available for data. See also Number of data subsections, below, for more information.
Significant Digits: number of digits saved for each value starting with the first non-zero digit. This parameter is applied to time stamps as well as data.
Hide Title: hides the first row with the column descriptions.
Raw Data Only: saves only the signal data and discards all of the other details like tank name, block name, event, time, sampling frequency, and number of points.
Output File Name: allows the user to browse to and set the location and name for the output file(s).
Append File Name By ...: appends the block, event, channel number, and/or row number of the exported data to the output file name. This is very useful when the Multi-File option is selected.
Number of data subsections: used to divide the data samples into subsections. By default, each data set is stored in a single row with the tank name, block name, and so forth at the beginning of the row. Specifying subsections allows the data to be stored using several rows. Each row (or subsection) includes the header information such as tank name, block name, followed by a subset of data samples.
This option is useful when loading a data file with a large number of samples. For example, if the user intends to work with exported data in Excel then each row must be limited to no more than 256 cells. A file with 300 points in each record can be exported specifying 2 subsections to create two rows dedicated to each record, each with 150 sample points. This would ensure that the maximum number of cells per row is not exceeded and creates a file with a consistent set of row headers at the beginning of each row. See also Max Col Width, above, for more information.
Transpose output (data in columns): transposes columns to rows so that each column is a data set (by default, OpenEx data is saved in rows). This option can be used when exporting a data file containing a large number of samples for use with Microsoft Excel. By saving data in columns the user avoids limitations in the maximum number of cells possible in a row.
PLX Export Specific Settings
Export epoch events as plx strobe events: used to display epoch events as strobe events in NeuroExplorer. Not used when exporting for use with Plexon's Offline Sorter.
Gain (for spike waveform, in K): used with Scaling Factor to scale spike data for viewing in Offline Sorter. Recommended value is 1. Values can be from 1 to 32.
Spike Scaling Factor (Floating Point to µV): used with Gain to scale spike data for viewing in Offline Sorter.
Gain (for continuous waveform): used with Scaling Factor to scale continuous data for viewing in Offline Sorter. Recommended value is 1. Values can be from 1 to 32.
Stream Scaling Factor (Floating Point to µV): used with Gain to scale continuous data for viewing in Offline Sorter.
Comment: 256 character comment line.
Output File Name: allows the user to browse to a network or local folder and saves the file with a set name.
Append File Name By ...: allows the user to select to automatically add the block, event, channel number, and/or row number of the exported data to the saved file name. This is very useful when the Multi-File option is selected.
Note
See Exporting to PLX for detailed information on using PLX export specific settings.
DDT Export Settings
Output File Name: allows the user to browse to and set the location and name for the output file(s).
Description: optional text field that is included in DDT header.
Scale Factor: used to scale streaming data before converting to integer values for viewing in Offline Sorter.
Append File Name By ...: appends the block, event, channel number, and/or row number of the exported data to the output file name. This is very useful when the Multi-File option is selected.
NEX Export Specific Settings
Quant Factor (mV per LSB): sets the millivolt range for the Least Significant Bit of the NEX format. The default value has been set to ensure that the data is exported correctly. Changing the default settings can cause data to be read incorrectly by NeuroExplorer.
Scaling Factor (to convert Tank Data to µV): not used.
Comment: 256 character comment line.
Append Event Name by Channel #: allows the user to select to automatically add the channel number to the event name.
Output File Name: allows the user to browse to a network or local folder and saves the file with a set name.
Append File Name By ...: allows the user to select to automatically add the block, event, channel number, and/or row number of the exported data to the saved file name. This is very useful when the Multi-File option is selected.
Note
The NEV export function is no longer supported.
NsN Export Specific Settings
For more information regarding the NeuroShare Native (NsN) file format, refer to the NeuroShare website at http://neuroshare.sourceforge.net/index.shtml.
Output File Name: specifies the path and filename for the exported *.nsn file.
File Type Descriptor: specifies the file extension for the exported data file. This should be set to .nsn.
Time Stamp Resolution: minimum timestamp resolution in seconds.
Digitization Scaling Factor (in nV): not used.
Scaling Factor (to Convert Tank Data to µV): scale factor used for buffer (type 2), snippet (type 4), or continuous (type 5) data. Recommended value is 1.
Scaling Factor (to Convert Event Tank Data): scale factor used for scalar (type 1) or list (type 3) data. Recommended value is 1.
File Comment: 256 character comment line.
Min Input Signal: minimum possible value of the input signal in Volts.
Max Input Signal: maximum possible value of the input signal in Volts.
Units: enter a text value to specify the recording units of measurement.
Input Signal Resolution: minimum input step size that can be resolved. To obtain the signal resolution divide the voltage range by the number of bit values. For example, for a ± 1 Volt 16-bit ADC this value is 2/216 or 0.0000305.
X Location: optional text information about the X coordinate of source in meters.
Y Location: optional text information about the Y coordinate of source in meters.
Z Location: optional text information about the Z coordinate of source in meters.
High Freq Cutoff: high frequency cutoff in Hz of the source signal filtering.
High Freq Order: order of the filter used for high frequency cutoff.
High Freq Filter Type: optional text information to describe the type of filter used for high frequency cutoff.
Low Freq Cutoff: low frequency cutoff in Hz of the source signal filtering.
Low Freq Order: order of the filter used for low frequency cutoff.
Low Freq Filter Type: optional text information that describes the type of filter used for low frequency cutoff.
Probe Info: optional text information about the signal source.
EDF Export Settings
Output File Name: specifies the path and filename for the exported *.edf file.
Description: optional text used to describe the data. This is included in the EDF header.
Scale Factor: used to scale streaming data before converting to 16-bit integer values for EDF format. If the TDT data is stored as floating point, a scaling factor of 1e6 converts everything into round units of uV. If the TDT data is stored as 16-bit integers, leave the Scale Factor at 1.
Units: enter a text value to specify the recording units of measurement after scaling.
Clip Min: force the EDF converter to use this value instead of the minimum value in the data for the conversion to integer. Useful for improving signal resolution if some channels have artifact.
Clip Max: force the EDF converter to use this value instead of the maximum value in the data for the conversion to integer. Useful for improving signal resolution if some channels have artifact.
Generate Test Data: optional checkbox. When selected, the output will contain eight channels of recognizable test data signals (sine wave, sawtooth, pulse, noise, etc.) that can be viewed in an EDF viewer to validate the export.
Append File Name By ...: appends the block, event, channel number, and/or row number of the exported data to the output file name. This is very useful when the Multi-File option is selected.
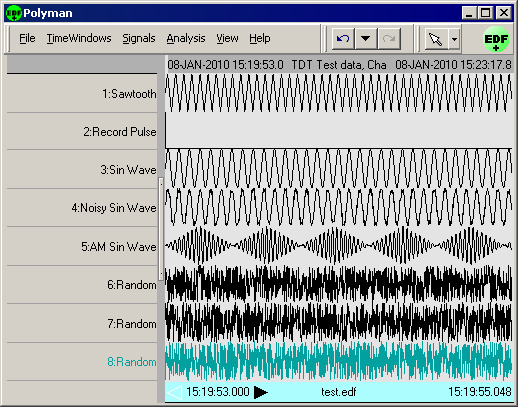 Exported Test Data Viewed in Polyman
An example of the generated test data can be found in the image above. The Polyman EDF viewer software was used to load the data and capture this image.