Data Selection
About the Data Selection Table Window
The Data Selection Table arranges information in rows and columns. The first three rows define the configuration properties for exporting the data and are separated from the data selection rows by a header row. The data selection rows determine what data is available for export and display. Each row can export data from a single tank, block, and event. To export data from multiple tanks, blocks, or events, a new row of data must be added.
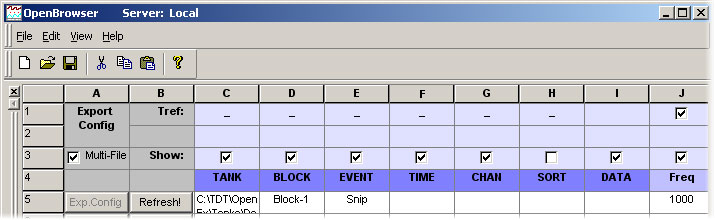
Tref: Check Boxes (Row 1)
This row allows users to select an epoch to be used as a time reference. When the
check box in this row is selected for an epoch, the time stamp of the event is based
on its position relative to the last epoch as opposed to the start of the block.
This is particularly useful if the data is to be exported to NeuroExplorer or
Plexon's Offline Sorter.
Show: Check Boxes (Row 3)
Selecting a check box in this row includes the associated column information, such
as the TANK, BLOCK, CHAN, SORT name and the associated TIME (time stamp), when the
data is exported or viewed in the Table view.
Multi-File: Check Box (Cell A3)
If the Multi-File check box is selected when data is exported then the data in each
row will be saved to a separate file.
Header Cells (Row 4)
This row displays the header names associated with a data tank. The first seven
header names (columns C - I) are standard for all tanks and cannot be changed. The
cells under each column header are used to access the associated variable type.
Cells in columns J and greater can be used to select epoch header names.
Data Selection Cells (Rows 5 and Greater)
Users can fill multiple rows with data export information. For example, an experiment
might consist of a single block of data with multiple events. An OpenBrowser export
file would consist of a series of export rows each with different events and possible
channels within an event. This allows a user to configure an OpenBrowser file to
organize how the data is exported.
Exp. Config Buttons (Column A)
Clicking the Exp. Config button for a row displays a dialog box that allows users to
select how the data in that row is exported.
Refresh! Buttons (Column B)
Clicking the Refresh! button for a row refreshes the View area with data for the
selected row.
Using the Data Selection Table Window
The Data Selection Table can be used to select data and to prepare data for export.
Selecting Data
To use the Data Selection Table window, select the tank, block number, then event
information for the data to be viewed or exported. These three pieces of information
must be selected in order, that is, the tank must be selected before the block can
be selected and the block must be selected before the event can be selected. Each
piece of information can be added by right-clicking the cell under the appropriate
column heading and then double-clicking the desired tank, block, or event from the
list in the selection window.
When selecting a tank, right-click in the cell under the Tank heading to bring up the Select Tank dialog. To select a tank, single-click a tank in the list or click the Open Existing Tank icon to browse to the desired tank folder.
Note
Clicking OK out of this dialog selects the tank and also closes the Select Tank dialog.
Epochs can be added to the table in the empty header cells (indicated by ellipses) and a single epoch can be used as a time reference by selecting the Tref check box for the epoch column. See Using Epochs as a Time Reference.
Once the first data selection row has been configured in the Data Selection Table, additional rows with the same configuration can be added by copying and pasting the row to a blank row.
After the row has been copied, change the block or event name as needed. To change a cell value, first delete the cell's current value, then right-click the cell to open a list of possible blocks or events. Shorthand characters can also be used to simplify setting up multiple rows. See Using Shorthand Characters for Data Selection for more information.
Tip
When using copy and paste to add multiple rows of data, configure the first row for export first. When it is copied and pasted the export configuration will also be included. Be sure to check one or more of the Append File Name By check boxes to ensure that multiple rows saved to multiple files will have unique names. See Data Export for more information on configuring data for export.
Adding Rows
To add a row click the Edit menu, and click Insert Rows.
Deleting Rows
To delete selected rows, click the Edit menu and click Delete Rows. To select
a row click the row number. Use the SHIFT or CTRL keys to select multiple rows.
Controlling the Data View Area
After a tank, block number, and event have been associated with the row the user can
click on Refresh! to view the data in the View area.
Configuring Data for Export
The Exp. Config buttons for each row provide easy access to the Data Export Format
Configuration dialog box. After a row has been configured for export, the text on the
Exp. Config button changes from gray to blue. When exporting more than one row, use
the Multi-File check box to determine if each row of data will be exported to a
separate file or if all data will be exported to one single file.
Using Shorthand Characters for Data Selection
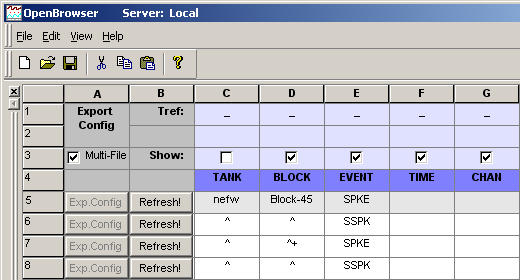
A series of shorthand characters can be used to speed up data selection in the Data Selection Table.
In the example below, data would be exported from tank nefw, blocks 45 and 46, and all SPKE and SSPK events (including all channels). Note that ^+ is only used once for the BLOCK cell for SPKE in row 7. If the BLOCK cell for the SSPK event in row 8 used a ^+, the data would have come from block 47.
Using Epochs as a Time Reference
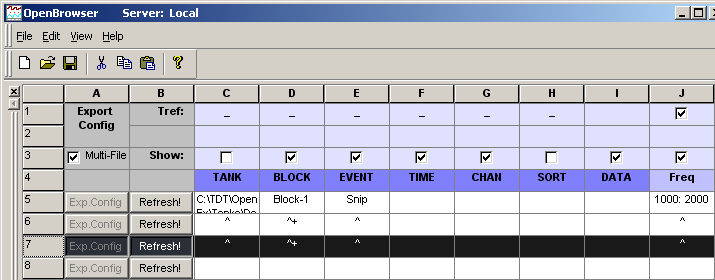
The Data Selection Table allows users to select an epoch to be used as a time reference. Using a time reference epoch starts the time value at zero for each epoch and allows the time code information to be used to generate PSTH and other graphs in NeuroExplorer and other analysis applications.
To add a time reference:
-
Select the Tref check box (in Row 1) for an empty epoch column. The header for an empty epoch column contains an ellipsis.
-
Select a row containing data selection information for the tank, block, and event. To select a row click the row number.
-
In the Header row, right-click the cell (containing an ellipsis "...") for that column. This will open an event selection dialog box. The available epoch events are listed (that is, available in the tank named in the TANK column for the currently selected row).
-
To select the epoch to be used as a time reference, double-click the epoch in the list. Additional epochs can be added to subsequent columns; however, only one time reference epoch can be active at a time.
Note
A specific value or range of values can be selected using the epoch cell for a row. For example, entering ">1000" in an epoch cell will limit the epoch values used to those greater than 1000. A single value may be selected by entering a number without a modifier, such as "1000". See Using Shorthand Characters for Data Selection for more information.
The active time reference determines the zero time for the time stamps. When the Show check box is selected for an epoch column the epoch will be included in the view area for any row that is refreshed. It will be displayed above the data in the scroll plot view or shown as a separate column in the data table view.