Data Export
Exporting Tank Data
The primary function of OpenBrowser is to export data from the tank to other data formats. OpenBrowser can export to several common file formats: ASCII, NEX, PLX, DDT and EDF. The standard ASCII format allows users to export data in a format readable by most statistical and graphic packages as well as Microsoft Excel spreadsheets. OpenBrowser can also export directly to the NEX format for import to NeuroExplorer, the PLX and DDT (v101) formats for use with Plexon's Offline Sorter, or EDF (European Data Format).
Note
The NEV export function is no longer supported.
Export From the File Menu
The File menu provides the following three choices for exporting data:
- Export Current Row: Exports the currently selected row.
- Export Selected Rows: Exports multiple selected rows.
- Export All Rows: Exports all rows containing data.
Before data can be exported using these commands it must be selected and configured for export. Data is selected using the Data Selection Table window. When multiple rows of data have been selected the user can choose to export multiple rows to a single file or to export each row to a separate file. Single or Multi-File export is determined using the Multi-File check box in the Data Selection Table window. If exporting to multiple files, each row must be configured before the export process begins. Individual rows of data can be configured for export at any time using the Exp. Config buttons. If exporting to a single file, the export configuration can be defined during the export process. If the export configuration has not been completed prior to export, the Data Export Format Configuration dialog box will be displayed during the export process.
Exporting From the Data Table View
The data in the data table can be copied and pasted directly to a Microsoft Excel
spreadsheet. This will save all the information about blocks, events, time stamps,
channel, sort, and epoch information displayed in the table view. It does not export
the waveform data.
Exporting to ASCII
Exporting to the standard ASCII format allows users to access data in a format readable by most statistical and graphic packages as well as Microsoft Excel spreadsheets. When data is exported in the ASCII format, the first six columns always denote the block name, event, time stamp, channel, sampling frequency, and number of points in each record. Subsequent columns contain actual data. Additional columns may be added before data columns to store information such as subsections and epoch events. The first row contains header information (describing the data stored in each column, such as BLOCK, EVENT, TIME, and so forth) for each column.
Export to Multiple Files
-
When exporting to multiple files, ensure that the Multi-File check box in cell A3 of the Data Selection Table window is checked.
-
Configure each row for export. To configure a row for export:
-
Click the Exp. Config button for the desired row.
-
In the Data Export Format Configuration dialog box, ensure that ASCII is selected in the File Type box.
-
Name the export file. Click the
 Browse
button to the right of the Output File Name box. The Open dialog box is
displayed.
Browse
button to the right of the Output File Name box. The Open dialog box is
displayed. -
Browse to the desired file location.
-
In the File Name box, type a file name and click Open. You can type individual names for each row/file or use the same base file name for all rows/files. If you use a base name be sure to use the Append File Name By check boxes. If two or more rows attempt to write to exactly the same file, data will be overwritten.
-
If desired, select one or more of the Append File Name By check boxes to include block, channel, event, or row information in the file name.
-
Modify any other settings as desired.
-
Click Save.
-
-
Repeat for each row to be exported. To save time, complete the export configuration during the data selection process. That way if you use copy and paste to add rows the export configuration will also be copied. Be sure to use one or more of the Append File Name By check boxes to ensure that each row will have a unique file name.
-
If exporting only selected rows, select the rows to export and click Export Selected Rows on the File menu.
-
If exporting all rows, on the File menu, click Export All Rows.
-
Review the messages in the Export Status dialog box and click OK.
Export to a Single File
-
When exporting to a single file, ensure that the Multi-File check box in cell A3 of the Data Selection Table window is not checked.
-
If exporting a single row, select the row then, on the File menu, click Export Current Row.
-
If exporting only selected rows, select the rows to export then, on the File menu, click Export Selected Rows.
-
If exporting all rows, on the File menu, click Export All Rows.
-
In the Data Export Format Configuration dialog box, ensure that ASCII is selected in the File Type box.
-
In the Output File Name box, click the
Browse button. The Open dialog box is displayed. -
Browse to the desired location for the data file.
-
In the File Name box, type a file name and click Open.
-
Modify any other settings as desired.
-
Click Export.
-
Review the messages in the Export Status dialog box and click OK.
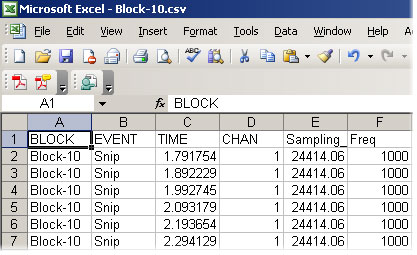 Exported Data Viewed in Microsoft Excel
Exporting to PLX
OpenBrowser can export directly to the PLX format for use with Plexon's Offline Sorter and Wave Tracker. Data exported in PLX format can also be viewed with NeuroExplorer. For researchers who use several different analysis packages, exporting to the PLX format eliminates the need to export data in several different formats. The PLX export has been streamlined to provide the user with both flexibility and ease of use.
Note
Use Offline Sorter version 2.5 or greater, if possible. Earlier versions of Offline Sorter might be unable to import OpenEx Stream data.
When tank data is exported to PLX format it must be scaled to match the requirements of the new format. This is done using two parameters: a scaling factor that scales the signal to the correct range and a gain factor that sets the units (mV, µV). Because Offline Sorter and Wave Tracker handle streamed data and spike data differently, users must set separate scaling factors and gain settings for each type of data. Once these values have been set, OpenBrowser automatically ensures that streamed data and spike data are exported correctly.
Before beginning the export process users should:
-
Ensure that block size for each waveform is less than 256.
Data that will be exported for use with Offline Sorter or Wave Tracker should have a block size (in the OpenEx Header) of less than 256 samples.
-
Determine if the PLX data will be used in NeuroExplorer.
The PLX export configuration settings include an Export epoch events as plx strobe events check box. If the data will be viewed in NeuroExplorer, this check box must be selected. If NeuroExplorer will not be used, the check box may be left cleared.
-
Determine the highest absolute value in the data set.
The highest value is used to calculate the scaling factor for export. It is an absolute number and can be approximated. An approximate value for the highest number can be determined at a glance when viewing the data set in the OpenBrowser preview plot. Simply refresh the data then view the scale values. Because the plot scales automatically, the maximum scale value is a good approximation of the maximum value in the data set.
-
Select a Gain setting.
Gain is expressed as an integer from 1 to 32. The gain is used to display data in Offline Sorter or Wave Tracker using the correct units, such as µVs. When unit information is not important, the gain can be safely set to 1 to simplify the formula for determining the scaling factor.
-
Calculate Scale Factor for Stream and/or Snippet data.
The scaling factor can be determined using the following formula, where G = gain, SF = scaling factor, and H# = the highest absolute value in the data set. Note that when processing spike data, setting the gain to 1 and the scale factor to 1e6 is usually acceptable.
For streamed data: SF x G = 5e6 / H#
For spike data: SF x G = 3e6 / H#
To better understand how the SF x G formulas are derived, begin by considering these facts:
- Data collected in OpenEx are stored as floating point values while Offline Sorter expects data stored as 12-bit signed integers. A 12-bit signed integer yields a maximum value of 2047.
- In Offline Sorter, the maximum voltage for streamed data is 5 Volts and the maximum voltage for spike data is 3 Volts.
- OpenEx data is typically viewed in the microvolt range (1e-6).
- OpenBrowser uses a user-specified scaling factor (SF) and gain (G) when exporting tank data to a PLX format.
For the highest value (H#) in the tank data, the specified SF and G must yield a value that can be expressed within Offline Sorter's dynamic range.
For streamed data this can be expressed as: H# * SF * 1e-6 * 2048 * G / 5 < 2048
For spike data this can be expressed as: H# * SF * 1e-6 * 2048 * G / 3 < 2048
Export to Multiple Files
-
When exporting to multiple files, ensure that the Multi-File check box in cell A3 of the Data Selection Table window is checked.
-
Configure each row for export. To configure a row for export:
-
Click the Exp. Config button for the desired row.
-
In the Data Export Format Configuration dialog box, in the File Type box, ensure that PLX is selected.
-
Enter the appropriate gain and scaling factor for the data type being exported in the current row.
-
Name the export file. In the Output File Name box, click the
Browse button. The Open dialog box is
displayed. -
Browse to the desired file location.
-
In the File Name box, type a file name, then click Open.
You can type individual names for each row/file or use the same base file name for all rows/files. If you use a base name be sure to use the Append File Name by check boxes. If two or more rows attempt to write to exactly the same file, data will be overwritten.
-
If desired, select one or more of the Append File Name by check boxes to include block, channel, event, or row information in the file name.
-
Modify any other settings as desired.
-
Click Save.
-
-
Repeat for each row to be exported.
To save time, complete the export configuration during the data selection process. That way if you use copy and paste to add rows the export configuration will also be copied. Be sure to use one or more of the Append File Name by check boxes to ensure that each row will have a unique file name.
-
If exporting only selected rows, select the rows to export and, on the File menu, click Export Selected Rows.
-
If exporting all rows, on the File menu, click Export All Rows.
-
Review the messages in the Export Status dialog box and click OK.
Export to a Single File
Note
If exporting multiple channels to a single PLX file for use in Offline Sorter's Tetrode Mode, use a single row, not different rows for each channel.
-
When exporting to a single file, ensure that the Multi-File check box in cell A3 of the Data Selection Table window is not checked.
-
If exporting a single row, select the row and, on the File menu, click Export Current Row.
-
If exporting only selected rows, select the rows to export and, on the File menu, click Export Selected Rows.
-
If exporting all rows, on the File menu, click Export All Rows.
-
In the Data Export Format Configuration dialog box, in the File Type box, ensure that PLX is selected.
-
Enter the gain and scaling factor for each type of data to be exported.
If both streamed and snippet data are being exported to the same file, values can be specified for each type of data in a single export configuration dialog box. If only one type of data is being exported, only the gain and scaling factor for that data type will be used and the others will be ignored.
However, keep in mind that all rows of a particular data type will be exported using the same gain and scaling factor. If two rows of the same data type are dissimilar they might need to be exported separately.
-
In the Output File Name box, click the
Browse button. The Open dialog box is displayed. -
Browse to the desired location for the data file.
-
In the File Name box, type a file name, then click Open.
-
Modify any other settings as desired.
-
Click Export.
-
Review the messages in the Export Status dialog box and click OK.
Troubleshooting the PLX Export Process
The following table will help users identify common errors that might occur during the export process.
Exporting to DDT
OpenBrowser can export directly to DDT format version 101. A DDT data file is used to import streaming waveforms into Plexon's Offline Sorter.
When tank data is exported to DDT format it must be scaled to match the requirements of the new format. This is done using a scaling factor. Once this value has been set, OpenBrowser automatically ensures that streamed data are exported correctly.
Before beginning the export process users should calculate the Scale Factor. To understand how the Scale Factor is used, begin by considering these facts:
- Data collected in OpenEx are stored as floating point values while Offline Sorter expects data stored as 16-bit signed integers. A 16-bit signed integer yields a maximum value of 32767.
- In Offline Sorter, the maximum voltage for streamed data is 5 Volts, so each bit represents ~153 uV.
- OpenEx data is typically viewed in the microvolt range (1e-6).
- OpenBrowser uses a user-specified scaling factor (SF) when exporting tank data to DDT format.
To get full resolution, where the max value of the TDT data is mapped to 5V in Offline Sorter, set Scale Factor to 32767/H# where H# is the largest absolute value in the tank data.
Note that a scale factor of 1e6 is usually acceptable, where each bit represents 1 uV.
Before data can be exported it must be selected and configured for export using the Data Selection Table window.
Export to Multiple Files
-
When exporting to multiple files, ensure that the Multi-File check box in cell A3 of the Data Selection Table window is checked.
-
Configure each row for export. To configure a row for export:
-
Click the Exp. Config button for the desired row.
-
In the Data Export Format Configuration dialog box, in the File Type box, ensure that DDT is selected.
-
Name the export file. In the Output File Name box, click the
Browse button. The Open dialog box is
displayed. -
Browse to the desired file location.
-
In the File Name box, type a file name then click Open.
You must type individual names for each row/file. If two or more rows attempt to write to exactly the same file, data will be overwritten.
-
Modify any other settings as desired.
-
Click Save.
-
-
Repeat for each row to be exported.
-
If exporting only selected rows, select the rows to export and, on the File menu, click Export Selected Rows.
-
If exporting all rows, on the File menu, click Export All Rows.
-
Review the messages in the Export Status dialog box and click OK.
Export to a Single File
-
When exporting to a single file, ensure that the Multi-File check box in cell A3 of the Data Selection Table window is not checked.
-
If exporting a single row, select the row and, on the File menu, click Export Current Row.
-
If exporting only selected rows, select the rows to export and, on the File menu, click Export Selected Rows.
-
If exporting all rows, on the File menu, click Export All Rows.
-
In the Data Export Format Configuration dialog box, in the File Type box, ensure that DDT is selected.
-
In the Output File Name box, click the
Browse button. The Open dialog box is displayed. -
Browse to the desired location for the data file.
-
In the File Name box, type a file name, then click Open.
-
Modify any other settings as desired.
-
Click Export.
-
Review the messages in the Export Status dialog box and click OK.
Troubleshooting the DDT Export Process
The following table will help users identify common errors that might occur during the export process.
Exporting to NEX
OpenBrowser can export directly to the NeuroExplorer NEX format.
Export to Multiple Files
-
When exporting to multiple files, ensure that the Multi-File check box in cell A3 of the Data Selection Table window is checked.
-
Configure each row for export. To configure a row for export:
-
Click the Exp. Config button for the desired row.
-
In the Data Export Format Configuration dialog box, in the File Type box, ensure that NEX is selected.
-
Name the export file. In the Output File Name box, click the
Browse button. The Open dialog box is
displayed. -
Browse to the desired file location.
-
In the File Name box, type a file name, then click Open.
You can type individual names for each row/file or use the same base file name for all rows/files. If you use a base name be sure to use the Append File Name by check boxes. If two or more rows attempt to write to exactly the same file, data will be overwritten.
-
If desired, select one or more of the Append File Name by check boxes to include block, channel, event, or row information in the file name.
-
Modify any other settings as desired.
-
Click Save.
-
-
Repeat for each row to be exported. To save time, complete the export configuration during the data selection process. That way if you use copy and paste to add rows the export configuration will also be copied. Be sure to use one or more of the Append File Name by check boxes to ensure that each row will have a unique file name.
-
If exporting only selected rows, select the rows to export and, on the File menu, click Export Selected Rows.
-
If exporting all rows, on the File menu, click Export All Rows.
-
Review the messages in the Export Status dialog box and click OK.
Export to a Single File
-
When exporting to a single file, ensure that the Multi-File check box in cell A3 of the Data Selection Table window is not checked.
-
If exporting a single row, select the row and, on the File menu, click Export Current Row.
-
If exporting only selected rows, select the rows to export and, on the File menu, click Export Selected Rows.
-
If exporting all rows, on the File menu, click Export All Rows.
-
In the Data Export Format Configuration dialog box, in the File Type box, ensure that NEX is selected.
-
In the Output File Name box, click the
Browse button. The Open dialog box is displayed. -
Browse to the desired location for the data file.
-
In the File Name box, type a file name, then click Open.
-
Modify any other settings as desired.
-
Click Export.
-
Review the messages in the Export Status dialog box and click OK.
Exporting to EDF
OpenBrowser can export directly to EDF format. An EDF data file consists of a header record followed by binary data records. More details about the EDF standard can be found online at http://www.edfplus.info/specs/edf.html.
Note
OpenBrowser does not support the EDF+ format.
Important
The OpenBridge software provides similar functionality to the OpenBrowser EDF export. TDT recommends using OpenBridge.
Before data can be exported it must be selected and configured for export using the Data Selection Table window.
Export to Multiple Files
-
When exporting to multiple files, ensure that the Multi-File check box in cell A3 of the Data Selection Table window is checked.
-
Configure each row for export. To configure a row for export:
-
Click the Exp. Config button for the desired row.
-
In the Data Export Format Configuration dialog box, in the File Type box, ensure that EDF is selected.
-
Name the export file. In the Output File Name box, click the
Browse button. The Open dialog box is
displayed. -
Browse to the desired file location.
-
In the File Name box, type a file name, then click Open.
You must type individual names for each row/file. If two or more rows attempt to write to exactly the same file, data will be overwritten.
-
Modify any other settings as desired.
-
Click Save.
-
-
Repeat for each row to be exported.
-
If exporting only selected rows, select the rows to export and, on the File menu, click Export Selected Rows.
-
If exporting all rows, on the File menu, click Export All Rows.
-
Review the messages in the Export Status dialog box and click OK.
Export to a Single File
-
When exporting to a single file, ensure that the Multi-File check box in cell A3 of the Data Selection Table window is not checked.
-
If exporting a single row, select the row and, on the File menu, click Export Current Row.
-
If exporting only selected rows, select the rows to export and, on the File menu, click Export Selected Rows.
-
If exporting all rows, on the File menu, click Export All Rows.
-
In the Data Export Format Configuration dialog box, in the File Type box, ensure that EDF is selected.
-
In the Output File Name box, click the
Browse button. The Open dialog box is displayed. -
Browse to the desired location for the data file.
-
In the File Name box, type a file name, then click Open.
-
Modify any other settings as desired.
-
Click Export.
-
Review the messages in the Export Status dialog box and click OK.
Single vs. Multi-File Export
The user can determine if data will be exported to multiple files or a single file using the Multi-File check box in the Data Selection Table window.
Single File Export
If the Multi-File check box is not checked (cell A3) all data is exported to a single
file. To use this export function the rows do not have to have been configured before the
export process begins. The Data Export Format Configuration dialog box will be displayed
during export, giving the user an opportunity to complete configuration. If a single row
is selected and has been configured, the dialog box will show the output format for that
row. If multiple (or all) rows have been selected the dialog box will display the output
format for the first row.
Note
Error messages will occur if a row has no data in it.
Multi-File Export
If the Multi-File check box has been selected each row of data will be saved to a separate
file. Each row can have a unique file format. Rows must be configured for export using the
Data Export Format Configuration dialog box prior to the export process.
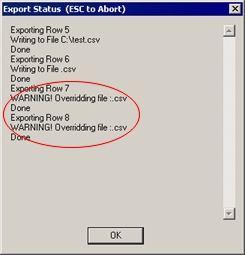
When the export process begins the selected rows are immediately stored to files based on the export configuration format specified. If rows are not configured for export a warning message is displayed in the Export Status dialog, starting with the first row that could not be exported.
Understanding the EDF Export
OpenBrowser's method for exporting to EDF format is designed to maximize resolution by using all 16 bits available in this format. Taking a closer look at the method used should help users understand how the scaling factor is applied and how to interpret the 16-bit values stored in the EDF.
-
OpenBrowser multiplies the tank data by the scaling factor.
-
OpenBrowser scans the entire data set to find the max/min values and then stores them in the EDF file as the Physical Maximum and Physical Minimum values for each channel (or signal). See http://www.edfplus.info/specs/edf.html for more information on the EDF format.
-
The Units parameter is stored as the Physical Dimension for all channels in the EDF file.
-
The Digital Maximum and Digital Minimum in the EDF file are always set to "32767" and "-32768", the maximum resolution of the EDF data format (16-bit integers).
-
The exporter then normalizes the data set onto the full -32768 to 32767 range, converts it to integers, and stores it in the EDF file.
The basic equation is:
EDF = -32768 + 65535 * (OriginalData*SF - PhysicalMin) / (PhysicalMax-PhysicalMin)So, if you are reading the 16-bit integer values from the EDF file, you must also read the physical max/min values and perform the reverse operation manually. For example:
OriginalData = (EDF + 32768)*(PhysicalMax-PhysicalMin)/65535 + PhysicalMin
Using the physical max/min values stored in the EDF header is essential to properly interpret the 16-bit samples.