SynapseAPI Overview
SynapseAPI is a collection of methods used to develop Synapse companion applications using MATLAB, Python, C++ or any language that can make HTTP requests. It provides access to System 3 real-time processing devices during an experiment, and lets you control Synapse remotely, mimicking many behaviors a user can perform.
Client applications developed using SynapseAPI can:
- Control the system mode
- Set tank and block names
- Set subject, user, and experiment, and add entries to the Synapse database
- Read and write gizmo parameters at runtime, including user gizmos
- Issue triggers and retrieve system status
SynapseAPI is a RESTful interface between a built-in TCP server and user development tools. Client applications can connect to Synapse through direct HTTP requests.

Synapse also uses TDT's TTank data server and data format which provides compatibility with many of the TDT OpenEx client applications, such as OpenExplorer and OpenScope, and includes direct data import into MATLAB with TDTbin2mat or Python's read_block for offline analysis or TDT2mat for online analysis.
Enable SynapseAPI in Synapse
To enable SynapseAPI tools in the Synapse user interface, you must modify the Synapse preferences to start the built-in TCP Server.
-
In Synapse, click Menu and Preferences
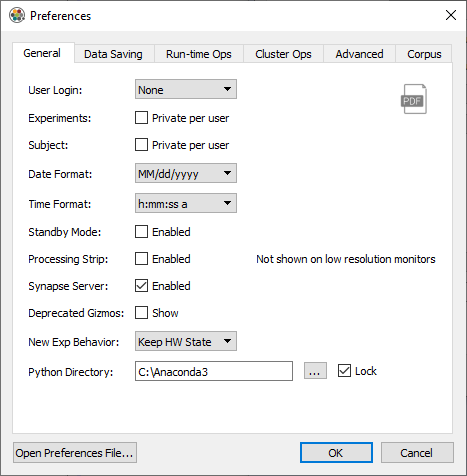
-
Click the Synapse Server Enabled check box
- Click OK
- Close and restart Synapse
Select a gizmo or hardware item in the Processing Tree, and if that item supports the API you will see an API button, pictured below, on the upper right of the Options page for that item.
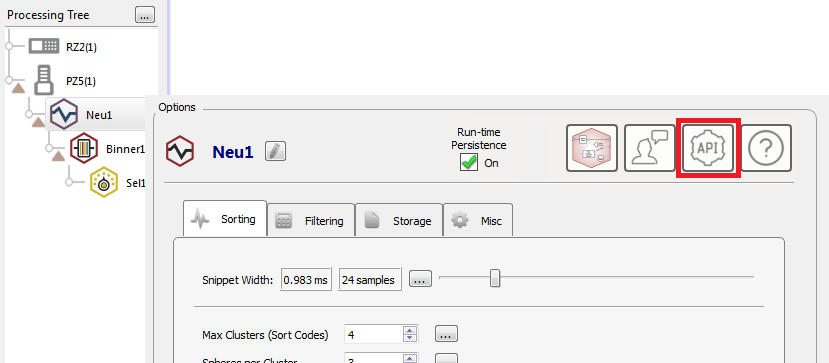 |
| PCA Spike Sporting Gizmo Options with SynapseAPI Tools Enabled |
Clicking the API button displays the parameters available for the selected gizmo or hardware object.
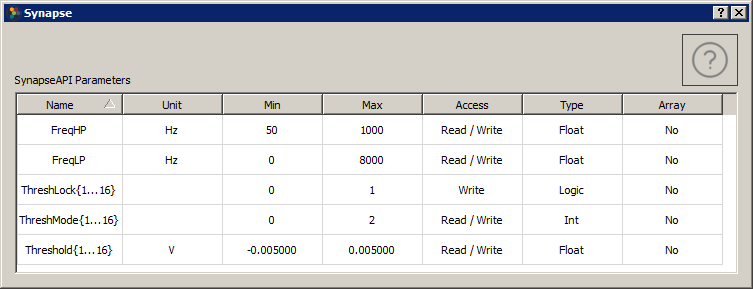 |
| PCA Spike Sorting API Dialog |
Each row describes the specified parameter with bounded values; including Min and Max values, the type of access allowed through the API, and the data type. The size of the parameter is also displayed if it contains more than one value. For example, you will see the size displayed for the Channel Mapper gizmo API.
The API dialog table is for information purposes only and does not allow you to modify the parameters. You can hover over the Name cell to view the syntax you would use in Python or MATLAB to get and set (if allowed) the value of the parameter.
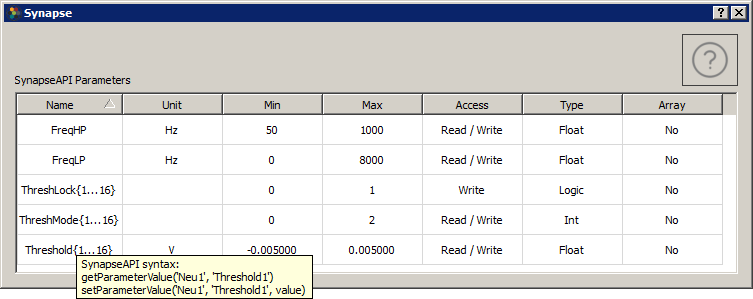 |
| PCA Spike Sorting API Dialog with the Syntax Tooltip Displayed |
Parameters that have one entry per channel will condense into a single row for
easier viewing. For example, the Threshold parameter of PCA Spike Sorting shown in
the table above is actually 16 unique parameters, one for each channel in this
example, called Threshold1, Threshold2, and so on up to Threshold16. You can't
get/set all of the Thresholds at once, but instead you make separate calls to get/
set each one individually.
The parameters available for SynapseAPI access may be controlled during runtime only. For example, the table above displays the parameters available for the PCA Spike Sorting: high-pass and low-pass filter frequency and the spike detection threshold. When using SynapseAPI to set these values, you will see the widgets update in the Synapse runtime interface with the new values and these changes will also be logged into the Synapse database.
When accessing parameters defined in a bounded Parameters table, the desired
parameter must be set to Widget Mode (runtime widget enabled), or else the
parameter will not be available as a SynapseAPI parameter and cannot be modified
at runtime. Below, the SortSel-1 parameter of the Selector gizmo is set to Widget
Mode.
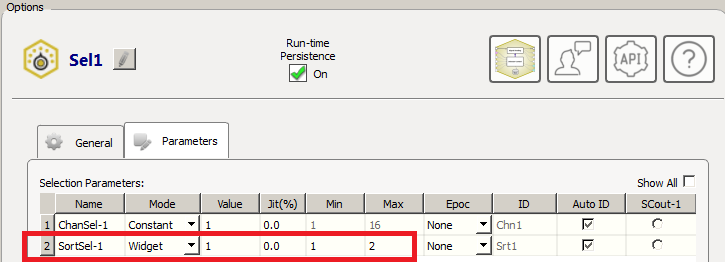
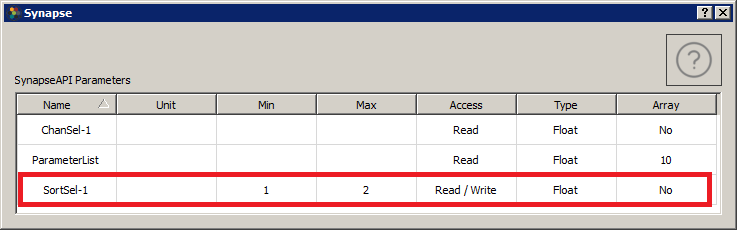
In this mode it then becomes a valid SynapseAPI parameter, and the API dialog shows the same Min/Max values defined in the Parameter Table.
Directly Reading Signals
An API Access checkbox appears on any gizmo output link that can be read directly through the SynapseAPI. This includes some most gizmo output links and some RZ links. Some examples are below.
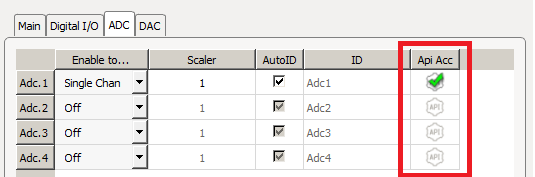 |
| API Access for Adc1 on RZ |
 |
| API dialog shows the parameter name to read Adc1 |
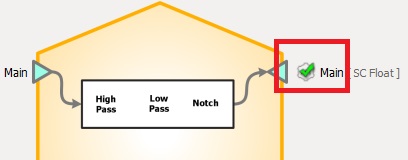 |
| API Access for output of General Purpose Filter gizmo |
 |
| Updated API dialog shows the parameter name to read filter output |
Interacting With User Gizmos
Any parameter in a User Gizmo that is defined by a matching parameter tag and gizmoControl macro pair is also accessible with SynapseAPI and will appear in the API dialog.
Note
See the User Gizmos section of the Synapse Manual for information on building and using User gizmos.
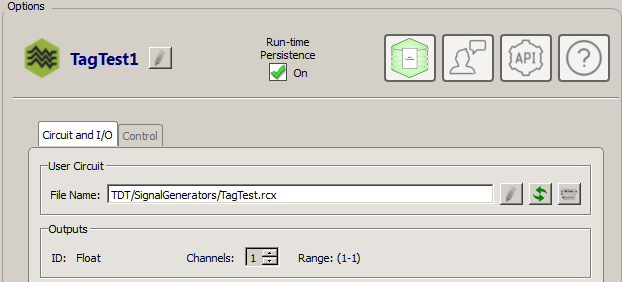
The example below shows the TagTest gizmo, which is available in the TDT >
SignalGenerators category of Custom gizmos. This gizmo outputs an array of numbers
controlled by the parameter called MyArray and turns the output on and off using a
parameter called Go. Add the TagTest gizmo to your experiment, followed by a
Stream Data Storage gizmo, to follow along with the example below.
The RPvdsEx circuit for the gizmo (TagTest.rcx) contains four gizmo builder macros: gizmoInput, gizmoOutput, and two gizmoControls. The gizmoControl macros create the parameter specifications for this custom gizmo.
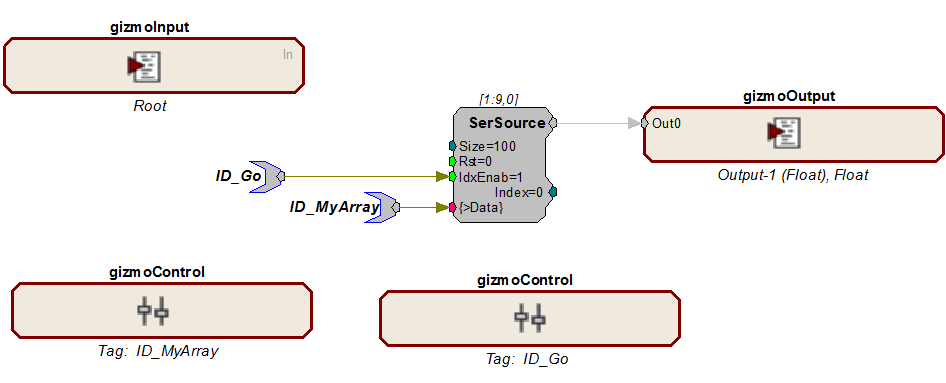
The first gizmoControl macro (ID_Go) turns the array test output on and off. By
attaching the TagTest gizmo to a Stream Data Storage gizmo you can verify this at
runtime.
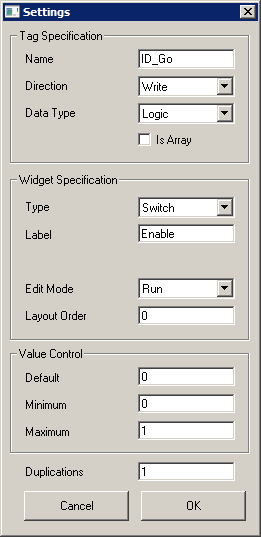
In the macro settings for ID_Go, the parameter tag is defined as a logic value, and
the runtime interface is a switch widget.
The circuit also includes a gizmoControl macro to define an array of values that can be written to dynamically and are sent as output when the test is running.
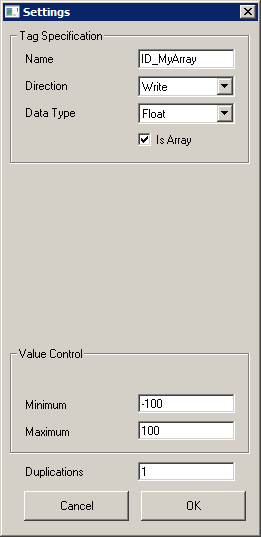
In the macro settings, the parameter tag is defined and the Is Array checkbox is
selected. The bounds (Minimum and Maximum) for the parameter are applied to each
element in the array whenever the API is writing the array values.

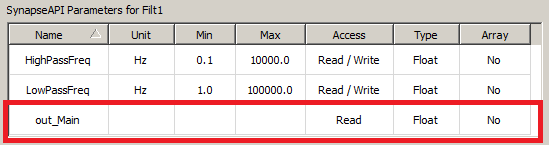
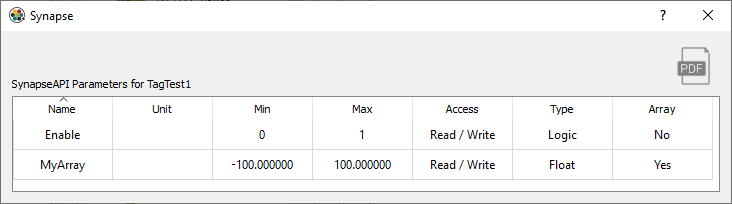
Because this user gizmo includes gizmoControl macros, the API button is
shown in the Options area and the SynapseAPI Dialog can be displayed. Notice that the
MyArray parameter is recognized as an Array. For User gizmos, the size of any
parameter array can only be determined programmatically at runtime using
getParameterSize, or by manually examining the circuit.
Example
Interacting with the user gizmo parameters
% create SynapseAPI connection
syn = SynapseAPI('localhost');

% switch into a runtime mode (Preview in this case)
if syn.getMode() < 1, syn.setMode(2), end

% get all info on the 'MyArray' parameter
GIZMO = 'TagTest1';
PARAMETER = 'MyArray';
info = syn.getParameterInfo(GIZMO, PARAMETER)

% get the array size (should be 100)
sz = syn.getParameterSize(GIZMO, PARAMETER)

% write values 1 to 50 in second half of buffer
result = syn.setParameterValues(GIZMO, PARAMETER, 1:50, 50)

% read all values from buffer
syn.getParameterValues(GIZMO, PARAMETER, sz)

% get all info on the 'Go' parameter
PARAMETER = 'Go';
info = syn.getParameterInfo(GIZMO, PARAMETER)

% flip the switch
result = syn.setParameterValue(GIZMO, PARAMETER, 1)

% check the value
value = syn.getParameterValue(GIZMO, PARAMETER);
fprintf('value = %d\n', value);

% also verify visually that the switch slipped in the run
% time interface. This state change will be logged just
% like any other variable change and saved with the runtime
% state.
import numpy as np
import tdt

# create SynapseAPI connection
syn = tdt.SynapseAPI('localhost')

# switch into a runtime mode (Preview in this case)
if syn.getMode() < 1: syn.setMode(2)

# get all info on the 'MyArray' parameter
GIZMO = 'TagTest1'
PARAMETER = 'MyArray'
info = syn.getParameterInfo(GIZMO, PARAMETER)

# get the array size (should be 100)
sz = syn.getParameterSize(GIZMO, PARAMETER)

# write values 1 to 50 in second half of buffer
result = syn.setParameterValues(GIZMO, PARAMETER, np.arange(1, 51), 50)

# read all values from buffer
syn.getParameterValues(GIZMO, PARAMETER, sz)

# get all info on the 'Go' parameter
PARAMETER = 'Go'
info = syn.getParameterInfo(GIZMO, PARAMETER)

# flip the switch
result = syn.setParameterValue(GIZMO, PARAMETER, 1)

# check the value
value = syn.getParameterValue(GIZMO, PARAMETER)
print('value =', value)

# also verify visually that the switch slipped in the run
# time interface. This state change will be logged just
# like any other variable change and saved with the runtime
# state.
Recording Notes
The Run-time Notes feature built into the RZ and RX objects in Synapse lets you record timestamps and notes during a recording that are saved to disk.
You can assign common notes to buttons that are easily clicked by the user. There is also a text field to enter custom notes. The SynapseAPI gives you a way to record notes through your custom application.
Unlike other gizmos that use the API, the RZ and RX objects do not have the API button so their API parameters are not easily visible in the Synapse window.
The Run-time Notes mode must be set to Notes File or Notes File + Epocs.
The API communicates with the 'RecordingNotes' tab at run-time during a Recording
only.
Note
Note Capture does not work during Preview mode
Example
Adding Recording Notes using SynapseAPI
GIZMO = 'RecordingNotes';
BUTTON = 'Button';
NOTE = 'Note';

% log note associated with first button
syn.setParameterValue(GIZMO, BUTTON, 0)

% log note associated with second button
syn.setParameterValue(GIZMO, BUTTON, 1)

% write a custom note
syn.setParameterValue(GIZMO, NOTE, 'My Custom Note')
GIZMO = 'RecordingNotes'
BUTTON = 'Button'
NOTE = 'Note'

# log note associated with first button
syn.setParameterValue(GIZMO, BUTTON, 0)

# log note associated with second button
syn.setParameterValue(GIZMO, BUTTON, 1)

# write a custom note
syn.setParameterValue(GIZMO, NOTE, 'My Custom Note')