zBUSmon Interface Testing Software
The zBus Monitor program is a tool used to test the USB, Gigabit, or Optibit connection to System 3. It is also be used to update the microcode firmware on processor devices.
This program is installed in the C:\TDT\zDrv3 directory by default and a
shortcut is added to the Desktop and to the TDT Sys3 Directory in the Start
menu.
The zBUSmon Window
When the utility is run a small monitor window is opened. All correctly connected zBus or built-in device chassis housing a programmable device, such as the RZ2 and PA5, are represented in the system diagram. Chassis housing non-programmable devices, such as the SA1 or SM5, are not displayed.
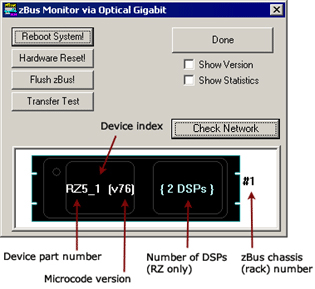
The device part number and index for each device along with the zBus chassis numbers are displayed in the system diagram. The version number of each programmable device's firmware (TDT Microcode) is also displayed within parentheses next to each device. See Updating the Microcode for more information about the microcode.
For RZ devices, the number of installed DSPs detected is displayed on the right side of the device in the diagram. "{DSP ERROR}" is displayed in red if a DSP is expected but not identified.
Reboot System!
The Reboot System! button resets all hardware in the system and reloads device drivers.
To reboot a single chassis (rack) within the system, right-click it in the diagram and click Reboot Rack on the shortcut menu.
Hardware Reset!
The Hardware Reset! button resets connected hardware and clears all circuits and zBus triggers.
Flush zBus!
The Flush zBus! button flushes interface line of commands or data.
Transfer Test
The Transfer Test button tests communication between the TDT modules and the PC. This will test data transfer both to and from the PC. A progress bar is displayed indicating how much time is remaining in the test. The button text changes to "Cancel Test" during a transfer test. Click this button to end the test early.
To run an indefinite transfer test, e.g. to test the communication overnight, hold
down the CTRL key and double-click anywhere on the gray background.
Update All Devices
The Update All Devices button automatically programs any out of date devices in the system with the current microcode. See Updating the Microcode for more information about the microcode (displayed only when multiple devices connected).
Check Network
The Check Network button searches across an available network connection and identifies other System 3 devices with an IP address; such as the PZ5 Amplifier, RV2 Video Tracker, or RS4 Data Streamer.
Click Scan to rescan the network for newly connected devices.

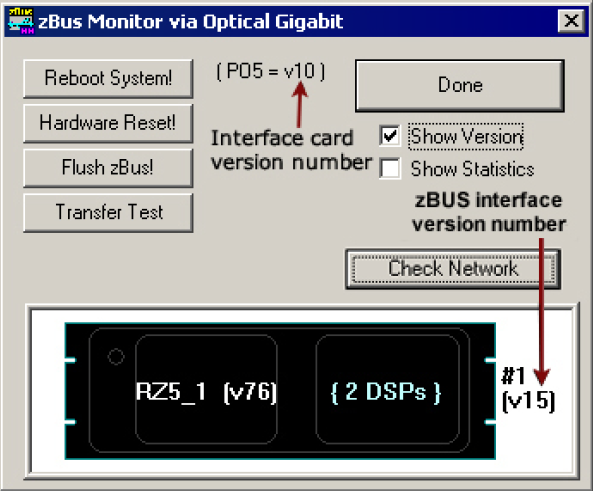
Show Version Check Box
When the Show Version box is checked, the version numbers of the PC to zBus interface firmware are displayed in the hardware diagram (see figure below). The FO5/PO5 interface shows v10. The RZ interface shows v15. Do not worry if these numbers don't match. The version information is useful for setting up a PO5c interface cluster. See Cluster Hardware Configuration for more information.
Show Statistics
An additional option to view system statistics is available when using the Optibit (PO5, PO5e, or PO5c) interface. When Show Statistics is checked, the window expands to display the amount of data transferred and error codes if necessary. Rebooting the system, resetting the hardware, or cycling power on the zBus racks will reset the data in the expanded window.
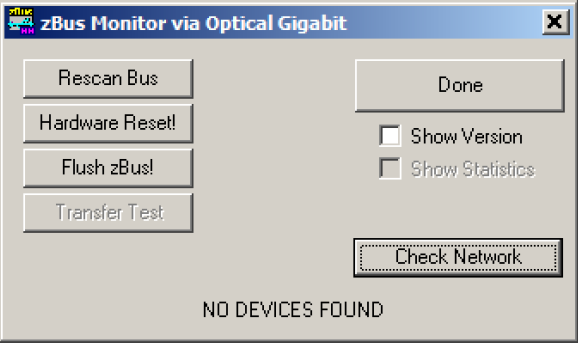
Rescan Bus
If no device is found when zBUSmon is run, a NO DEVICES FOUND message is displayed in place of a system diagram and the Rescan Bus button is displayed. This button can be used to scan for devices that have been connected or turned on after zBUSmon was launched.
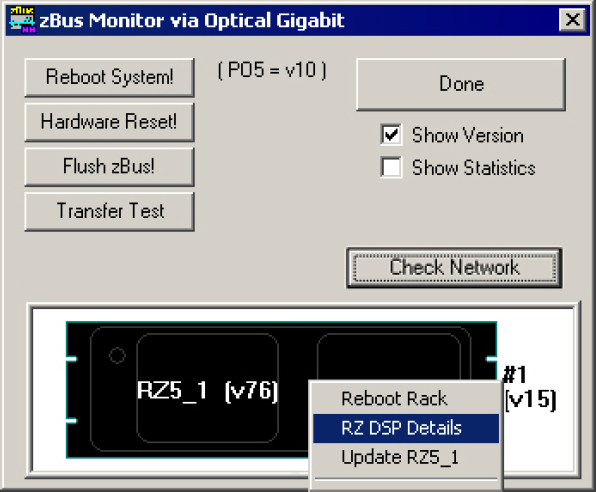
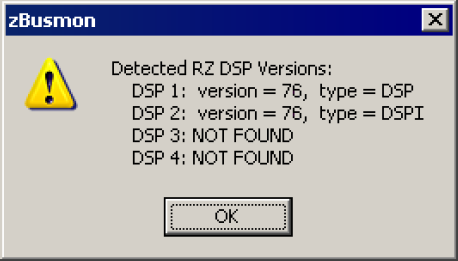
Viewing Microcode Version for all DSPs on an RZ DSP Device
If an RZ device has more than one DSP, the system diagram displays the number of DSPs and the microcode version for the first DSP.
To confirm the microcode version and DSP type for each installed DSP:
-
Right-click the RZ device in the diagram.
-
Click RZ DSP Details on the shortcut menu.
-
Click OK to close the pop-up window.
Updating the Microcode
Programmable devices use low-level software called microcode that resides in their flash memory. The microcode contains low-level hardware instructions. The microcode for processor devices contains the DSP instructions for the processing components. Because the System 3 design allows users to update this software quickly and efficiently, users can take advantage of the latest software tools available without purchasing new equipment or sending devices to our manufacturing facility for upgrades.
When you install TDT Drivers, microcode with a matching version number is stored in .dxe files on the PC. The zBUSmon utility uses these files to update or reprogram processor devices in the system. The current microcode version number for each device is displayed in the utility's system diagram. For processor devices, the version number for RX and RZ devices should be the same as the version number of the TDT Drivers installed on the PC.
Note
PA5 will always show v30. RP2.1, RA16BA, and other non-RX and non-RZ devices installed with TDT drivers v80 and above will always show v80.
Important
If any device (or any RZ DSP) is programmed with microcode that doesn't match the currently installed release, the microcode version number will appear in red and the 'Update All Devices' button will also appear below the 'Transfer Test' button. Devices with outdated Microcode versions should be updated immediately.
The zBUSmon Utility can be used to update the microcode on one or more devices. There are three options for updating:
-
The Update All Devices button automates the process of updating all devices in a system.
-
The Update {device name} command automates the process of updating a specified device.
-
The Program {device name} command allows the user to select the microcode file when specifying a device to program.
Updating All Devices in a System
To quickly update all devices in the system:
-
In the zBUSmon utility window, click the Update All Devices button.
A time warning will be displayed. The RZ processors may take up to 40 minutes to program (five minutes per DSP). If your system contains several devices this process could take significant time.
-
Click Yes to continue.
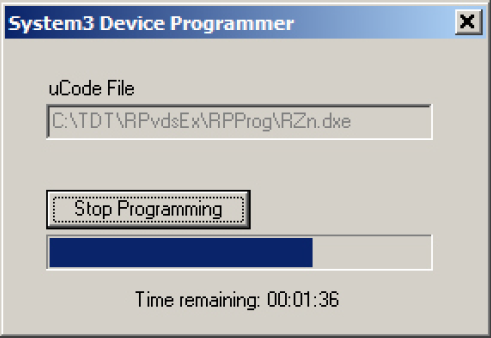
Programming begins automatically.
Important
The PC should not be used for other tasks while devices are being reprogrammed.
If the automatic update process detects an RX device, follow the on screen instructions. You will need to press and hold the Mode button on the front panel of the RX device and then click Retry. Release the Mode button when the front panel of the RX device displays Firmware: BLANK or Firmware: Burning.
If there are multiple RX processors in the system, they will be programmed in the order in which they are connected in the system. To determine the order, check the device index numbers in the zBUSmon system diagram.
The Stop Programming button will halt programming, but the device will need to be programmed before it can be used. It may show up as a G21K device if programming is interrupted prematurely, in which case you will have to manually program it. See Programming a Single Device Manually below.
-
The dialog will close when programming has completed.
Updating a Single Device Automatically
To automatically update a single device:
-
For all devices except RX-Series Processors, right-click the device in the system diagram, then click Update {device name} on the shortcut menu. If a time warning is displayed, after reading the message click Yes to continue.
For RX-Series Processors only, press and hold the Mode button on the front panel of the device, right-click the device in the system diagram, then click Update {device name} on the shortcut menu. When Firmware: BLANK or Firmware: Burning is displayed on the front panel of the device, release the Mode button.
Programming begins automatically.
Important
The PC should not be used for other tasks while devices are being reprogrammed.
The Stop Programming button will halt programming, but the device will need to be programmed before it can be used. It may show up as a G21K device if programming is interrupted prematurely, in which case you will have to manually program it. See Programming a Single Device Manually below.
-
The dialog will close when programming has completed.
Programming a Single Device Manually
To manually program a device:
-
How down the
SHIFTkey and right-click the device in the system diagram. -
Click Program {device name} on the shortcut menu.
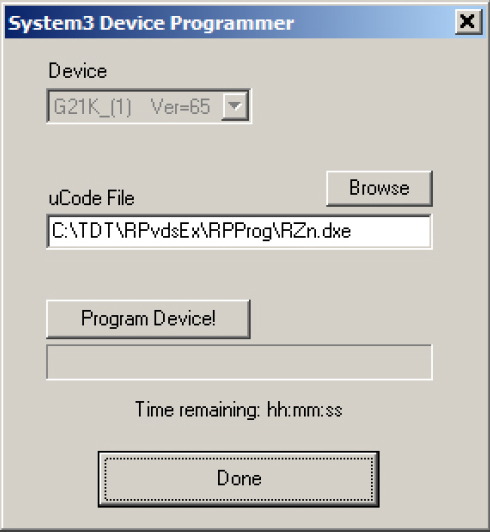
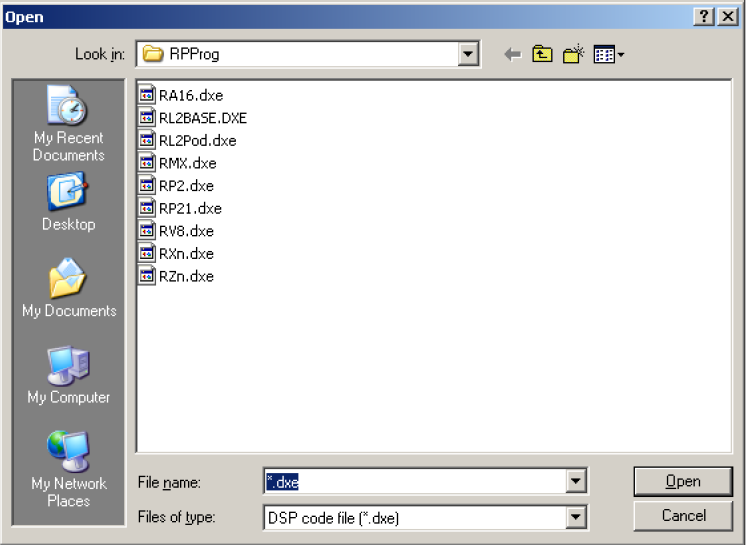
- Next to uCode File, click the Browse button.
-
Once you have selected the desired file, click Open. The Open window is closed and the selected file appears in the uCode File box.
-
For all devices except RX-Series Processors, click Program Device!. For RX-Series Processors only, press and hold the Mode button on the front panel of the device then click Program Device!. When Firmware: BLANK or Firmware: Burning is displayed on the front panel of the device, release the Mode button.
Programming begins and the progress bar displays the estimated time to complete the task.
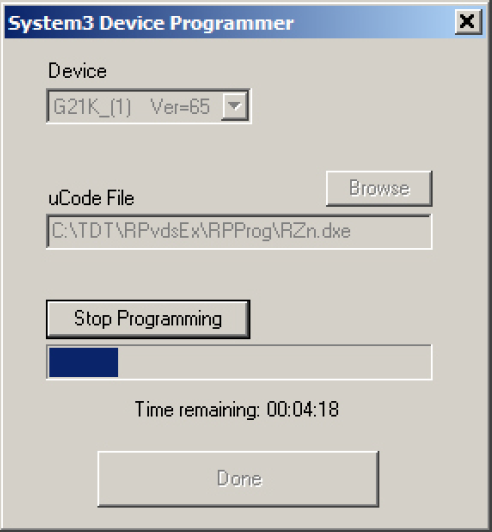
-
When the Device Programmed message is displayed, click OK.